
The schematics for the Iron Reaver were found in the workshop of Blackfuse himself after the fall of Orgrimmar, drawing inspiration from the mighty constructs of the Legion and designed to be the nefarious goblin’s masterwork. The project was completed after his death, and represents the pinnacle of the Iron Horde’s military might.
|
Short tactic explanation before pull when in LFR or PUG raid, /rw tank boss where he stands now |
Overview
This fight consist of 2 phases, a ground phase and an air phase.
Ground phase is the main phase in which players attack the boss. Boss is on the ground when charging his power.
Upon reaching full power, the Iron Reaver takes to the skies and decreasing all damage taken by 95%. During this phase raid will not attack boss. Focus only on destroying bombs and dodge boss abilites.
Positioning
Phase 1
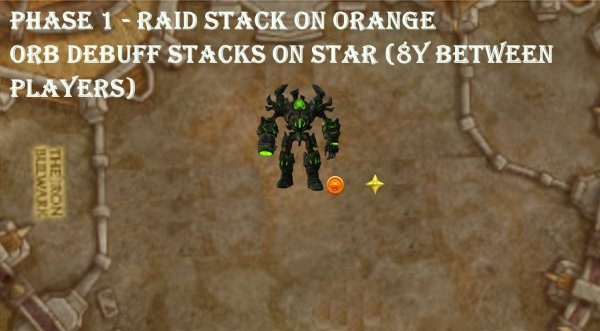
- Tank boss where he stands from start facing boss away from raid.
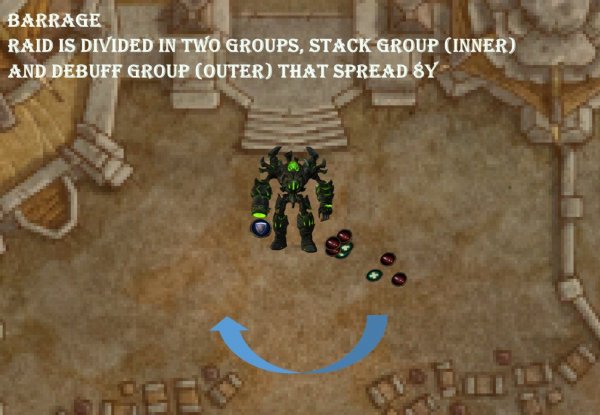
- The entire raid soft stacks behind boss with 8 yards minimum spreading on the right side (orange marker)
- Players with Unstable Orb, moves behind raid (on star marker) and makes sure they are 8y form each other. Be in range to nuke boss.
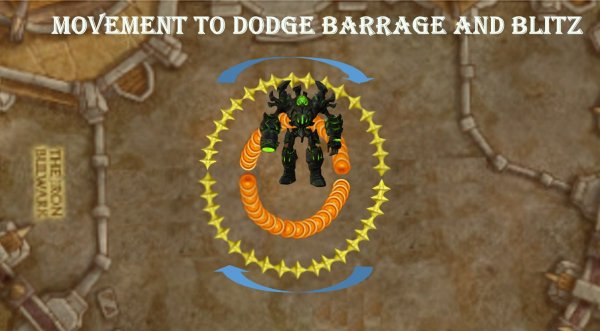
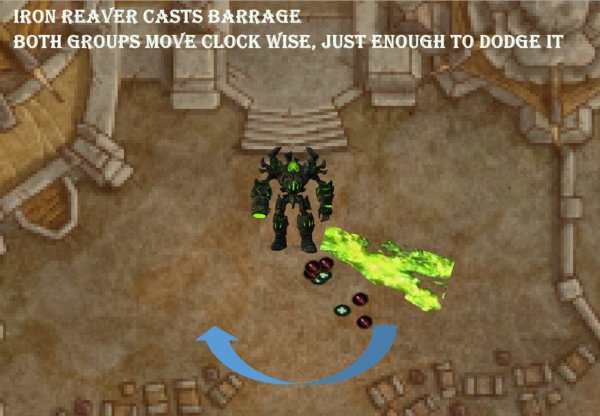
- At every barrage, raid moves to the left (clockwise). This includes players that are stacking on boss and players behind with the Orb debuff.
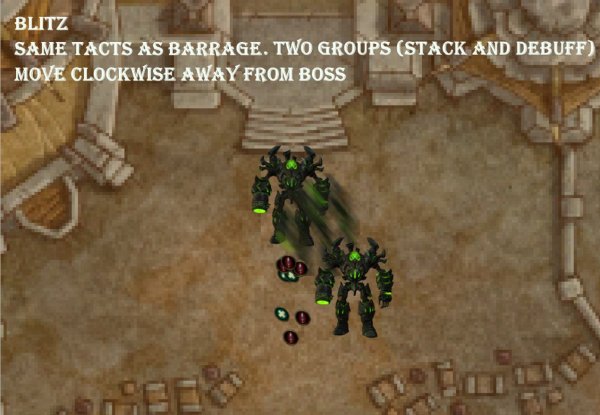
- At every Blitz, raid moves to the left (clockwise). This includes players that are stacking on boss and players behind with the Orb debuff.
- The one tanking will turn boss clockwise at the same time the raid turns. So that raid will always be behind boss. Tanks adapt to where raid stands.
- When tank is marked for artillery, run behind you and place it far away from raid.
- When boss does pounding, healers will heal better when raid is stacked like this.

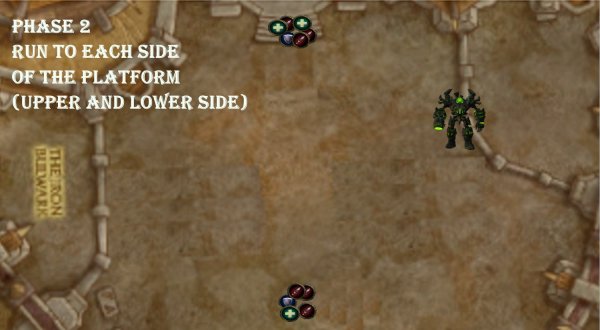
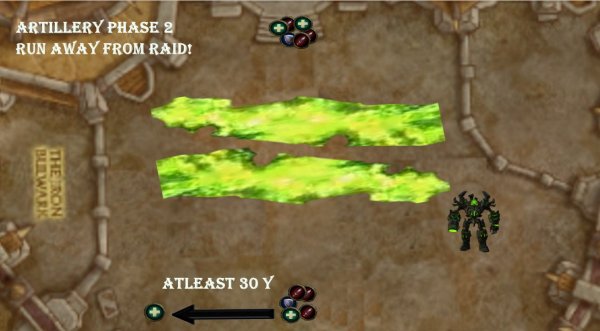
Phase 2
- Raid divides in two groups, one to upper and one to lower side of the platform and stack.
- The boss will start at one side of the platform, and then fly to the opposite side then back to the opposite side again. Meaning the boss will fly over the platform 3 times.
- All these 3 times will be in the middle on the platform so sides are safe.
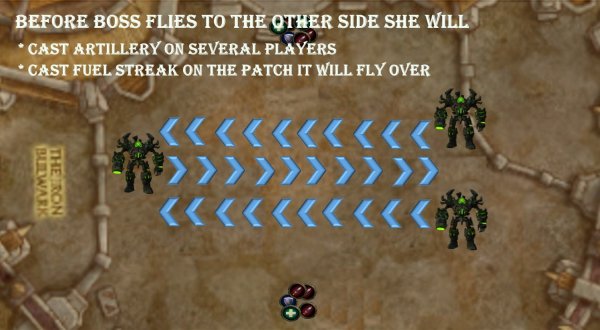
- Every time before the boss flies, he casts Fuel Streak that will be lined up crossing the room.
- Boss will then fly to the opposite side of the room and cast Immolation on this Fuel Streak causing Flash fire.
- When standing still on the other side he will now cast Artillery on random ppl. This artillery does 50% less dmg.
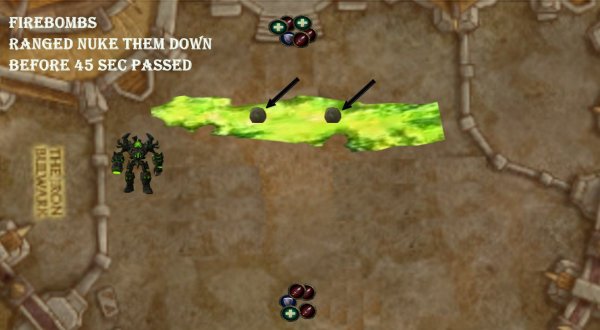
- Every time he flies, he also throws firebombs that will detonate after 45 seconds and do high damage on players and cause more immolations.
- This goes on 3 times then its back to phase 1 again
- When boss throws the mines, ranged nuke them fast, melee nuke the ones you can without standing in fire
Abilities
Immolation and Artillery are abilities that will occur in both phases.
Phase 1 – Ground Phase
Immolation
A sticky, fiery patch burns the ground, inflicting Fire damage every second for 9 sec. This effect stacks. Stay away from it
Artillery
The boss shoots an Artillery shell at a target (tank), inflicting high fire damage to all targets, decreasing in damage based on distance. Overall damage is decreased by 50% while flying. When tank is marked for artillery, run behind you and place it far away from raid. The other tank taunts. So basically tank swap every time it happens.
Unstable Orb
Fires an Unstable Orb at a random player, burning all targets within 8 yards for 19 500 Fire damage every second for 15 sec. This effect stacks. This effect stacks. Players hstand close to boss behind im and 8 y from eachother. Several players will get the debuff at the same time. Players with Unstable Orb, moves behind raid and makes sure they are 8y form each other.
Barrage
The boss fires a massive barrage of explosives in a frontal cone that does really heavy Fire damage to enemies within 5 yards of each impact location. She has a casting time before she releases the Barrage, which gives time for players to move away before she casts it. At every barrage, raid moves to the left (clockwise) still stacked. This includes players that are stacking on boss and players behind with the Orb debuff.
Pounding
Iron Reaver pounds the ground doing dmg to all players for around 20k damage every half-second for 6 sec. Healers beware to heal the raid when this happens. Since raid is more or less stacked, it will be easier to heal.
Blitz
Iron Reaver charges in a targeted direction, inflicting Fire damage. All players in that direction will be dragged with the Iron Reaver and getting a debuff called Blitz, which does fire dmg over time (every half-second for 15 sec) which also stacks. At every Blitz, raid moves to the left (clockwise) still stacked. This includes players that are stacking on boss and players behind with the Orb debuff.
Phase 2 – Air Phase (Iron Reaver reaches Full power)
Immolation and Artillery are still Boss abilities in 2nd phase.
Firebomb
The boss launches a Firebomb at a targeted location, doing moderate fire damage to players within 5 yards of the impact location and creating a Firebomb. This Firebomb which will now be called Volatile Firebomb has to be nuked and destroyed within 45 seconds.
Fuel Streak
The boss shoots down fuel on the ground. This fuel is sticky and reduce your movement speed by 30%. Also, This Fuel + the Fire from Immolation on the ground = ignite (Flash Fire). Flash Fire does moderate dmg to enemies within 3 yards of the impact location.
Click here to get back to Hellfire Citadel Boss Guides WoD 6.2
Other Boss Guides |
| Hellfire Assault |
| Iron Reaver |
| Kormrok |
| Hellfire High Council |
| Kilrogg Deadeye |
| Gorefiend |
| Shadow-Lord Iskar |
| Socrethar |
| Fel Lord Zakuun |
| Xhul'horac |
| Tyrant Velhari |
| Mannoroth |
| Archimonde |


