When Gul’dan brought his gift to the Sargerei, Velhari had already made her ambitions clear and risen through the ranks with brutal ferocity. Known to her enemies as the Tyrant, Velhari was one of the first to accept the fel touch, further enhancing her combat process. Velhari now bears a mockery of the holy symbol of the Naaru, signifying her conviction to the new order.
Short tactic explanation before pull when in LFR or PUG raid,
/RW (Raid warning)
/rw 3 Phase fight. Every phase an add comes (a dps, a healer, a tank)
/rw Phase 1 Spread out, when first add comes; don’t move if u don’t have to
/rw Phase 1 Nuke add asap
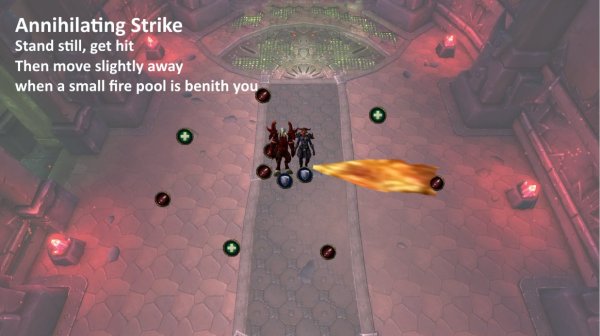
/rw Phase 1 stand still when boss does Annihilating Strike and move away afterward from fire pool
/rw Phase 1 Move to Melee when having the debuff Edict Condemnation (purple circle around you)
/rw Phase 1 Healers heal the person with debuff (dispel if too much damage and heal next person it jumps to).
/rw Phase 1, Tanks: Tank Swap at 3 Seal of Decay (This goes for all 3 phases)
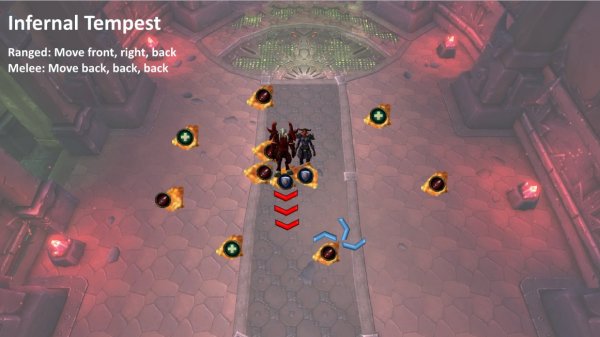
/rw Phase 1 When boss does Infernal Tempest (all players affected) 3 fire pools are summoned in a row under you. Move left, front, right to avoid. Move small movements only!
/rw Phase 2 Entire raid stack on right side of boss (diamond)
/rw Phase 2 When having the debuff Font Corruption, move to left side of boss and stack (Triangle)
/rw Phase 2 Use Bloodlust/Time warp and focus boss only (cleave add)
/rw Phase 2 Interrupt the add that heals boss
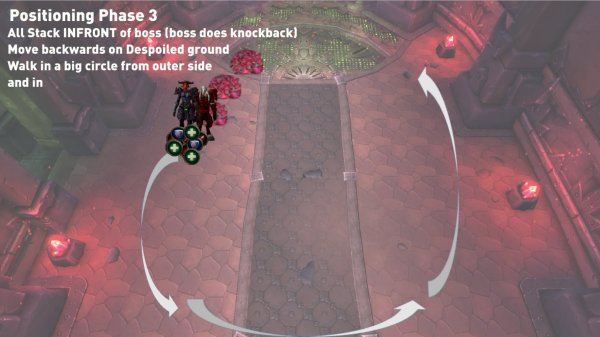
/rw Phase 3 Stack on tank, meaning in front of boss since she does knockback.
/rw Phase 3 Move from outer side of platform in a circle every time boss does Despoiled Ground
/rw Phase 3 Nuke add before boss
Overview
This encounter is about fighting with a paladin that uses different auras while fighting and also summon mini bosses that helps him.
Tyrant Velhari has three different auras that she will use when:
- Having 100% health
- Having 70% Health
- Having 40% Health
HOTFIX: Aura of Oppression in stage one and Aura of Contempt in stage two of the encounter now increases its effect over time more slowly on Normal difficulty.
A general thing all auras do after the boss gets it, is to summon a mini boss when boss lose 10% health.
- Mini boss spawns at 90% (Ancient Enforcer) that acts as DPS
- Mini boss spawns at 60% (Ancient Harbringer) that act as HEAL
- Mini boss spawns at 30% (Ancient Sovereign) that act as TANK
Every time a mini boss is spawned, all dps change to that target and nuke it until dead before going back to Main boss.
In this way, the boss fight is divided in 3 phases, each phase depends on what aura the boss is using.
Positioning
Positioning differs between the 3 phases.
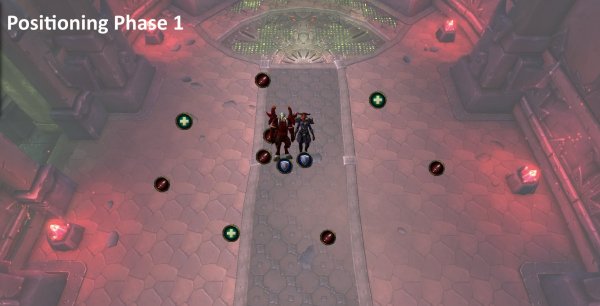
Phase 1 - Positioning
Ranged - Spread around the boss in a circle. Do not stand at max dps range since players will get knocked back when the mini boss is summoned and if you move in this phase you get dmg so it´s important to minimize movements as much as possible.
Tanks – Tank boss and mini bosses in the middle.
Melee – in the middle behind boss.
When a mini boss spawns, tank it on top of the main boss for cleave damage on boss.
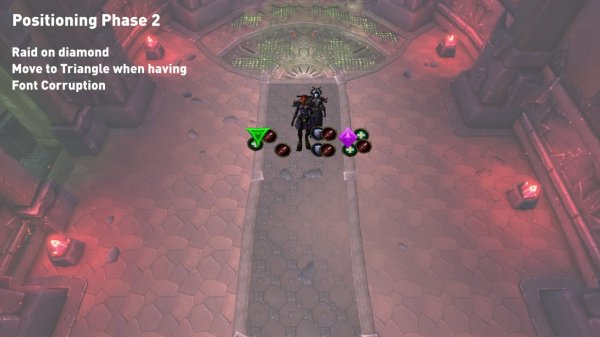
Phase 2 - Positioning
Entire Raid on rigt side of boss (Diamond)
Player moves to the left side (Traingle) when having the debuff Front Corruption
When a mini boss spawns, tank it on top of the main boss for cleave damage on boss.
Phase 3 - Positioning
Everyone stack on boss.
Move away everytime boss does Despoiled Ground
Move in a big circle from outer side and in.
Stand infront of boss since she does knockback.

Abilities and Strategy
We start with the main boss which has three abilities that will go on through the entire fight:
- Edict Condemnation
Boss Targets a player and does deadly dmg (over a million in dmg) that is shared with other players that stands close.
This damage happens 3 times over 9 seconds.
You will definitely see who is targeted since the boss places a big shadow hammer that slowly falls on the player.
At the same time there is a big shadow circle around that player.
Players inside that circle will share the damage.
The player that is targeted moves to melee and shares the dmg (if any ranged is close to that circle, move slightly inside it so the shared dmg will be less). 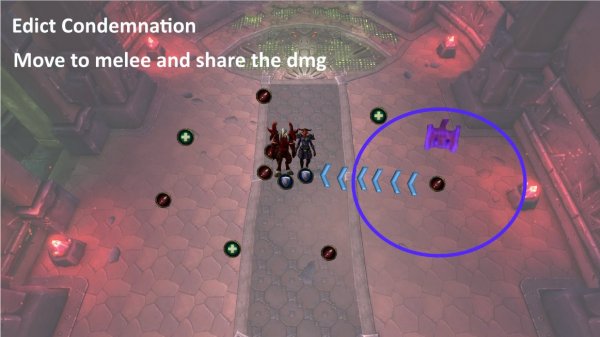
- Touch of Harm
Boss places a shadow magic on a player that absorbs loads of incoming heals (over 2 million).
The shield goes away when healed that amount.
If the shield gets dispelled, the remaining amount of that shield will jump to a random player.Let the Touch of Harm be on a player until that player gets dmg that really needs healing before dispelling.
Then do the same for the next player it jumped to and keep doing so until it´s healed through and gone. - Seal of Decay
Melee attacks from the boss occasionally curse the target (tank) with shadow damage.
This curse reduces 10% healing and absorbs for 16 seconds and stacks.
This is the Tank Swap Ability.
Tanks get this curse every 6th second.
Tank Swap at every 3 Seal of Decay.
Phase 1 – First Aura is applied (Oppression) Boss health 100%
HOTFIX: Aura of Oppression in stage one and Aura of Contempt in stage two of the encounter now increases its effect over time more slowly on Normal difficulty.
Players get 15k dmg every time they move.
Do not move if you don’t have to, meaning is nothing is damaging you. Because your health can go down very fast when you start moving. I think that this dmg is per step your character takes.
Annihilating Strike
Main Boss targets a player and shoots fire breath in a cone shaped form doing moderate dmg. Also, when hit, a Searing Blaze (fire pool) is created underneath the target. This Blaze explodes after 2 seconds and does dmg and knocking the player up in the air that also does fall dmg.
Stay spread all the time. When boss targets you, stay were you are, get shot by boss´s fire cone BUT, move slightly away from the fire pool before it explodes. Do not move far away because it only does dmg within 2 yards.
Infernal Tempest
Main Boss targets EVERY players with Searing Blaze (creates fire pools under EVERY player which will explode after 2 seconds, if hit it does dmg and knocking players up in the air and also do fall dmg). This will occur 3 times after each other.
Since players still got the Oppression Aura, you get dmg every step you take.
The tact for ranged: first move front, then right, then back In this way all the players will not affect any nearby player and players will still be spread in the exact same distance as before.
The tact for melee: Move backwards slightly every time a pool is created beneath you.
Mini Boss one – Ancient Enforcer
When Main boss is at 80% the mini boss is spawned. When summoned all players get a knockback and low damage.
He has one ability which is Slamming the ground. This slam creates a big fire ball that shoots outwards. Players getting hit by it suffers low dmg BUT this also creates a Searing Blaze (creates fire pools under EVERY player which will explode after 2 seconds, if hit it does dmg and knocking players up in the air and also do fall dmg)
As usual, stay spread all the time. If the Fire ball is coming towards you, do not move, get hit BUT when Searing blaze (fire pool under you) move slightly front/back (depending how close to boss you are). I Saw that this ball bounces back to the mini boss again, if it happens then get hit again by it, but yet again, move front/back directly after when the Searing blaze is created.
Every time a mini boss is summoned all dps change to that mini boss and kill it before going back to main boss.
Phase 2 – Second Aura is applied (Contempt) Boss health 70%
Now players can’t be healed more than 80% of their maximum health. So all players will eventually have 80% HP as maximum for the rest of the fight.
HOTFIX: Aura of Oppression in stage one and Aura of Contempt in stage two of the encounter now increases its effect over time more slowly on Normal difficulty.
Tainted Shadows
Boss targets a player and does low shadow damage. This hit also creates something called Corrupted blast which does low AoE dmg on players that are 5 yards close to the player getting hit by it.
Font Corruption
Boss places a curse on random players. This curse makes these players targets for the Tainted shadow. Meaning whenever a Tainted Shadow is hit on a player, all players that have this curse will also get hit by it. However, they won’t do any AoE dmg (no Corrupted blast).
Everyone Stack on diamond, left side of boss.
Nuke boss and interupt the add that heals (have some ppl assigned for it).
Move to triangle when you have the debuff Font Corruption.
Move back when no debuff.
Healers need to do some major AoE heals here.

Mini Boss two – Ancient Harbringer
When Main boss is at 60% the mini boss is spawned. When summoned all players get a knockback and low damage.
Harbringer´s Mending
The mini boss places a Shadow mending that heals the Main Boss with 5% health directly followed by 2% health every 2 seconds for 10 seconds.
If this heal gets interrupted, the mini boss get´s an ability called Impatience which increases cast speed by 15% and stacks as well.
This spell has a casting time and can be interrupted which it of course has to be! If not, it will heal 15% health in total. I don´t know yet if you can spellsteal once applied, I´ll check and update it.
Have an interrupt rotation on this. The gap between every Mending is 10 seconds.
- The first cast takes 3 seconds to cast.
- If interrupted, the second cast takes 2.6 seconds to cast
- If interrupted, the third cast takes 2.3 seconds to cast.
- If interrupted the 4th cast takes 1.7 seconds to cast
Phase 3 – Third Aura is applied (Malice) Boss health 40%
Now players will do 20% more dmg and receive 10% more dmg that increases over time.
Bulwark of the Tyrant
Boss targets two random players that suffers low/moderate shadow dmg and leaving a shadow pool underneath them called Despoiled Ground, which does Shadow dmg every second when standing in it.
When phase 3 starts, all players moves to the entrance of the platform where the fence is.
Tanks and melee in the middle on star having their back at the side boss starts.
Ranged spread on each side equally closest to boss, moon and diamond.
When two players are hit the entire raid moves as far as the size of the Despoiled Ground (Shadow pool) is, toward the side the boss starts.
When reaching the wall on the other side: Ranged move to square and triangle. Melee move to cross. And the entire raid will move back to entrance now.
If the boss is not dead yet, all players find a spot in which there are no shadow pools which should be a lot.
Gravel of the Tyrant
The boss does a knockback on all the players and moderate fire damage.
If positioning yourself like the tactic above. No players will get knocked back on a shadow pool.
Mini Boss three – Ancient Sovereign
When Main boss is at 30% the mini boss is spawned. When summoned, all players get a knockback and low/moderate damage.
This mini Boss places a shield on the Main boss that reduces 90% of incoming damage for 20 seconds. The only way to remove the shield is to kill the mini boss.
Nuke the mini boss until dead before attacking the Main boss and killing her.
Blood Lust / Time Warp
You can choose to use it either on phase 1 or phase 2 or even phase 3. All of them got different reasons and depends on the raid.
Why Phase 1
Raid takes alot of damage here, from boss, from the mini boss that does dmg on raid and from moving since moving on phase 1 does dmg on the player. Bursting through this phase will give a bigger chance for raid to survive it
Why Phase 2
Mini boss heals the boss A LOT if not interrupted. Since the cast time increases every time the boss gets interrupted, it can come to a point where the casting time is too fast to interrupt. This may happen if dps is “low” on the mini boss. If mini boss dies before the cast time is to fast it´s ok, otherwise use BL/TW here to make sure mini boss dies without getting to fast to cast a heal on boss.
Why phase 3
There will be loads of pools in the end. Maybe so many that there is no place to stand and boss is still alive. So bursting BL/TW on this phase will make it easier to kill boss before getting over flooded with pools and wipe because of that.
Other Boss Guides |
| Hellfire Assault |
| Iron Reaver |
| Kormrok |
| Hellfire High Council |
| Kilrogg Deadeye |
| Gorefiend |
| Shadow-Lord Iskar |
| Socrethar |
| Fel Lord Zakuun |
| Xhul'horac |
| Tyrant Velhari |
| Mannoroth |
| Archimonde |


