
Garrosh knew that the surest path to breaking the Gronn lay in subjugating their great father, Gruul. Known in another time as the Dragonkiller, here Gruul has been reduced to the role of menial laborer. In a cruel mockery of the Shattered Hand's warrior tradition, his hand has been replaced with a hook to enable him to more easily haul pallets of fuel to the furnace.
If you are here to understand why your tanks die on slice, click here
Raid setup
Depends on amount of ppl. In General, 2 tanks and 1 healer for every 3 player.
Gruul fight has two phases
A Tank phase (phase 1), which last for around 70 seconds and a Stationary phase (phase 2) which lasts for around 30 seconds and Gruul is positioned in the middle.
Positioning
The raid will be divided in 3 groups. One "group" for tanking boss and the other 2 groups mixed of dps and healers equally.
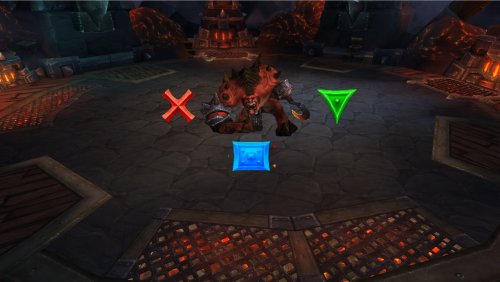
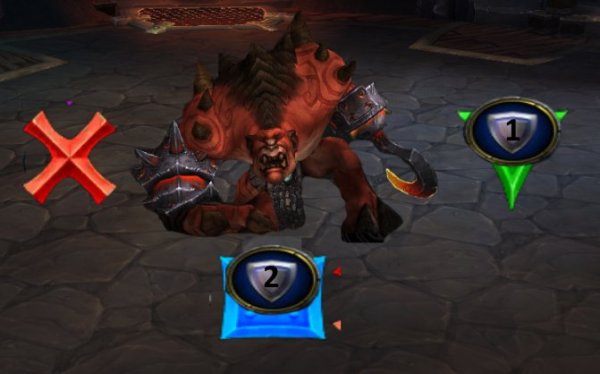
Phase 1 - positioning
Blue square: The one tanking Gruul (tank 1 or tank 2)
Red Cross: Dps + Heal (tank 2, when tank 1 tanking Gruul)
Green Triangle: Dps + Heal (Tank 1, when tank 2 tanking Gruul)
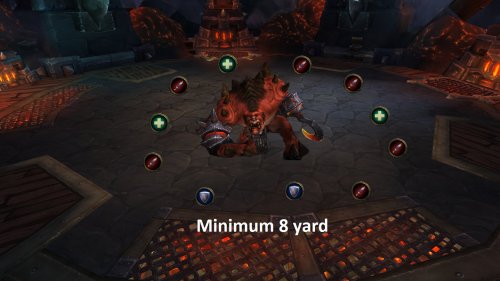
Phase 2 - positioning
Since the boss will do loads of raid damaged that spread to nearby players, all raid members needs to be spread at least 8 yards from each other.
Abilities
In total there are 6 important abilities to keep in mind:
Inferno Slice
- Deals a very high amount of Fire damage to Gruul's tank, and it also deals a massive amount of Fire damage to all other players in a cone in front of the boss, split among them.
- This slice gives the players that get hit a 20% increased dmg to other Inferno Slices.
- This debuff lasts for 30 second and the boss casts the slice before the debuff expires.
Overwhelming Blows
- Aimed at the tank, and deals high amount of damage to the tank AND anyone else within 10 yards of that tank.
- The players getting hit will get a 60s debuff, causing them to take 10% more damage from Overwhelming Blow per stack.
Overhead Smash
- Is only used in phase 1.
- The boss marks a long line on the floor in front of him, and a few seconds after that he deals a high amount of Nature damage to all players standing there.
Petrifying Slam
- Knocks all players back and begins to Petrify for 5s.
- Leaves a stackable debuff which slows, after some stacks the player is unable to move
- This ability is followed by Shatter
Shatter
- Causes all petrified players to deal Nature damage to any raid members in an 8-yard radius around them. This removes Petrification from players.
Cave in
- Cracks the celling and does raid dmg (45000 per second on player standing under it)
Strategy
This boss is very dependent on proper tank swap and positioning of inferno slice.
At pull
- Tank 1 goes to blue and tanks boss
- Tank 2 goes to cross
- The rest of the raid goes (stacks) to red or green depending on the setup you did.
- Pop time Warp/Bloodlust
Phase 1

- Tank swap will occur every time the boss does Inferno Slice.
- When boss is casting the first inferno slice, Tank2 taunts the boss so the slice lands on raid players at cross. Directly after Inferno Slice, Tank2 moves to blue and Tank1 moves to green.
- When boss is casting 2nd inferno slice, Tank1 taunts the boss to green so the slice lands on raid players at green. Directly after Inferno Slice, Tank1 moves to blue and Tank2 moves back to red.
- And the fight goes on like this at phase 1 (se figure)
- Do NOT let the Overwhelming Blows hit the raid. Always stand on blue when boss does it.
- Stand only at raid when Boss does Inferno Slice, NEVER otherwise.
- After boss casts Petrifying Slam (you get knocked back) be sure you are 8y away from other players (you have 3s to move away from).
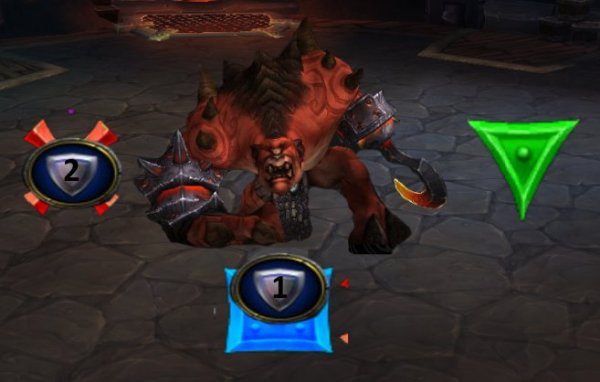
Tank1 tanks pic
Positioning when Tank11 tanks. Tank 2 rdy to taunt when boss is about to cast Inferno Slice.
Tank 2 tanks pic
Positioning when Tank2 has taunted and Inferno Slice hit the raid on cross, then moves boss to blue. Tanks1 ready to taunt when boss is about to cast Inferno Slice.
There are 6 slices on slice phase
THere are 6 Slams on slam phase

- Will be positioned at red or green.
- Heavy healing will occur when boss does Overwhelming Blows and Inferno Slice
- Move away if Overhead Smash will land on you.
- After boss casts Petrifying Slam (you get knocked back) be sure you are 8y away from other players (you have 3s to move away from). Heal the raid up after this since Shatter may dmg players.

- Will be positioned at red or green.
- Dps boss
- Move away if Overhead Smash will land on you.
- After boss casts Petrifying Slam (you get knocked back) be sure you are 8y away from other players (you have 3s to move away from).
Phase 2
During this phase (30s) Gruul cannot be tanked. Gruul position himself in the middle and casts Smash.
- Move away from smash and keep on dpsing boss
BL/timewarp on 30%
 Gruul
Gruul Oregorger
 The Blast Furnace
 Hans'gar and Franzok
 Flamebender Ka'graz
 Kromog
 Beastlord Darmac
 Operator Thogar
 The Iron Maidens
 Blackhand


