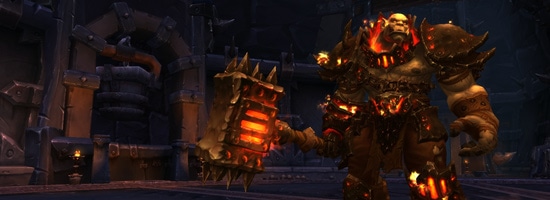
A ruthless tyrant and fierce warrior, Blackhand is Warlord of the Blackrock clan, second only to Grommash in stature within the Iron Horde. Bathed in sweltering heat that few other mortals could withstand, Blackhand oversees the operations of his Foundry from atop its Crucible, wielding his smoldering slag hammer to forge weapons of peerless quality.
Overview
You will fight Blackhand on 3 different Platforms. At 70%, and 30% Health he will slam the ground so it breaks and you fall to the new fighting platform.
On phase 1 (Platform 1) there are no adds, only Blackhand.
On phase 2 (platform 2) there are adds. Phase 2 starts after Boss hits 70% health.
On phase 3 (platform 3) there are no adds, only Blackhand. Phase 3 starts after boss hits 30% health.
Boss abilities
Blackhand has 3 abilities that he will use in each phase.
- Players will be Marked for Death (a red skull over your head). 5 seconds later, a spear will be tossed on you. The spear (Impaling Throw) will impale with whatever it comes to contact with first. Move to an area free from ppl in front (so spear doesn’t touch them on the way) and hide behind a debris (rubbish fragment pile) so the spear hits that and not you.
- Boss does Shattering Smash in front of him (5y), which is a huge Knock Back. A red circle will grow under the tank that is tanking boss. Few sec after, any player on that circle will be blasted away. Tank Swap occurs here.
- Slag Bombs is the most important ability to beware of since this is where ppl may fail. 3 Slag bombs will be placed by boss on nearby locations of boss. If you touch, it does dmg to you and players nearby you. So beware to avoid the bombs.
Phase 1, first platform
Positioning
Ranged Dps on center of the room
Ranged Healers on center of the room
Tanks move around in a circle around the ranged. Move every time the Slagbombs are out.
Melee, follow the tanks and watch out for the Slagbombs, so you don’t pop them.
Phase 1 specific abilities
Molten slag, is slag that falls from the ceiling on the platform. These slags falls in a circular pattern on different random locations. It does more damage over time if you stand under it. It also breaks slag bombs if it hits them. Move away from it ASAP.
Demolition, will lead to that pieces of the ceiling falls on the platform at random locations. A lot those falls so move all the time more or less.
The main difference between Molten Slag and Demolition is that the molten are much bigger and Demolition is very small, covering around a players feet.
Debris (rubbish fragments) will fall on places demolition has landed. These piles has to be used to hide behind when boss does Marked of death on you, so the Impaling Throw spear hits the debris instead.
![]()
- Move the boss in a clockwise circle on the outer platform. This to avoid the Slag Bombs (3 bombs placed melee range that does aoe dmg if touched) and Shattering Smash (Knock back smash in front of boss).
- Tank swap at each Shattering Smash, since the one tanking gets knocked back.
![]()
- Tanks get high damage from Shattering Smash (knock back)
- Move away from Demolition (many pieces fall on platform)
- Move away from Molten slag (medium big circles of slag falls on platform).
- Demolition does annoying dmg on raid
- If targeted by Marked of Death, Move to an area free from ppl in front (so spear doesn’t touch them on the way) and hide behind a debris (rubbish fragment pile) so the spear hits that and not you.
![]() Ranged
Ranged
- Nuke Blackhand
- Move away from Demolition (many pieces fall on platform)
- Move away from Molten slag (medium big circles of slag falls on platform).
- If targeted by Marked of Death, Move to an area free from ppl in front (so spear doesn’t touch them on the way) and hide behind a debris (rubbish fragment pile) so the spear hits that and not you.
![]() Melee
Melee
- Follow the tanking movement of boss and nuke Blackhand
- BEWARE of the Slag bombs (3 bombs placed melee range, that does aoe dmg if touched)
- Don’t stand in front of boss
- Move away from Demolition (many pieces fall on platform)
- Move away from Molten slag (medium big circles of slag falls on platform).
- If targeted by Marked of Death, Move to an area free from ppl in front (so spear doesn’t touch them on the way) and hide behind a debris (rubbish fragment pile) so the spear hits that and not you.
Phase 2, second platform
Boss slams the ground when he reaches 70% and you fall to the next platform.
Adds are on the balcony covering the whole circular platform shooting at you.
From time to time, a door opens and in comes a siege tank called Siegemaker (there are four doors).
Positioning
Same as phase 1
Ranged Dps on center of the room
Ranged Healers on center of the room
Tanks move around in a circle around the ranged. Move every time the Slagbombs are out.
Melee, follow the tanks and watch out for the Slagbombs, so you don’t pop them.
Phase 2 specific abilities
- The new abilities that occurs on phase 2 are: The Siegemaker and The adds on balcony.
The Siegemaker will sometimes come out from one of the four door. One ranged player needs to be assigned to come move close to is ASAP when it comes out so that player gets fixated by it, and kite it around the platform behind the boss (that will move in a circle like phase 1). Then it will be easier to kite it over the bombs from Slag Bombs, which it should.
Now players will hide behind that Siegemaker when they are Marked for death (a red skull over your head).
The Siegemaker needs to be destroyed before reaching 100 energy. Nuke the Siegemaker when their buff called Blackiron Plating is gone.
Adds on Balcony
Adds spawns on the balcony surrounding the room and shoots explosives on random players. Players needs to stay spread.
You should kill those adds by assigning 2 dps and 1 tank to jump up on the balcony and kill the adds. Kill as many as you can and jump down before you get killed, since you will be out of sight for healers.
To jump up on balcony: Stand in front of boss and get hit by Shattering Smash so you get knocked backwards and land on the balcony. Meaning, you need to plan when to stand in front of boss and tank needs to aim a bit so the knock back actually takes you to the balcony.
![]()
- Move the boss in a clockwise circle on the outer platform. This to avoid the Slag Bombs (3 bombs placed melee range that does aoe dmg if touched) and Shattering Smash (Knock back smash in front of boss).
- Tank swap at each Shattering Smash, since the one tanking gets knocked back.
- One tank needs to be assigned to jump on the balcony.
![]()
- Stay spread in middle
- Tanks get high damage from Shattering Smash (knock back)
- If targeted by Marked of Death, Move to an area free from ppl in front (so spear doesn’t touch them on the way) and hide behind a debris (rubbish fragment pile) so the spear hits that and not you.
- Raid will get extra damage from the adds shooting a them from balcony.
![]() Ranged
Ranged
- Nuke Blackhand
- Stay spread in middle
- If targeted by Marked of Death, Move to an area free from ppl in front (so spear doesn’t touch them on the way) and hide behind a debris (rubbish fragment pile) so the spear hits that and not you.
- One Ranged needs to be assigned to move fast to The Siegemaker and get fixated by it, followed by kiting it around the platform behind boss and aim so it runs over the bombs.
![]() Melee
Melee
- Follow the tanking movement of boss and nuke Blackhand
- BEWARE of the Slag bombs (3 bombs placed melee range, that does aoe dmg if touched)
- Don’t stand in front of boss
- If targeted by Marked of Death, Move to an area free from ppl in front (so spear doesn’t touch them on the way) and hide behind a debris (rubbish fragment pile) so the spear hits that and not you.
- Two Melee Dps needs to be assigned to jump on the balcony.
Phase 3, Third platform
At 30% health the boss will slam the ground again and you fall in to the last platform. This platform has no walls and you can easily get knocked out of it and die.
Positioning
- Tank boss in the edge of the platform.
- Move as a group (the entire raid stands in front off boss.
- Move as one clockwise of the platform.
- Always remember: Boms left side, Marked right side.
Phase 3 specific abilities
- New Abilities that occurs on this phase are Slag bombs, Upgraded Marked of Death, Massive Shattering Smash
The boss targets 3 random players and throws Slag Bombs on them. This bomb, when detonated will do an AoE dmg and leave a pool of Slag that does dmg as well. If you get targeted by Slag Bomb, move away from the raid on the side behind the boss and let the bomb drop off there (left side).
Upgraded Marked of Death occurs here as well of course, but 3 players at the same time. This time move to the center (right) of the platform and make sure the spike doesn’t hit raid on the way. (The boss has yellow arrows that shows which direction the spike will get tossed). Also, you can’t hide behind anything this time so use defensive.
Massive Shattering Smash does huge amount of damage now but can be shared between players. It still does a knock back. The entire raid needs position themselves so the knockback knocks you back to the platform, not outside of it. So stand on the side closest to middle. .
Eruption: Blackhand leaves craters behind him, and after a while he will cause them to explode and when mixed with Slag Bombs that are left behind boss it will cause a pool that gets bigger and does dmg. Try to move boss slowly so that the crated he leaves behind him are close to each other and when the Eruption occurs, move away fast (still as one group) same clock wise direction to avoid the pool.
The next time players get Slag Bombs on them, place them next to the big pool (from Eruption) to the direction closest to the center of the platform.
Repeat these steps until boss is dead (there will be very little space left on the platform in the end).
Blood Lust/Time Warp at start on phase 3
 Gruul
Gruul Oregorger
 The Blast Furnace
 Hans'gar and Franzok
 Flamebender Ka'graz
 Kromog
 Beastlord Darmac
 Operator Thogar
 The Iron Maidens
 Blackhand


