Background
Summoned from depths unknown, the Blackwater Behemoth lurks in an abyss so dark that not even the naga dare to venture to into it. Only Azshara is capable of taming the beast, and she has trained it to faithfully guard her treasure.
Overview - Fast Tacts
- You will have a buff that makes you breath under water and swim 100% faster. This also leaves a debuff that makes you immune to heals.
- You will fight a big fish on two platforms with a big gap between the platforms covered with jellyfish.
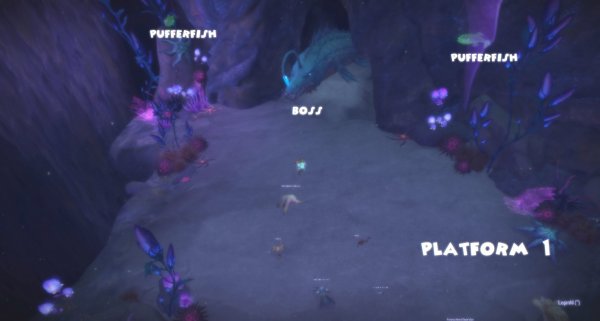
- The entire fight is one phase but 3 platforms in which the boss is sticking out his head from a cave.
- To be able to get healed, there are bioluminescence fish on the platforms that you must kill and stand inside and get the bioluminescence buff. 10 sec before the buff is over, kill a new fish and retake the buff.
- Tanks get bioluminescence from hits by boss and don’t run to the small fish when dead.
Tanks tank swap every 14 sec. - Raid Abilities
Bioelectric Feelers – Stay spread at least 5 yards from each other.
Shock Pulse – Move away from boss, further away, less dmg.
Toxic Spine – Random player dmg from boss - Changing Platform
Make sure your bioluminescence buff is gone before you move to the other platform.
Make sure you don’t touch jellyfish, then you get bioluminescence.
If you have Bioluminescence buff, a big fish comes and eat you up.
There are speed boosts on the edge of the platform.
Abilities and Tactics
Being in the water and survive
- When players are in the water, they need to be able to breath and survive down there. Therefore, there is a buff to click on just before entering the boss encounter area that lets you breath under water. The bad part is that it reduces incoming healing by 100% (Darkest Depths).
- To be able to get healed, players must gain Bioluminescence buff.
- There are 2 Pufferfish on each side of the boss.
- Killing a pufferfish cause it to expel Bioluminescence cloud. Entering the cloud gives Bioluminescence buff for 45 sec.
- Prio ranged players on the fish otherwise you will loose dmg from melee when they swim.
THREE platforms, dangerous between them
- When the boss reaches 100 energy it travels to the 2nd platform and casts Cavitation which does dmg every 2 sec until interrupted. Therefore, you must move to the other platform, interrupt boss and fight it over there.
- There are three platforms that you ping pong between during this encounter.
- The space between the platforms is even darker and deeper water.
- If you have the bioluminescence buff when passing the open water between platforms, you will die because big fish will see you and eat you up.
- You must also dodge loads of jelly fish that are between the platforms as well. Touching them will give you bioluminescence which makes big fish spot you… and you die.
- There is a small ramp on the platform that gives you a speed boost by 150% when you cross to the other platform. Make sure you get closer to the ground before leaving the platform, so you gain the speed boost.

The fish boss
There are 2 abilities on tanks and 4 on raid.
Radiant Biomass and Feeding Frenzy (Tank)
Getting hits from boss makes the main take be able to be healed.
The hits also give a debuff that does dmg every 3 sec for 15 sec.
Repeated melee attacks from the boss on the same player will also increase the boss attack speed by 8%.
Tactics: Radiant Biomass and Feeding Frenzy (Tank)
The tactics here is to make sure that both tanks can be healed and also not let boss attack speed increase to much.
Tank swap every 14 sec.
Toxic Spine
Boss shoots debuffs on random players.
The debuff does high dmg every 3 sec for 12 seconds.
Tactics: Toxic Spine
Raid players must make sure they have the bioluminescence buff so they can be healed.
Healers beware of high incoming dmg on random players.
Bioelectric Feelers
Every 3 second, The boss strikes players with high Nature dmg, that are in clumps within 5 yards.
Tactics Bioelectric Feelers
Stay spread at least 5 yards.
The most important is when the raid must enter the Biolouminescence clouds after killing the fish.
Shock Pulse
Boss start casting and after a couple of seconds. Every player will take high deadly dmg, BUT the further away players are, the less dmg they take.
It seems that this got changed since the PTR raid test. Before, It was a frontal cone dmg that melee had to move away from.
Tactics: Shock Pulse
Move far away fast but beware so you don’t move out from the platform, then you are most likely dead because of the Bioluminescence buff.
Use class abilities to help raid and yourself to move away fast and come back to position fast.
Bioelectric Discharge
If no player is melee combat on boss, the boss will do high/deadly dmg to all players.
Other posts
- Gearing ALTS EASIER in this UPDATE in 12.0.7
- World of Warcraft 12.0.7 Revelations Roadmap: Your Complete Content Release Schedule
- MRGM Caught Red-Handed Stealing WoW PTR Discoveries – The Predictable Pattern of Content Theft Continues
- The BEST Midnight Season 1 DPS Tier List Guide
- Midnight Pre-Patch Event Guide: Twilight Ascension Rewards, Rare Timers, and Collectibles
- Endeavor: A Deeper Dive Into WoW’s Expansive New System
- LOADS of Extra Decors You Did NOT Know About!
- World of Warcraft Players Score Exclusive Housing Decor with Diablo 4: Lord of Hatred Pre-Order
- Brawler´s Guild 2025 GUIDE
- Legion Remix Decor will be available after Legion Remix


