OVERVIEW (Fast Tactics)
- In this encounter you will fight 4 pantheon prototypes.
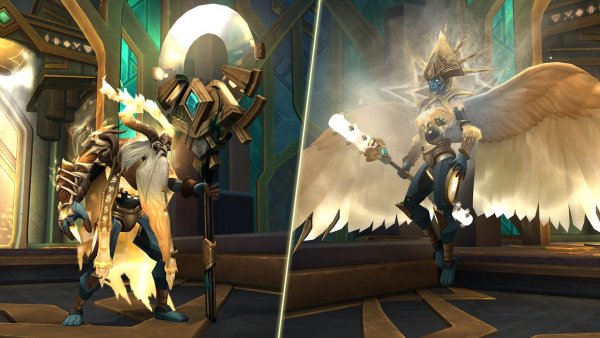
Prototype War is the image of The Primus.
Prototype Duty is the image of The Archon.
Prototype Renewal is the image of The Winter Queen.
Prototype Absolution is the image of Sire Denathrius. - This fight has 3 phases.
In phase 1, you will fight Prototype War and Prototype Duty.
In phase 2, you will fight Prototype Renewal and Prototype Absolution
In phase 3, you will fight all 4 at the same time.
Phase 2 starts when a Prototype reaches 50% health.
Phase 3 starts when a Prototype reaches 50% health.
War & Duty share health %.
Renewal & Absolution share health %. - PHASE 1
Tank the bosses on top center and stack them up. Tank a boss each.
Tank swap each
Interrupt The cast War does.
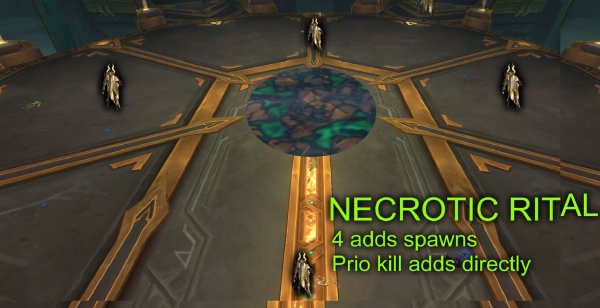
4 adds will spawn on each side of the platform – kill them fast.
Players with debuff runs in to the dome and get dispelled.
Do NOT dispell players until they are inside the dome.
Dodge swirls and destroy the spear to save pkayer if hit by swirl.
When pushback, use healing cooldown to top up health on raid. - PHASE 2
The bosses come from the sides. Take bosses to the left side where Renewal comes out.
Tank a boss each.
Face Absolution away from raid.
Tank swap each Wracking Pain.
Interrupt Renewal.
Dodge anima prototypes that walks in straight lines.
Dodge whirlwinds.
Full heal the seeds when they spawn.
Absolution pulls all to him and explode raid – run away when pulled in.
Absolution spawns loads of small pools on the ground, dodge them. - PHASE 3
Phase 3 starts when a boss has 50% health.
All 4 bosses will now enter the platform.
You will fight the 4 bosses and all their abilities they had in phase 1 and 2.
Same tactics as before.
Stack up all the 4 bosses.
Tanks
The main difference is for the tanks.
One tank on Duty and War.
One tank on Renewal and Absolution.
Tank swap between Duty and Absolution when after Duty does Humbling Strikes.
Remember to face Absolution away from raid.
POSITIONING & MARKERS
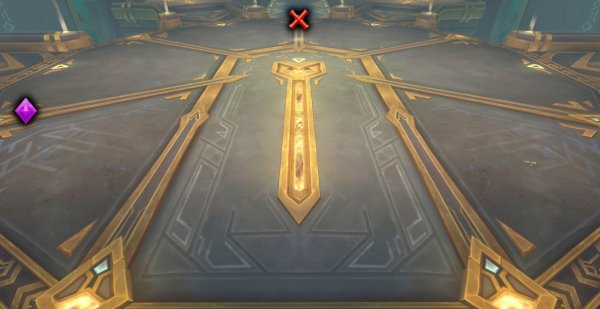
- Place one marker on the upper middle side between Duty and War.
- Place one marker on the left side of the platform, next to where Renewal comes out.
POSITIONING
PHASE 1
- Tank the 2 bosses on the upper side of the platform (cross)
PHASE 2
- Tank the 2 bosses on the left side of the platform where Renewal comes out (diamond)
PHASE 3
- Tank all the 4 bosses on the upper side of the platform (cross)
BOSS ABILITIES & TACTICS
This fight has 3 phases.
In phase 1, you will fight Prototype War and Prototype Duty.
In phase 2, you will fight Prototype Renewal and Prototype Absolution
In phase 3, you will fight all 4 at the same time.
Phase 2 starts when a Prototype reaches 50% health.
Phase 3 starts when a Prototype reaches 50% health.
Prototype War is the image of The Primus.
Prototype Duty is the image of The Archon.
Prototype Renewal is the image of The Winter Queen.
Prototype Absolution is the image of Sire Denathrius.
Phase 1
In this phase you will fight War and Duty.
One tank on War and one tank on Duty.
Stack the bosses for cleave dmg.
NORMAL/HEROIC MODE – War & Duty share health %. Renewal & Absolution share health %.
MYTHIC MODE – The bosses do not share health %.
PROTOTYPE WAR
Gloom Bolt
- Boss shoots at a random player for high damage.
- Can be interrupted.
Tactics: Gloom Bolt
- Always focus on interrupting this cast.
Necrotic Ritual
- 4 adds will spawn on each side of the platform.
- These adds will make a pool on the center of the platform that expands and covers the entire platform in the end if not killed.
- Standing on the pool reduces healing by 100% and does moderate damage every 1 sec.
Tactics: Necrotic Ritual
- The adds must be killed fast.
- Either divide the group in 4 and kill the adds, or entire raid kills them one by one.
- When all adds are dead, the pool goes away.
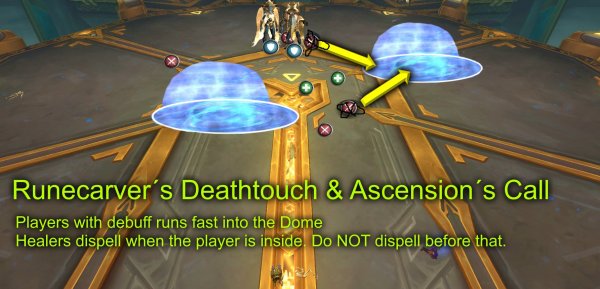
Runecarver´s Deathtouch
- Boss puts a debuff on 2 players (based on raid size).
- It´s a big dark swirl around the player with the debuff.
- The debuff does Shadow dmg every 2 sec for 30 sec.
- If the debuff is gone/removed it does deadly dmg to all players and debuff jumps to the closest player.
Tactics: Runecarver´s Deathtouch
- Players with this debuff must run in to a protective dome called Bastion´s Ward. This dome is created by the other boss, Duty.
- Healers will dispell the debuff when the affected player is inside the dome.
- When the debuff is dispelled it will not dmg player and wont jump to the closest player.

PROTOTYPE DUTY
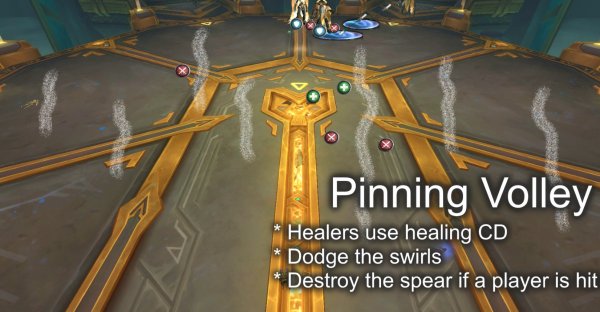
Pinning Volley
- Boss flies away to the top side of the platform.
- Does a big wind push back on all players and moderate Nature dmg every 1 sec.
- Targets player locations with a barrage of spears, a big swirl in show the impact location.
- Getting hit by a spear does dmg and roots the player until the spear is broken.
Tactics: Pinning Volley
- Healers use healing cooldown to top up the health on raid.
- Tank the other boss (War) on top of the Duty boss until you have to move away from spears.
- Destroy the spear if a player is hit to free the player.
Ascension´s Call
- Boss summons Kyrian projections that flies around in the air.
- Boss makes a Kyrian fly down to the platform and create a protective dome (Bastion´s Ward) on the platform.
- Standing in the dome reduces dmg taken by Runecarver´s Deathtouch by 100% and prevents the debuff jump to closest player.
- Standing in the dome reduces the players healing and dmg done by 100%.
Tactics: Ascension´s Call
- Players with the Runecarver´s Deathtouch debuff must run in to a protective dome called Bastion´s Ward. This dome is created by the other boss, Duty.
- Healers will dispell the debuff when the affected player is inside the dome.
- When the debuff is dispelled it will not dmg player and wont jump to the closest player.
Humbling Strikes
- Boss hits the tank with very high physical dmg and a debuff that increases dmg taken by this hit by 100% for 40 sec.
- All other players will take 30% of the dmg from this hit.
Tactics: Humbling Strikes
- Tank swap after each Humbling Strikes.
- Always use a defensive before the hit so that the raid takes less dmg.
Phase 2
Phase 2 starts when a boss has 50% health.
War and Duty leaves the platform.
Renewal and Absolution runs in to the platform.
Renewal comes from the left side and Absolution comes from the right side.
Entire raid runs to left side where Renewal is since she casts.
Other tank brings Absolution to the raid.
PROTOTYPE RENEWAL
Wild Stampede
- Boss spawns projections of animals that runs through the platform.
- These animals run in several lines of the platform.
- The higher difficulty (normal/heroic/mythic mode) the more lines of animals.
Tactics: Wild Stampede
- Tank the bosses between the lines of the animals.

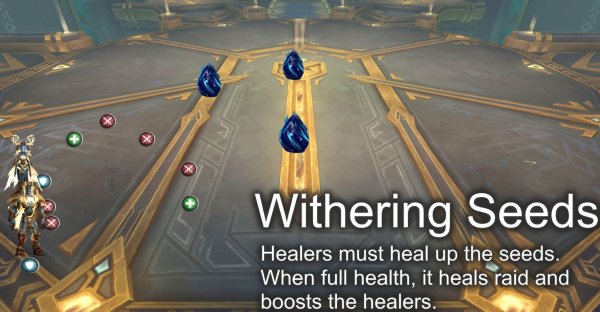
Withering Seeds
- Boss summons several seeds on random locations on platform.
- If a seed is not healed
It does high nature dmg to all players and a stacking debuff that does moderate dmg every 2 sec. - If a seed is healed
All players are healed.
Healing done is increased by 25% for 30 sec on all players and this stacks.
Withering Seeds
- Healers prioritize and heal up all the seeds back to full health as soon as they spawn.
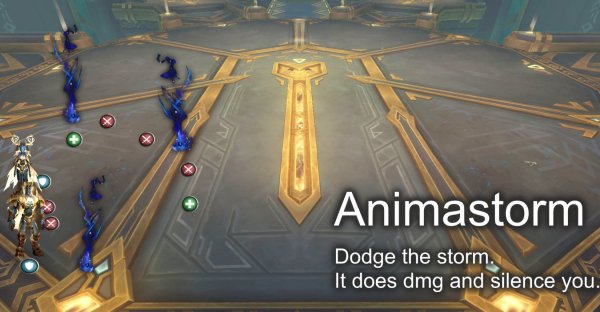
Animastorm
- Boss summons several tornadoes that travels around on the platform.
- Touching a tornado does Nature dmg every 0.2 sec and silence the player during that time.
Tactics: Animastorm
- Dodge the tornadoes.
Anima Bolt
- Boss shoots at a random player with moderate Nature dmg that also does dmg every 2 sec for 16 sec.
- This can be interrupted.
Tactics: Anima Bolt
- Interrupt Anima bolts as much as possible.
PROTOTYPE ABSOLUTION
Burden of Sin
- As soon as this boss spawns, all players will get a debuff.
- Every 2 sec, the debuff does low/moderate shadow damage.
Burden of Sin
- This is raid dmg for the rest of the fight.
- Beware healers.
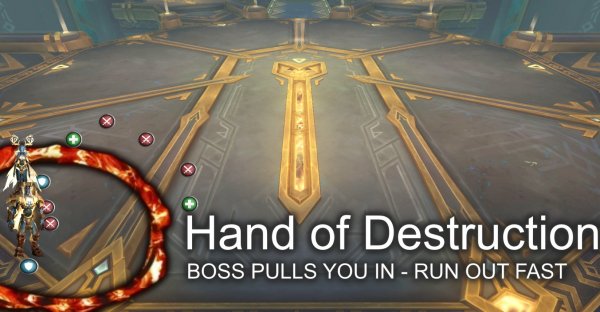
Hand of Destruction
- Boss pulls all players to him.
- That location will then explode after 6 seconds.
- The does high dmg but the further away you are, the less dmg you take.
Tactics: Hand of Destruction
- Tank the boss on the edge of the room.
- When all players all pulled, use movement speed increase abilities to move away fast.
- Healers beware
Wracking Pain
Boss does a frontal attack on tank direction with high physical Shadow dmg.
This puts a debuff that increase all dmg taken by 25% for 40 sec and stacks.
Tactics: Wracking Pain
- Tank the boss on the edge of the platform and turn him away from raid.
- Tank swap each wracking pain.
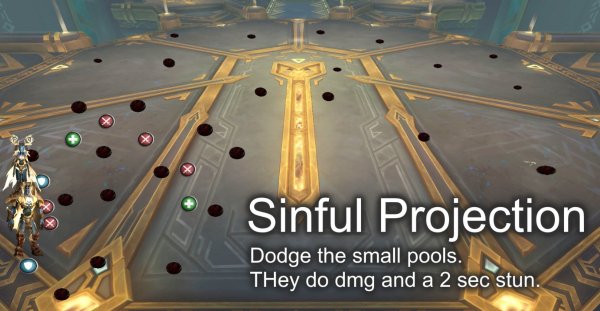
Sinful Projection
- Boss spawns loads of small pools on the ground that moves around fast.
- If a pool touches you it does moderate shadow dmg and stuns the player for 2 sec.
- This also increases the Burden debuff stack.
Tactics: Sinful Projection
- Focus on dodging all those small pools.
- Angle your camera so that you can see your character from above, then it´s easier to dodge them.
Phase 3
Phase 3 starts when a boss has 50% health.
All 4 bosses will now enter the platform.
You will fight the 4 bosses and all their abilities they had in phase 1 and 2.
Same tactics as before.
Stack up all the 4 bosses.
Tanks
The main difference is for the tanks.
One tank on Duty and War.
One tank on Renewal and Absolution.
Tank swap between Duty and Absolution when after Duty does Humbling Strikes.
Remember to face Absolution away from raid.
Other posts
- World of Warcraft 12.0.7 Revelations Roadmap: Your Complete Content Release Schedule
- MRGM Caught Red-Handed Stealing WoW PTR Discoveries – The Predictable Pattern of Content Theft Continues
- The BEST Midnight Season 1 DPS Tier List Guide
- Midnight Pre-Patch Event Guide: Twilight Ascension Rewards, Rare Timers, and Collectibles
- Endeavor: A Deeper Dive Into WoW’s Expansive New System
- LOADS of Extra Decors You Did NOT Know About!
- World of Warcraft Players Score Exclusive Housing Decor with Diablo 4: Lord of Hatred Pre-Order
- Brawler´s Guild 2025 GUIDE
- Legion Remix Decor will be available after Legion Remix
- Professions Unpacked: Your Guide to Crafting Housing Decor with Reagents from Every Era


