Background
Painsmith Raznal is a sadistic mastermind who spent eons perfecting the deadly traps found in Torghast. He relishes the screams of his victims as a testament to his skills, listening with malignant delight as they echo through the tower´s desolate halls.
Overview
In this fight you will only fight boss and at the same time handle mechanics on the platform.
There is a main phase and an intermission phase.
Main phase
- Fighting boss.
- Tanks move to top left corner when targeted by boss. He throws a weapon and on impact it does dmg + raid dmg (based on how close raid is). It also spawns spikes that travels through the platform. Based on boss health, the weapon he throws will make the spikes have different patterns.
- Raid, dodge the spikes.
- Several players will be shackled (can still move around) make sure you are spread because it does dmg and knockback to other players.
- A line of spiked balls spawns and travels through the platform. Mark the center ball and nuke it to open a gap to run through. This overlaps with shackles, so shackled players must wait until all other players pass through or you will knock them into the balls and stuff.
- Heroic mode – up to 4 players will be marked with traps that they drop after 8 sec. Traps must be placed in a good way because when they trigger, they do raid dmg and a 1.5 sec debuff that increased trap dmg by 200%. See tactics below on how to handle traps.
Intermission
- Boss leaps away and forges a new weapon, happens a 70% and 40% health.
- During this time you must dodge waves on lines of spikes. Each line has a gap to run through.
- Dodge swirls on the ground and nuke small adds.
- Healers beware of a stacking debuff that does fire dmg every 1 sec. This debuff will last for the rest of the fight. You cannot remove it, just heal up the raid.
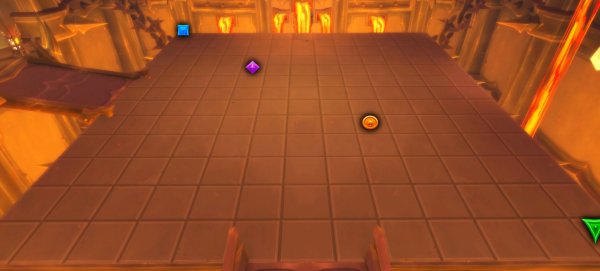
Positioning
The platform is shaped in 169 squares. It has 13 squares from one side to the other.
Standing on a square will make it easier do dodge mechanics.
Have following markers on the platform:
- Place the first one on the top left corner, on the square.
- Place the second one 3 squares diagonally from the previous marker.
- Place the third one 3 squares diagonally from the previous marker.
- Place the last one on the bottom right corner, on the square.
Don’t stand close to the first marker on the top left corner.
Stay spread.
Abilities and Tactics
Main phase – A Chamber of Agony
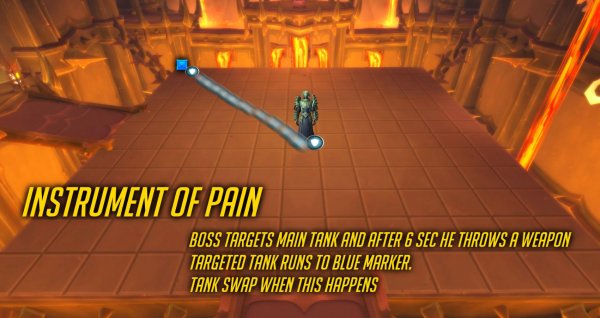
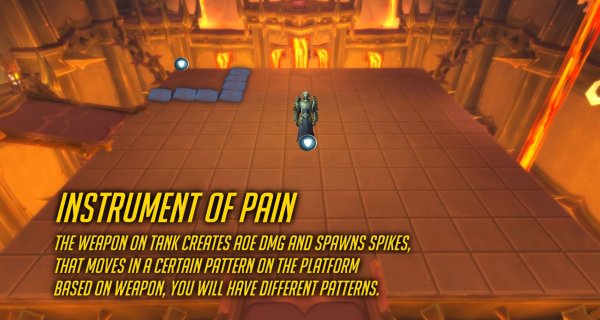
Instrument of Pain
This weapon boss ability is on the main tank and the outcome of it affects the raid.
Boss targets the tank with one of the three weapons and then throws it after 6 sec.
Tank will take very high physical dmg and the raid will take fire dmg as well. The further away the raid is from the tank, the less dmg they take.
This hit will also leave a debuff on the tank (Blackened Armor) that increases physical dmg taken by 200% for 30 sec and stacks.
The impact of the weapon will also lead to spikes spawning from the location of the impact on tank.
Based on what weapon the boss threw (axe, hammer, or scythe) the spikes will have different pattern that the raid must dodge.
- Cruciform Axe
Boss starts with this weapon at 100% health.
This will spawn spikes in four directions of from the tank position and move outwards.
The spikes will spawn then despawn and move one step further out, then spawn and despawn again.
In this way, the players can move pass it as soon as it despawn.
- Reverberating Hammer
Boss swaps to this weapon at 70% health.
The spikes will ripple outwards in four straight lines from the tank position only once then despawn.
- Dualblade Scythe
Boss swaps to this weapon at 40% health.
The spikes will first spawn in four directions and also ripple outwards in four straight lines.
Spiked
Getting hit by a spike does very high physical dmg and a 2 sec stun.
Tactics: Instrument of Pain
Tanks
- Have a maker on a corner. That marker is where to run when targeted by a weapon.
- Tank swap each time the main tank runs away.
Raid
- Raid position themselves further away and get ready to dodge the spikes.
- The platform is designed with squares. Just move from one square to the other when dodging spikes, because the spikes hits around the squares they are in.

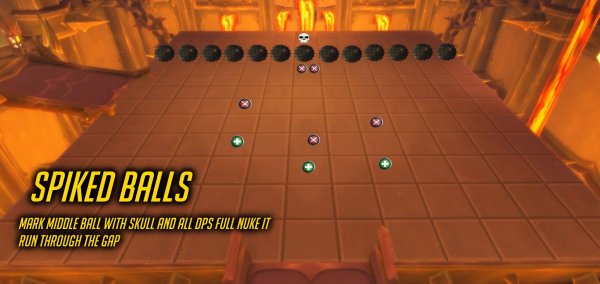
Spiked Balls
- Boss will spawn a line of spikes balls, from one side of the platform to the other.
- These balls will when move as a line from the side they spawn and cross the platform.
- If a player is hit, they will take deadly dmg and a 8 sec stun.
Tactics: Spiked Balls
- Mark the middle ball with a skull
- All dps must nuke that ball bast and destroy it, once destroyed, players can move through that gap.
- Some classes can pass the balls with abilities for example mage blink, or the venthyr teleport ability, or DH can jump out of the platform and fly back in again behind the ball. There are some cool stuff that we will definitely see.
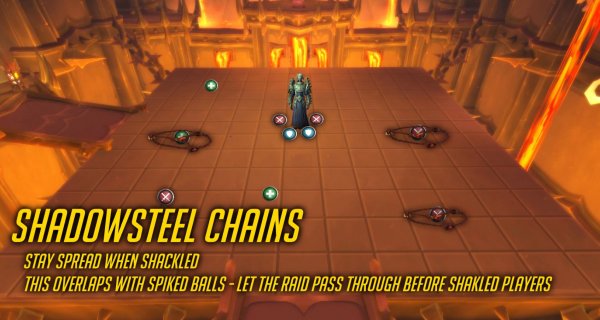
Shadowsteel Chains
- Boss targets several players (amount is based on raid size).
- These players will have a chain circle around them, they are shackled basically.
- This does moderate fire dmg every 1 sec for 20 sec.
- If a shackled player comes within 4 yards of another player, they do high physical dmg to that player and a knockback.
Tactics: Shadowsteel Chains
- Stay spread when shackled.
- This ability overlaps with the spiked balls, meaning, shackled players MUST move further back and wait until the spiked ball is broken and all NON-SHACKLED players has passed through before the shackled players passes through.
- Also, heads up on LFR or maybe pugs where some players that are shackled will knockback players out of the platform. Yes, I did that, sry! :D
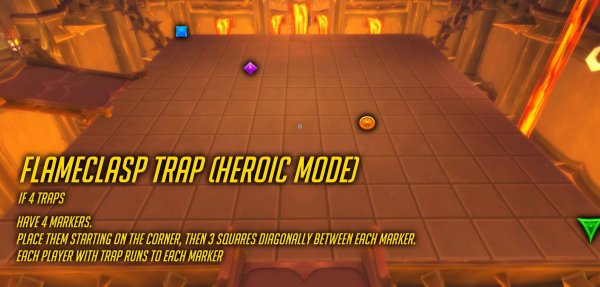
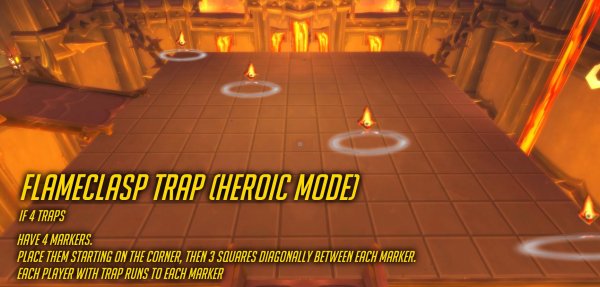
Flameclasp Trap (HEROIC MODE)
Up to 4 players are marked with arrow on their head (amount is based on raid size).
After 8 seconds, they drop a swirl on the platform. This swirl is a trap.
If a trap detonates it will do 10k fire dmg to all players and also increase trap dmg taken by 200% for 1.5.
The traps detonate if a player steps on it, or a spike hits it, or spiked balls run over it.
Tactics: Flameclasp Trap (HEROIC MODE)
You have to make sure that the traps are broken with at least 2 sec window between them so players don’t take that extra dmg.
Healers must beware and heal the raid asap when a trap is broken.
The spikes can be controlled where they will spawn but the spiked orbs had a random spawning direction on the PTR. Sometimes it spawned on the top and sometimes from the side. It was therefore tricky to place the traps. But we will see how it looks on live.
How to place the traps
There are 13 squares from one side to the other on the platform.
The spiked balls move with the speed of 1 platform a second.
Meaning, you must have at least2 squares between each trap. In this way, the raid will not take extra dmg from the debuff.
The best way to place the four markers and make sure they will break with at least 2 sec window no matter of what direction the spikes come from is following:
- Have 4 markers.
- Place the first one on the top left corner, one the square.
- Place the second one 3 squares diagonally from the previous marker.
- Place the third one 3 squares diagonally from the previous marker.
- Place the last one on the bottom right corner, on the square.
In this way, no matter if the balls come from the side or bottom/top, the traps will always have 3 squares distance from each other, meaning 4-5 seconds between each detonation. The raid will not have the increased dmg taken debuff and the healers will have time to heal up the raid.
Also, have the tank marker (the weapon/spikes) on the same position as the top left marker, otherwise if spikes spawn, they will blow up two traps instead of one each time.
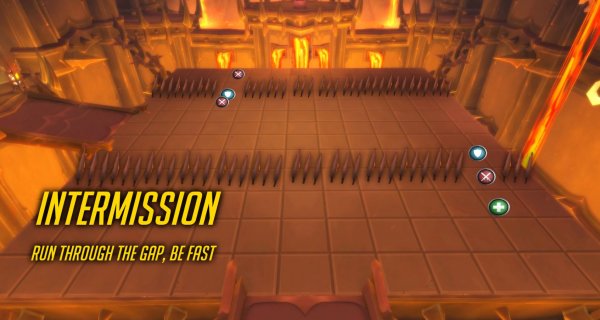
Intermission – The Screaming Anvil
- Boss leaps away from the platform and forges a new weapon to the fight.
- This happens when boss has 70% health and 40% health.
- During this time, the raid must dodge obstacles on the platform.
- You will get waves of lines of spikes passing through the platform from one side to the other, but there is a small gab randomly located in each line that you can pass through.
- Small red swirls will spawn on random locations on the platform during this intermission (Shadowsteel Ember). These swirls are location for these embers to land, and do high fire dmg to players hit when they land.
- During each intermission, every player gets more stacks of Black Flames debuff that do fire dmg every 1 sec.
Tactics: Intermission
- Tank pick up the adds and raid nuke the adds while dodging the lines of spikes.
- Healers beware of extra raid dmg that increases during the fight.
Other posts
- Best Consumables in WoW Midnight Patch 12.1: Flasks, Food, Runes & Potions
- Ultimate Guide to Farming Timewarped Badges in WoW Midnight (2026)
- Gearing ALTS EASIER in this UPDATE in 12.0.7
- World of Warcraft 12.0.7 Revelations Roadmap: Your Complete Content Release Schedule
- MRGM Caught Red-Handed Stealing WoW PTR Discoveries – The Predictable Pattern of Content Theft Continues
- The BEST Midnight Season 1 DPS Tier List Guide
- Midnight Pre-Patch Event Guide: Twilight Ascension Rewards, Rare Timers, and Collectibles
- Endeavor: A Deeper Dive Into WoW’s Expansive New System
- LOADS of Extra Decors You Did NOT Know About!
- World of Warcraft Players Score Exclusive Housing Decor with Diablo 4: Lord of Hatred Pre-Order


