Background
For countless ages, Sire Denathrius stood among the Eternal Ones who rule the realms of Death. But in the Shadowlands darkest hour, he has betrayed his sacred duty. With his bloodthirsty living blade Remornia at his side and defended by his most sycophantic loyalists, Denathrius will cut a swath through any who stand against him and cast their remains into the inescapable terror of the Maw.
Overview (Fast Tactics)
This fight has 3 phases and 1 intermission.
Phase 1
- Phase 1 has a mini enrage because the boss must have 70% health to get to phase 2 before the platform is covered with anima.
- There is a dagger in the middle of the platform (Remoria). When boss reaches 100 energy, 1/3 of the platform is covered in a pizza slice anima that reduces all healing taken by 100% and does Shadow dmg every sec when standing on it.
- At the start of the fight, every player gets 5 stacks of a debuff, called Burden of Sin.
- Every 2 sec, it does Shadow dmg per stack the player has.
- Players must remove at least 3 stacks before phase 1 ends.
- Players must be hit by the boss´s frontal cast, called Cleansing Pain to remove Burned of Sin before they run out of space, to avoid Ravage.
- Each hit removes 1 stack of Burden of Sin.
- The frontal cast (Cleansing Pain) also spawns an add (Echo of Sin) next to each player for each stack that is removed.
- Each add casts shadow dmg to all players every 2 sec and cannot be crowd controlled. Must be AoE nuked fast.
- Boss will also cast Blood Price that does dmg to all players that have the same amount of stacks of Burden of Sin.
- Divide the raid in 2 groups with a tank on each group. Tank swap after each front cast (Cleansing Pain) so that each group will get the hit every 2nd
- HEROIC MODE - After each frontal cast, two boss images will spawn and mark 2 random players (a line between the image and the player) and charge them (Blood Price). The charge must be soaked otherwise it heals boss. Soak by standing on the line, not on the player.
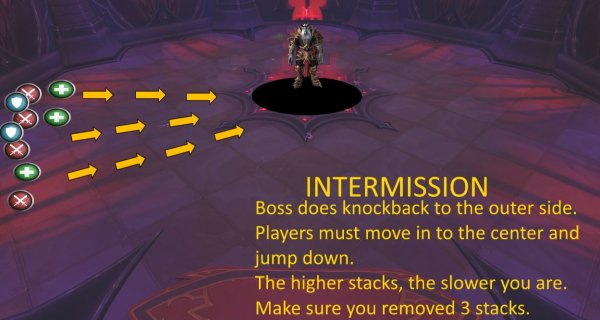
Intermission
- When boss reaches 70% health, he teleports to the middle and pushes everyone back.
- Players must run in to the center where boss is before 15 sec or they die.
- Each stack they have left of Burden of Sin will put a 20% slow.
- Players cannot use abilities in this intermission.
Phase 2
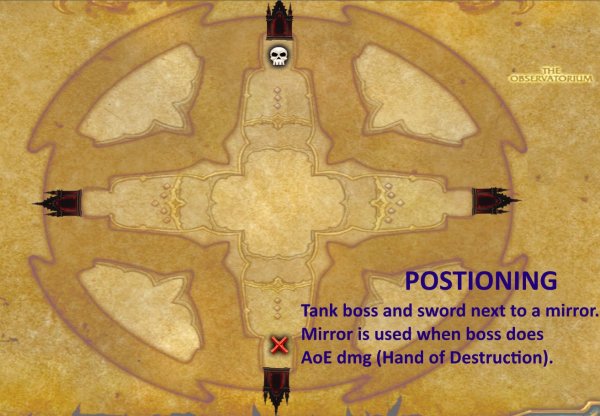
- The platform is cross shaped with a mirror on each side. The corners got small platforms.
- On phase 2, you will fight the boss, his floating dagger and waves of adds.
- One tank must be on boss and one tank must be on the dagger Remornia.
- Adds will not be tanked.
- Tank swap each Wracking Pain
- Tank the boss and dagger next to a mirror. When boss does AoE Hand of Destruction, run through the mirror so you get teleported to the other side and take less dmg.
- When boss has 100 energy, big blades will swipe through the platform. Dodge the Red lines on the platform.
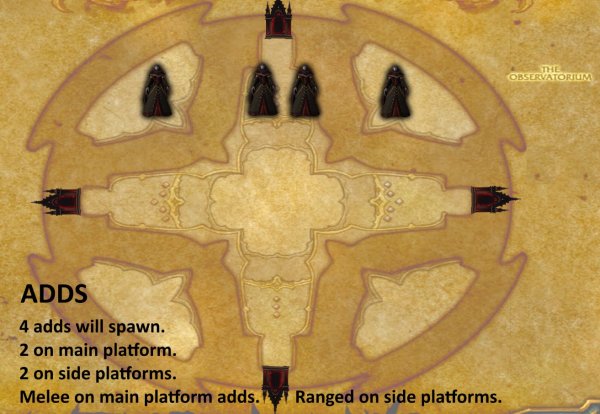
- 4 adds will spawn periodiacally. 2 on main platform and 2 on side platforms. Ranged on the ones on the side platforms. Nuke them fast.
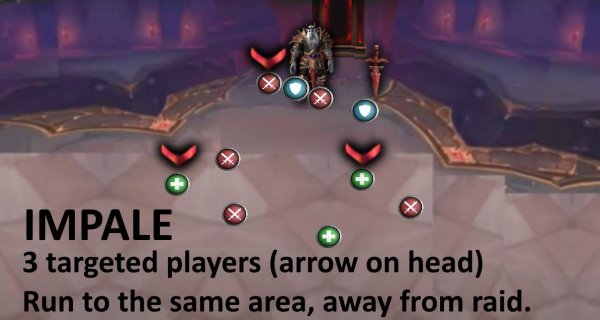
- The Dagger will target a player. Move away from that player fast. The dagger will rush at the player and does dmg to anyone in the way as well.
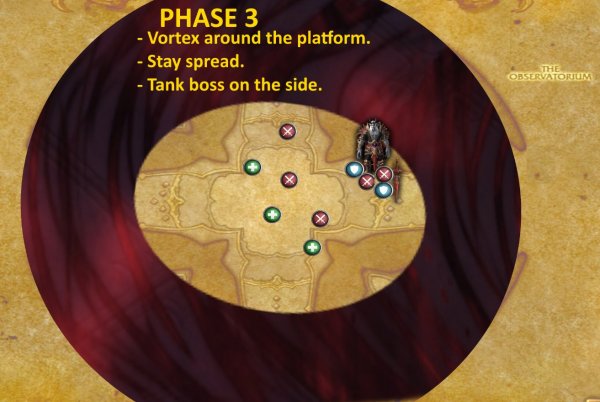
Phase 3
- Starts when boss has 40% health.
- He will cast a mealstorm on the platform so that you cant use side mirrors. Running out from platform will kill you pretty fast.
- Boss will have the dagger on his hand now instead.
- Boss spawns an image of himself that does
- 1 ability from phase 1: The cone shaped anima. Move to the side.
- 1 ability from phase 2: The big blades that swipes through the platform. Dodge them
- Tank swap when getting the scorn debuff or after Shattering pain.
- Shattering pain does a combo on tank and ends with an AoE blast on raid. Tank use defensives, healers heal up raid as well.
- Boss targets 5 players that he will slash. This leaves a debuff within 9 yards. Stay pread.
HEORIC MODE – Leaves spheres when debuff ends that must be soaked or wipe. - Boss pulls all to him and does the blast (same as phase 2 – Hand of Destruction). You can only run far away now because there are no mirrors to use. Use defensives.
- Bloodlust / Timewarp / Heroism
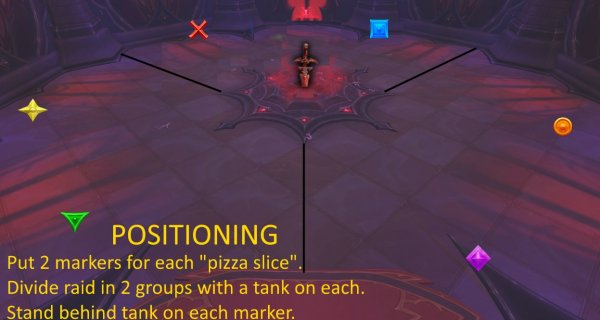
POSITIONING
PHASE 1
PHASE 2
PHASE 3

PHASE 1
Burden of Sin / Cleansing Pain / the adds
At the start of the fight, each player gets a debuff with 5 stacks, called Burden of Sin.
Every 2 sec, it does Shadow dmg per stack the player has.
Denathrius does high shadow dmg to players in a cone dmg (Cleansing Pain).
Each hit removes 1 stack of Burden of Sin.
This summons an Echo of Sin for each stack that is removed.
If a player does not have Burden of Sin and gets hit by this:
That players takes 300% increased dmg from this boss ability (dead).
Echo of Sin
- These adds do Shadow dmg to all players every 2 sec.
- They are immune to crowd control.
Tactics: Burden of Sin / Cleansing Pain / the adds
- This debuff must be removed with 3 stacks before phase 2 (when boss hits 70% health).
- The stack is removed when getting hit by Cleansing Pain.
- Divide the raid in two groups.
- Have a tank in each group and stack up on the tank.
- Each time boss does the frontal spell, you tank swap.
- AoE burst nuke the adds that spawns.
Blood Price
Boss makes players with the Burden of Sin debuff unable to move or act for 3.5 sec.
When the effect expires, each player is knocked away from boss and explodes for Shadow dmg to all players who have the same number of Burden of Sin Stacks.
Tactics: Blood Price
- This is the main reason you divide the raid in two groups, so that you have half of the raid with different number of stacks compared to the other half.
- Make sure the wall is behind you when knockback.
- Tanks position yourself (and raid that stacks on them) so both groups have the wall behind them.
- Healers beware and heal up the raid fast.
Ravage
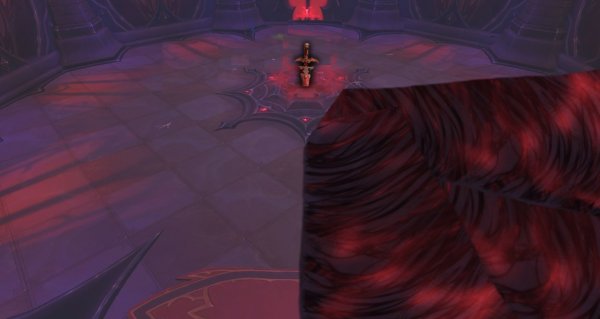
- When boss reaches 100 energy. He commands the dagger (Remoria). Located in the center of the platform.
- The add Remoria does a big arc (pizzal slice) dmg that does deadly dmg to all players.
This ability leaves behind Desolation.
Desolation is anima pool on the ground that reduces all healing taken by 100% and does Shadow dmg every sec when standing on it.
Tactics: Ravage
- Move away fast before this is casted.
- Boss will do this 3 times, then the entire platform is covered and it’s a raid wipe.
- That is why it’s a mini boss enrage. You must take the boss health down to 70% before entire platform is covered with it.
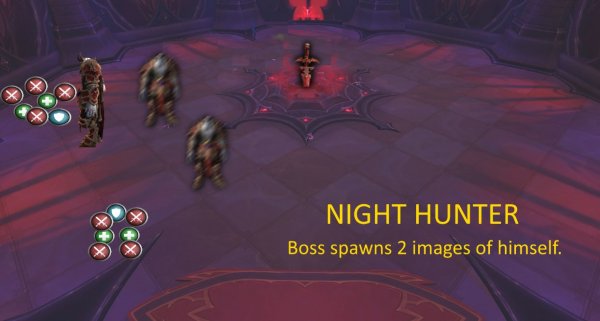
HEROIC MODE: Night Hunter
- Boss creates 2 images of himself.
The images mark 2 random players and charge to them 6 sec later. - This does Deadly physical dmg to players within 4 yards and heals boss for 150% of that amount.
- The dmg is reduced for each player in the path.
- All players in the path that are hit gets a debuff (Touch of the Night).
This does physical dmg and increases dmg taken from Night Hunter by 500%.
Tactics: HEROIC MODE: Night Hunter
- This happens after each frontal dmg (Cleansing Pain).
- Stand on the line to soak the dmg.
- Each individual player must soak only one of them, otherwise the debuff you get from it increases dmg taken by 500% from the 2nd
- Don’t cross the beams (lines), it will be harder to soak only one otherwise.

INTERMISSION
At 70%, boss reaches INTERMISSION and casts March of the Penitent.
Boss draws all players to the center of the room and casts them outward to the edges.
Players affected by Burden of Sin have their movement speed slowed by 20 sec per stack and cant use abilities.
Moving within 16 yards of boss clears players of their Burden of Sin debuff.
Tactics: INTERMISSION
- Make sure that you have 3 stacks removed of your Burden before hitting 70% boss health.
- After being tossed away, run in to the center where boss is fast before time runs out.
- Remember, you can´t use any abilities to move faster, so RUN :D
PHASE 2 – THE OBSERVATORIUM, THE CRIMSON CHORUS
After 15 sec, all players are pulled into another platform – the Observatorium.
Now all players still alive are cleaned for the Sin debuff.
This platform has 4 of mirrors that is located on each side of the platform.
Moving into a mirror teleports you to the other side of the platform mirror.
You can use this to doge abilities.
The platform
The platform is cross shaped with a mirror on each side.
The corners are small platforms that you can´t walk on but have to nuke adds from range.
Entering a mirror will teleport you to the mirror on the opposite side.
On phase 2, you will fight the boss, his floating dagger and waves of adds.
One tank must be on boss and one tank must be on the dagger Remornia.
Adds will not be tanked.
Phase 2 ends when boss has 40% health.
Denathrius Abilities in phase 2
Wracking Pain (Tank)
- Boss does a frontal attack on tank direction with high physical Shadow dmg.
- This puts a debuff that increase all dmg taken by 50% for 24 sec.
- Adds (Cabalists) take dmg from this as well.
Tactics: Wracking Pain (Tank)
- Tank swap each attack.
- Try to position yourself and hit adds with it the boss frontal attack.
Hand of Destruction
- Boss pulls all players to him.
- Spawns an image of himself.
- After 6 sec, the image does deadly dmg to all players. The further away, the less dmg taken.
Tactics: Hand of Destruction
- Tank the boss near a mirror on one of the sides.
- When boss pulls the raid, run in to the mirror and you get teleported to the opposite side of the platform. This way, you are away from the blast.
- Healers, top layers health back up fast.
Command: Massacre
- When boss reaches 100 energy it commands the dagger Remornia.
- Several big blades travel through the platform.
- Getting hit does deadly shadow dmg.
- HEROIC MODE: Getting hit also puts a 1 min pool on the ground under the player, that does moderate shadow dmg every 1 sec and increase dmg taken by 50% when running over it.
Tactics: Command: Massacre
- Dodge the big blades. There are red lines on the platform just before a sword swipes through that direction.
- If you get hit or about to get hit, use a defensive ability.
- Healers beware for players that get hit and heal them up fast.
- HEROIC MODE: If you get hit, beware of the pool on the ground.

Adds – Crimson Cabalists
During the fight, 4 adds will periodically spawn.
2 on the main platform and 2 on the small side platforms.
They have 3 abilities
Crimson Chorus – Ritual that does Shadow dmg to all players every 2 sec. The dmg is incrased based on amount of adds alive.
HEROIC MODE: Crescendo – When an add dies it does volley of anima that does moderate Shadow dmg to players within 2.5 yards and a knockback.
Dusk Elegy – When boss reaches 40% health, all remaining adds move to the inner platform and intensify the Chorus Ritual. Incoming heal on all players is reduced by 15% for each add alive.
Tactics: Adds – Crimson Cabalists
Ranged focus nuke the adds on the smaller platforms.
Melee focus on the adds on the big platform.
HEROIC MODE: Beware of the dmg and knockback when they die, especially melee players.
The dagger – Remornia
This dagger will randomly attack players when not using an ability. Therefore, she must be tanked.
When using abilities she focus on raid and is not tanked.
She shares health with boss.
Carnage
The dagger puts bleed debuff on players that does physical dmg every 1 sec for 15 sec and stacks.
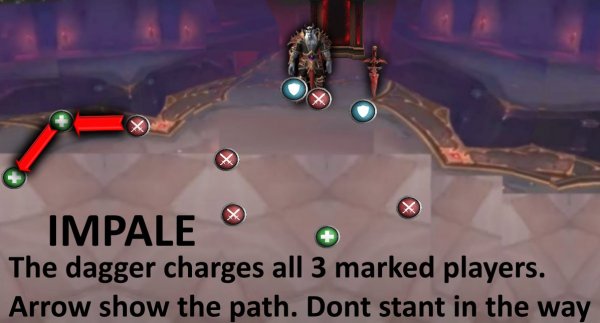
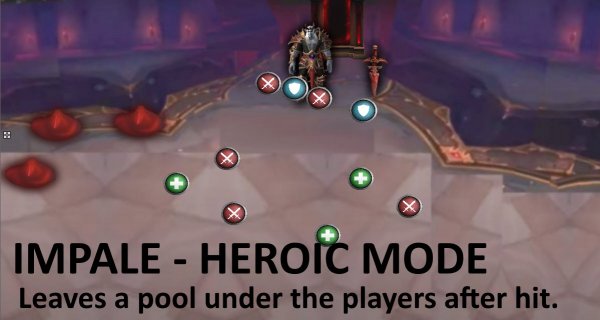
Impale
Marks 3 random players
After a few seconds that players get charged.
Does high physical dmg to all players in her path.
HEROIC MODE: Getting hit also puts a 1 min pool on the ground under the player, that does moderate shadow dmg every 1 sec and increase dmg taken by 50% when running over it.
Tactics: The dagger – Remornia
- Tank the dagger on top of boss.
- Tank swap is based on the boss ability, not anything the dagger does.
- Targeted players move away from raid.
- Nuke boss and the dagger since they share health you can do more dmg.
PHASE 3
Starts when boss has 40% health.
Boss traps players inside a maelstrom. Running out from the platform (out from the maelstrom) does high shadow dmg every 1 sec.
Boss will now hold the dagger in his hand instead, and will use abilities from phase 1 and 2.
Remornia and Shattering Pain (Tanks and raid dmg)
Boss does 2 abilities on tanks
- Remornia
Boss hits tank with the dagger that is 25% slower but 50% more dmg.
This puts a Scorn debuff, that does Shadow dmg every 1 sec for 15 sec and stacks. - Shattering Pain
Boss does series of attacks.
Does 100% weapon dmg 3 times.
Then finishes with a blow that does high Shadow dmg to all players and knocks them back.
Tactics: Remornia and Shattering Pain (Tanks and raid dmg)
- Use defensive when shattering pain.
- Healers beware and heal up the raid after each Shattering Pain.
- The tank swap is scorn debuff.
Fatal Finesse
- Boss targets several players.
- After 5 seconds they get slashed with high shadow dmg and a 20 sec debuff that does moderate dmg every 1 sec.
- Also, all players within 9 yards will get the hit as well.
- HEROIC MODE: This slash also leaves a sphere that explodes after 10 sec and does very high dmg to all players. Standing on the sphere does moderate dmg to that player, and the explosion will instead do moderate dmg.
Tactics: Fatal Finesse
- Stay spread
- Use defensive
- Healers beware
- HEROIC MODE: Soak the spheres that spawns.
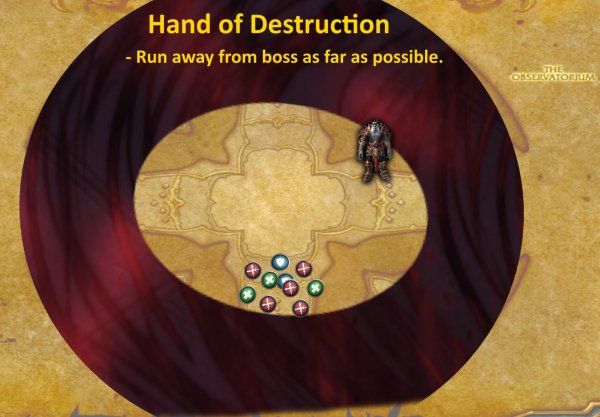
Hand of Destruction
Boss pulls all players to him.
Spawns an image of himself.
After 6 sec, the image does deadly dmg to all players. The further away, the less dmg taken.
Tactics: Hand of Destruction
- You can´t use mirrors to teleport anymore.
- Tank the boss on the edge of the platform.
- When he does hand of destruction, run away to the opposite side
Sinister Reflection
When boss reaches 100 energy he spawns an image of himself.
Ravage: After 6 sec, a cone formed anima hits the ground leaving desolation (similar to phase 1).
Massacre: The image forms big blades that slash every direction. Getting hit does deadly dmg. Same as phase 2 with the red lines on the platform.
HEROIC MODE: Same as phase 2, getting hit by the slash puts a pool of the ground that does high shadow dmg and increases dmg taken by 50%.
Tactics: Sinister Reflection
- Move away fast before the image casts Ravage.
- Boss will do this 3 times? then the entire platform is covered and it’s a raid wipe.
- Blood lust /Timewarp / Heroism on this phase.
- Dodge the big blades.
- Healers beware
When to Bloodlust / Timewarp / Heroism
At last phase. Kill him before the platform is full of anima and you wipe.
Other posts
- World of Warcraft 12.0.7 Revelations Roadmap: Your Complete Content Release Schedule
- MRGM Caught Red-Handed Stealing WoW PTR Discoveries – The Predictable Pattern of Content Theft Continues
- The BEST Midnight Season 1 DPS Tier List Guide
- Midnight Pre-Patch Event Guide: Twilight Ascension Rewards, Rare Timers, and Collectibles
- Endeavor: A Deeper Dive Into WoW’s Expansive New System
- LOADS of Extra Decors You Did NOT Know About!
- World of Warcraft Players Score Exclusive Housing Decor with Diablo 4: Lord of Hatred Pre-Order
- Brawler´s Guild 2025 GUIDE
- Legion Remix Decor will be available after Legion Remix
- Professions Unpacked: Your Guide to Crafting Housing Decor with Reagents from Every Era


