Background
Sire Denathrius seldom engages in the hunts himself, but Altimor makes certain the master has the finest beasts should he ever choose to indulge. Margore, Barghast, and Hecutis has been trained longer than most beasts have existed, and each is ready to deliver the Huntsman´s wrath to any in his domain.
Overview
- A three phase fight where you will fight the main boss the entire fight
- there will be 3 hounds in total during the fight, Margore, Bargast and Hecuits.
-
You will fight boss and 1 hound at a time.
-
When a hound is dead, another one spawns.
-
The hounds share health with boss.
- Each hound possesses 2 unique abilities
- The first dog is Margore, and spawns at 100% boss health.
- The second dog is Bargast, and spawns at around 70% boss health.
- The third dog is Hecutis, and spawns at around 30% boss health.
- The boss has 2 abilities
Spreadshot – Shoots a cone of bullets on random player. Stand spread
Sinseeker – Targets 3 players, then shoots, does dmg and debuff. Players in the way take dmg as well. Make sure you are spread. Melee, stand on tank if needed. - The first Hound, Margore
Positioning – Stack the boss and hound
On tank – High dmg and debuff, tank swap at 2 stacks.
On raid – Targets random player and leaps. Does deadly dmg but shared. Stack up on that player
HEROIC MODE - Players that soaked gets a bleed debuff. - The second Hound, Bargast
Positioning – Spread them, boss one side, dog far on the other side.
On tank – rips the soul out that moves to boss. Use defensive. Healers, heal the soul that moves to boss.
On raid – Spawns 2 CC the adds until they reach several stacks of dmg taken increased (20 s).adds that casts a Roar. Roar must be crowd controlled (stun/fear etc).
Assign players for each roar. Kill the adds single target, one at a time.
Alternative
Stack the boss and hound and move hound away before it does Rip Soul.
Rip Soul is every 30 sec. - The third Hound, Hecutis
Positioning – Stack boss and hound. Move them clockwise when needed.
On tank – a buff on dog that makes it hit harder and slows. Move the dog (and boss) because when dog moves it drops stacks BUT does raid dmg, so move when possible based on raid health. Healers beware.
On Raid – petrifies players, does dmg and movement reduction and stone shards spawns when debuff expires. Move away from the shards. Healers beware.
Bloodlust/Timewarp/Heroism on this phase.
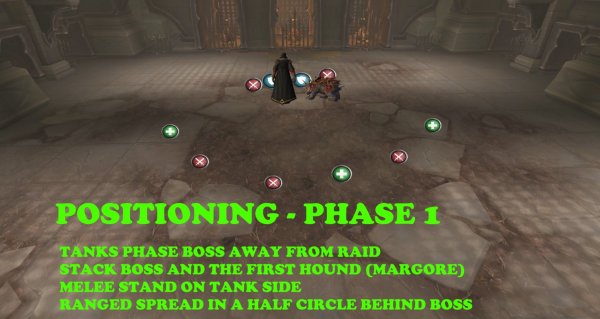
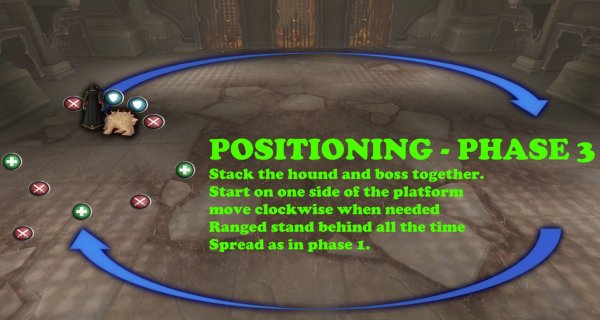
Positioning
Phase 1 (First dog)
- Stack the hound Margore and boss together.
- Ranged stands spread, in a half circle around the boss.
- Melee stand next to Boss tank
- Main tank (boss tank) turn boss so he faces away from ranged.
Phase 2 (Second dog)
- Spread the boss and the new dog away from each other. Opposite sides.
- Ranged stand in the middle, between boss and hound.
- Melee on hound side
- Alternative
Stack the boss and hound and move away before hound does Rip Soul.
Rip Soul is every 30 sec.

Phase 3 (Third dog)
- Stack the hound and boss together.
- Start on one side of the platform, move clockwise when needed.
- Ranged stand behind all the time, spread as in phase 1.
Abilities and Tactics
- You will fight boss and 1 hound at a time.
- When a hound is dead, another one spawns.
- There are 3 types of hounds, Margore, Bargast and Hecuits.
- Each hound possesses 2 unique abilities
- The hounds share health with boss.
- The first dog is Margore, and spawns at 100% boss health.
- The second dog is Bargast, and spawns at around 70% boss health.
- The third dog is Hecutis, and spawns at around ?% boss health.
Boss (Huntsman Altimor)
Boss has 2 abilities (the third is just that they share health)
Sinseeker
Boss targets 3 players and shoots at them, and any players in the way.
Each bolt does high physical dmg and also a debuff that does moderate dmg every 2 sec for 30 sec.
Tactics: Sinseeker
Stand spread next to each other, so no one extra gets hit.
Melee, stand next to tank
Spreadshot
Boss shoots a cone of bullets on random players that does high physical dmg.
Tactics: Spreadshot
No need for extra raid movement.
Stand spread in a half circle around boss
The closer ranged are, the less players are hit.
Healers beware.
Huntsman´s Bond
Dmg taken by boss and hounds is taken by both.
There are dogs that you can stack with boss and one that must be away from boss.
They share health, so you need to be efficient.
When first hound is out (Margore), stack boss and hound.
When second hound is out (Bargast), off tank run away with it and tank it on the other side.
When third hound is out (Hecutis), stack boss and hound together (but this phase requires movement)
The dogs
The dogs are spawned one at a time. When one is dead, next one spawns.
Each dog has one ability on tank and one on raid.
Margore
Stack the boss and the dog during this fight
Vicious Lunge
The Margore dog targets a player
After 6 sec, he dives at them and does deadly dmg.
The dmg is divided evenly by players within 6 yards.
HEROIC MODE – all players struck will also get a debuff (Vicious Wound) that does high physical dmg every 3 sec for 6 sec.
Tactics: Vicious Lunge
Stack up on the player that is targeted to share the dmg.
It’s a red circle around that player.
Healers beware
Jagged Claws (Tank)
Margore dog hits the tank with high physical dmg and puts a debuff that does physical dmg every 3 sec for 30 sec.
Tactics: Jagged Claws (Tank)
Tank swap each debuff
Bargast
Tank the boss on one side of the room, and the dog on the opposite side, away from each other.
Shades of Bargast
This dog spawns 2 adds (shades of itself)
The shades casts Deathly Roar, which does moderate Shadow dmg to all players and a debuff that does shadow dmg every 2 sec for 20 sec.
You cannot interrupt the roar but you can use crowd control abilities to stop it.
Dmg taken is increased by 100% when under loss of control effects, and stacks.
When reaching 100 energy, they become immune to crowd control.
Tactics: Shades of Bargast
Have players assigned to cc the adds and dont attack them until they reach 40 stacks of Destabilize. Then kill them one by one.
But till them befor next set of adds come.
Have players assigned to use crowd control abilities (stun, knockback) when they cast Deathly Roar.
Rip Soul (Tank)
Does high shadow dmg and causes the players soul to move to the boss until the player´s soul is healed to full.
If the soul reaches the boss, he gets increased dmg done by 200%.
Tactics: Rip Soul (Tank)
Tank the boss on one side of the room, and the dog on the opposite side, away from each other.
Healers
Focus Heal the soul that walks to the boss. Must be full health.
Tank
Use defensive before the Rip Soul.
The less health the tank has from Rip Soul, the less health needs to be healed on the soul.
Hecutis
Crushing Stone (Tank)
The melee attacks increase this dog´s physical dmg done by 50% and reduce his movement.
While moving, this dog drops stacks of Crushing Stone.
While moving this dog does Nature dmg to all players (Shattering Stone)
When the dog is out of stacks, it charges to his target (tank).
Tactics: Crushing Stone (Tank)
Stack the boss and the dog.
Start on one side of the room.
Move the dog (and boss) to reduce the stacks it has. The less stacks, the less dmg increase.
BUT, make sure the raid is healed up because when the dog moves, it does raid dmg.
Petrifying Howl
This dog puts a debuff on several players.
This does low nature dmg every 1 sec and reduces movement speed by 5%.
When the debuff expires, it deops rocks on the zone of the players.
This does nature dmg and reduce movement speed by 25% to players in that area.
Tactics: Petrifying Howl
Run away to the sides when targeted (a big circle around you).
Make sure the rocks are on the sides of the platform.
When to Bloodlust / Timewarp / Heroism
When the 3rd hound, Hecutis spwans.
Other posts
- World of Warcraft 12.0.7 Revelations Roadmap: Your Complete Content Release Schedule
- MRGM Caught Red-Handed Stealing WoW PTR Discoveries – The Predictable Pattern of Content Theft Continues
- The BEST Midnight Season 1 DPS Tier List Guide
- Midnight Pre-Patch Event Guide: Twilight Ascension Rewards, Rare Timers, and Collectibles
- Endeavor: A Deeper Dive Into WoW’s Expansive New System
- LOADS of Extra Decors You Did NOT Know About!
- World of Warcraft Players Score Exclusive Housing Decor with Diablo 4: Lord of Hatred Pre-Order
- Brawler´s Guild 2025 GUIDE
- Legion Remix Decor will be available after Legion Remix
- Professions Unpacked: Your Guide to Crafting Housing Decor with Reagents from Every Era


