OVERVIEW
(FAST TACTICS)
I recommend checking the tactics and not only overview on this fight because there are some overlapping abilities that must be handled correct.
- This fight has 3 phases and 2 intermissions.
Phase 1-3 - In the phase fights you will only fight the boss.
- When boss puts teleport debuff (Dimensional Tear) it will always be one on a tank and the other on a random raid member (non-tank). One player goes to outer area and the other player goes to the center so that you can use that teleport to portal in our out.
- The boss spawns rings (Genesis Ring) that will either start from center and move outwards or start from outer platform and move inward. Touching the ring kills you most likely. Use the teleports to dodge the rings.
- When boss puts a small circle under you (Hyperlight Sparknova), make sure no one is inside your circle.
- Before boss puts a trap (Statis Trap) on you, make sure to position yourself so that all traps are close to each other.
Normal mode: Clear traps by using players with immunity that runs over them.
Heroic mode: Traps cannot be cleared. Instead, you will fight on one side of the platform and place traps on the other side of the platform. - When boss targets tank with explosion (Glyph of Relocation) , that tank runs away from raid. The explosion will pull players to that tank. During the fight you must position yourself in certain ways since tank explosion overlaps with the rings.
- Each phase is the same boss abilities. The main difference is the Genesis Rings that changes and also overlaps with the tank explosion debuff.
Phase 1: Rings start from center and moves out.
Phase 2: Rings start from outer side and moves in.
Phase 3: 2 rings will spawn after each other. Sometimes 2 that moves out, or 2 that moves in, or one from outer side and one from inner side.
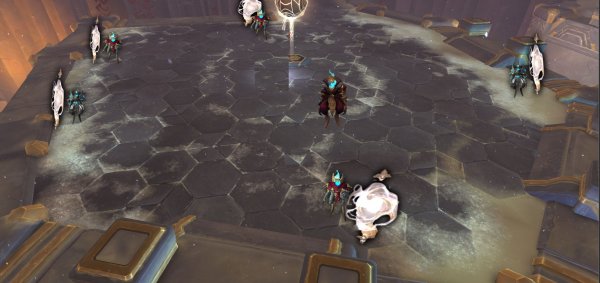
Intermission - 5 adds will spawn, 3 casters and 2 melees.
One tank on each melee and tank the casters.
Interrupt casters (Debilitating Ray).
Kill melee first. Focus nuke melee and cleave.
Don’t stand in front of melee, they do frontal cone dmg (Massive Blast). - Adds must be crowd controlled as much as possible.
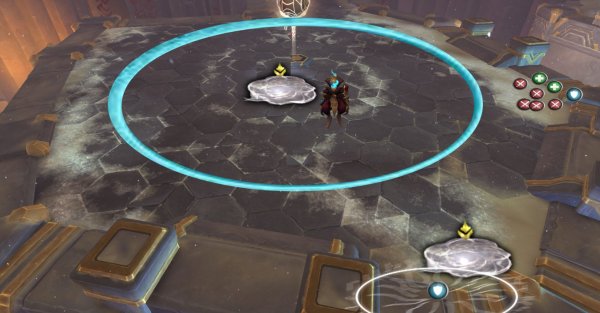
POSITIONING & MARKERS
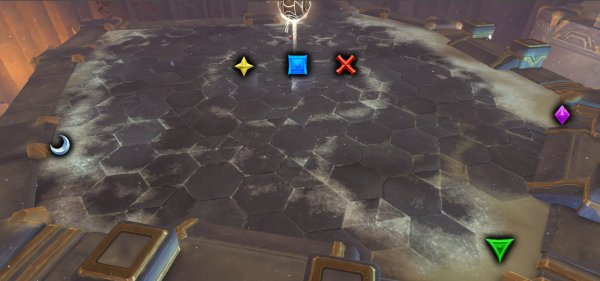
Check the image on placings of markers.
- Place a Blue marker on the center
- Place a cross marker little bit further away from blue.
- Place a green marker on outer side on top side (that’s a good distance between mid and edge).
- Place a diamond marker on the outer side further down on left side.
- Place a moon marker on the outer side further down on right side
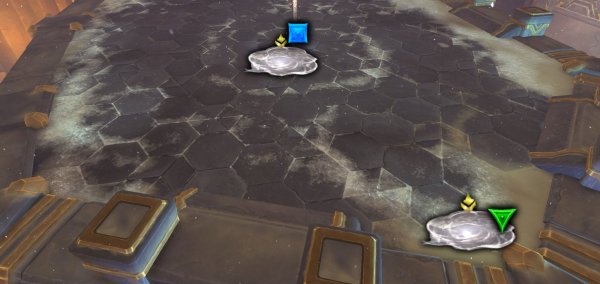
BLUE
Tank place portal there.
GREEN
Raid place portal there
DIAMOND
Raid runs there when taking portal to OUTER side is overlapped with tank explosion.
MOON
Tank explosion runs there when taking portal to OUTER side is overlapped with tank explosion.
CROSS
Raid runs there when taking portal to INNER side is overlapped with tank explosion
STAR
Tank explosion runs there when taking portal to INNER side is overlapped with tank explosion.
POSITIONING
NORMAL MODE
- Tank boss closer to green marker on phase 1.
- Tank boss closer to blue marker on phase 2
- Tank boss between blue and green marker on phase 3.
HEROIC MODE
- Tank boss between blue and green marker.
- Ranged soft stack between cross and diamond on phase 1 and 2.
BOSS ABILITIES & TACTICS
Phase 1
Dimensional Tear
- Boss puts a debuff on a tank and a random raid member (non-tank).
- After 8 sec it does Arcane dmg and also places a portal on the ground under the player.
- Players can travel between these 2 portals.
- Entering a portal gives u a small debuff that hinders you from entering portal again in 3 sec.
Tactics: Dimensional Tear
- Tank with the portal debuff runs to marker in the middle.
- Raid player with portal debuff runs to green marker on the edge.
- Wait until the portal spawns under you.
Statis Trap
- Boss puts a trap near 3 players. Its either next to player or behind the player.
- The traps are armed after 2 sec.
- Stepping over a trap stuns the player and does arcane dmg every 2 sec.
- The trap can be destroyed by other players.
- HEROIC MODE
The traps cannot be destroyed. If you clear it with immunity or destroy it when a player is stuck, it comes back up straight away.
Tactics: Statis Trap
- Only ranged players are targeted by traps.
- Make sure you are close to the boss before traps come out.
- Have a player with immunity to run over them. But wait until the traps are armed before running over.
Have a rotation of players that can run over. Classes that can help out are:
Hunters
Death Knights
Rogues
Paladin
Other classes that can run over one trap as back up
Mage

- HEROIC MODE TACTICS
Have all ranged between cross and diamond marker (see markers & positioning).
You will always get circle debuff (Hyperlight Sparknova) before the traps. Every time you have the circle debuff, ranged players must run to the empty side of the platform and soft stack so that the traps are close to each other. Have a targeted ranged player to follow.
Hyperlight Sparknova (Circle debuff)
- Boss targets all players. A small circle under each player.
- After 6 seconds a spark jumps between all players doing Arcane dmg and a stacking debuff that does arcane dmg over 26 sec.
- If players are within each other’s circles (3 yards) the debuff stacks.
- HEROIC MODE
The trap will rearm after it has been triggered.
Tactics: Hyperlight Sparknova (circle debuff)
- Make sure you are spread but stand close to each other because the statis trap will always come directly after.
- HEROIC MODE
You will always get circle debuff (Hyperlight Sparknova) before the traps. Every time you have the circle debuff, ranged players must run to the empty side of the platform and soft stack so that the traps are close to each other. Have a targeted ranged player to follow.

Glyph of Relocation (Tanks)
- Boss will put a debuff on the main tank.
- This does moderate dmg every 5 sec.
- After 6 seconds debuff explodes and does very hihgh Arcane dmg and drag all players to its location.
- The dmg is based on the distance. The further away players are, the less dmg they take.
- The tank gets a 1 min debuff that increases Arcane dmg taken by 50% for 1 min.
Tactics: Glyph of Relocation (Tanks)
- In general, the tank runs away from raid and raid runs away from tank.
- This boss ability overlaps with Genesis Ring. See tactics under rings section on how to handle it for each phase.
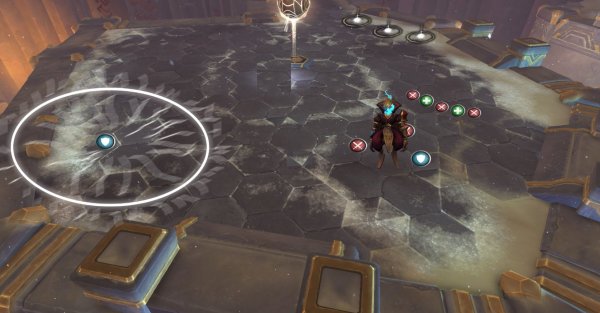
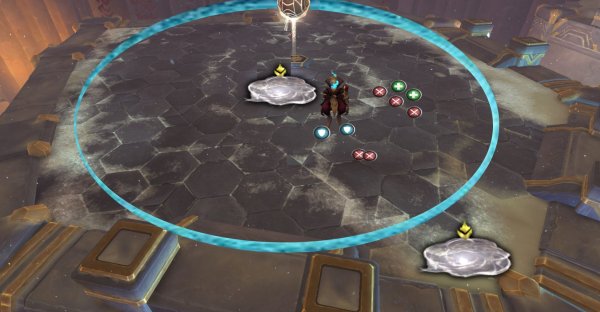
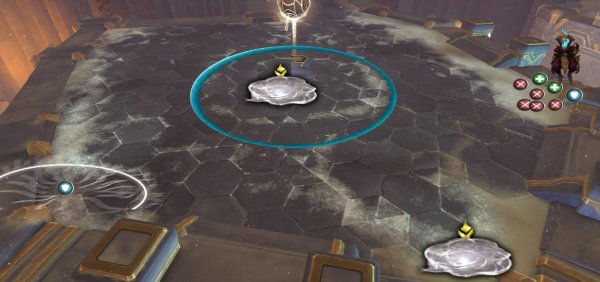
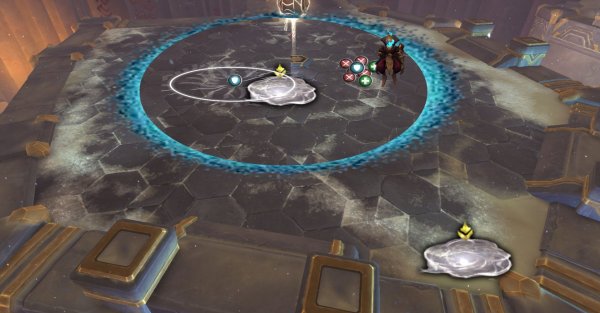
Genesis Ring
Boss activates a ring that either starts from the middle and expands outwards or it starts from the outer area and contracts inwards.
You can see which way it will take by looking at the pillar in the middle. If the circle moves upward the pillar, it will start from the outer area. If the circle goes downwards the pillar, it will start from the center.
Based on what phase it is on the fight, you will get different combinations of the genesis rings.
Rings Phase 1
The rings will start from the center and move out.
Use the outer portal when the ring has passed the inner portal.
The ring does not overlap with Glyph of Relocation in phase 1.
Gunship Barrage
- There is a boat that floats on the outer area that shoots into the platform. These are swirls on the ground that you must doge. Getting hit high Arcane dmg.
Tactics: Gunship Barrage
- These come as two shots (two swirls) on the ground.
- They shoot random close to players.
- Dodge them but take the hit if you must when running in to portal for example.
Intermission 1
First intermission starts when boss reaches 75% health.
Boss will be immune to dmg during this phase.
All players will get a stacking debuff called Genesis Supernova. This debuff does Cosmic dmg and increase dmg taken by this debuff by 5% for 8 sec.
Healers beware.
5 ads will spawn.
- 3 Spellslingers (casters)
Casts Dibilitating Ray that does every 1 sec and reduces movement speed by 50% for 8 sec. - 2 Xy Acolytes (melee)
Does frontal cone dmg (Massive Blast) on tank that does very high arcane dmg and a debuff that makes you take increased Massive Blast dmg by 30% for 30 sec.
When reaching 100 energy they are immune to cc and transforms doing deadly dmg to all players. - Interrupt the adds so all adds are clustered together.
- Focus kill the Acolytes and cleave dmg on the casters.
- Don´t stand in front of the acolytes due to the frontal cone dmg.
- Always interrupt the casters.
- You can use all kinds of crowd control on them.
Gunship will shoot on this phase as well.
Dodge the swirls on the ground.
Phase 2
The fight is the same as in phase 1 except for the Genesis Rings and the overlap with Glyph of Relocation
Genesis Rings Phase 2
The rings will start from the outer area and move in to center.
Use the inner portal when the ring has passed the outer portal.
- When ring overlaps with Glyph of Relocation
After using the inner ring teleport.
Raid runs to diamond.
Tank with debuff runs to moon.
Use movement speed increase on raid.
Use defensives on raid.
Entire raid takes dmg and gets pulled to moon side.
Intermission 2
Second intermission starts when boss reaches 50% health.
Boss will be immune to dmg during this phase.
All players will get a stacking debuff called Genesis Supernova. This debuff does Cosmic dmg and increase dmg taken by this debuff by 5% for 8 sec.
Healers beware.
5 ads will spawn.
- 3 Spellslingers (casters)
Casts Dibilitating Ray that does every 1 sec and reduces movement speed by 50% for 8 sec. - 2 Xy Acolytes (melee)
Does frontal cone dmg (Massive Blast) on tank that does very high arcane dmg and a debuff that makes you take increased Massive Blast dmg by 30% for 30 sec.
When reaching 100 energy they are immune to cc and transforms doing deadly dmg to all players. - Interrupt the adds so all adds are clustered together.
- Focus kill the Acolytes and cleave dmg on the casters.
- Don´t stand in front of the acolytes due to the frontal cone dmg.
- Always interrupt the casters.
- You can use all kinds of crowd control on them.
Gunship will shoot on this phase as well.
Dodge the swirls on the ground.
Phase 3
The fight is the same as in phase 1 except for the Genesis Rings and the overlap with
Genesis Rings Phase 3
The rings can start from outer or inner on this phase.
The rings will also come back-to-back, meaning you will get 2 rings instead of 1.
When it is two rings, you can get them after each other starting from outer or inner side.
When it is two rings, you can get one starting from inner and the other one starting from outer.
The rings will occasionally overlap with the tank debuff – Glyph of Relocation.
- 2 inner rings overlapping with Glyph of Relocation
When one inner ring expands, and another inner ring expands AND overlaps with Glyph of Relocation
When first inner ring comes, take the outer portal so you enter the center.
Raid runs to diamond.
Tank with debuff ruins to outer teleport and position so that the teleport is between tank and raid.
Make sure raid has full health.
The tank debuff drags all players but raid will pass the teleport and dodge the next ring.
Tank follows.
- 1 inner and 1 outer ring overlapping with Glyph of Relocation
When one inner ring expands, and one outer ring enters AND overlaps with Glyph of Relocation
When inner ring comes, take the outer portal so you enter the center.
Raid stacks at cross.
Tank with debuff runs to star.
Make sure that the inner teleport is between the tank and the raid.
Use heavy defensives on raid for the tank explosion.
The tank debuff drags all players but raid will pass the teleport and dodge the next ring.
Tank follows.
Other posts
- World of Warcraft 12.0.7 Revelations Roadmap: Your Complete Content Release Schedule
- MRGM Caught Red-Handed Stealing WoW PTR Discoveries – The Predictable Pattern of Content Theft Continues
- The BEST Midnight Season 1 DPS Tier List Guide
- Midnight Pre-Patch Event Guide: Twilight Ascension Rewards, Rare Timers, and Collectibles
- Endeavor: A Deeper Dive Into WoW’s Expansive New System
- LOADS of Extra Decors You Did NOT Know About!
- World of Warcraft Players Score Exclusive Housing Decor with Diablo 4: Lord of Hatred Pre-Order
- Brawler´s Guild 2025 GUIDE
- Legion Remix Decor will be available after Legion Remix
- Professions Unpacked: Your Guide to Crafting Housing Decor with Reagents from Every Era


