Background
The infamous Imonar serves as the Legion´s bloodhound, capable of tracking prey across the cosmos. With a vast array of gadgets and traps at his disposal. Imonar has yet to lose a bounty… and he certainly doesn’t intend to sully his perfect record by failing to fulfil his latest contract.
Overview
This encounter platform has two circular platforms with a bridge between them.
The encounter has 3 phases with each phase will take place on a circular platform.
Phase 1
- In this phase you will fight boss on a small platform and dodge grenades and stay spread because of debuffs.
- The boss makes player fall asleep and the dispel makes players that are too close to fall asleep as well.
- Players must stand spread all the time. Melee will have a hell here but can be tackled in a good way if you are too many melee (see tact below).
Phase 2
- In this phase there are different abilities compared to phase 1. Players still need to be spread to tackle the abilities.
- Players will be blasted from a legion ship that does dmg over a big space of the platform and it is very important that targeted players by the ship must stand still and other players move away instead.
- Tanks takes a dmg over time debuff instead of dmg taken increased. The stack will be less before tank swap.
Phase 3
- In this phase you will have abilities from other phases but now, they are empowered instead.
- Main change on empowered is that the stacking debuff from taking damage from various abilities will not go away.
- The debuff will stay until the player dies.
Intermission
- Between phase 1-2 and 2-3, boss jumps to the other platform after each phase and players must run through the bridge to get there.
- Passing the bridge is the intermission, and this occurs 2 times.
- Players have to encounter many obstacles to pass the bridge and need to move as one and at the same time have some player(s) with immunity to remove some obstacles to clear the way as well.
- This must go pretty fast because players take damage over time that increases over time as well and then interrupt boss to enter next phase.
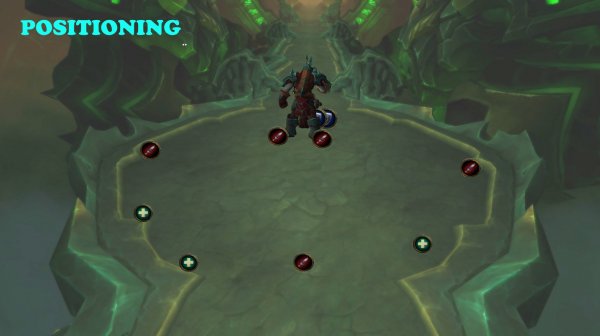
Positioning
During all phases
Tanks
Tank boss on top of the circular platform.
Melee
Behind boss, spread out from each other
Ranged
Max range
Spread out from each other
During Intermission phase
Move as one as much as possible.
Abilities and Tactics
PHASE 1 – ATTACK FORCE
- In this phase you will fight boss on a small platform and dodge grenades and stay spread because of debuffs.
- The boss makes player fall asleep and the dispel makes other players that are too close to fall asleep as well.
- Players must stand spread all the time. Melee will have a hell here but can be tackled in a good way if you are too many melee (see tact below).
Shock Lance
Boss does an extra hit ability that does very high physical damage.
The hit will also put a stacking debuff that last for 20 sec.
The debuff makes the player take 10% increased damage.
The hit will also do nature damage on another player.
Tactic: Shock Lance
Use a defensive cooldown (active mitigation) on every Shock Lance.
Tank swap at 4 stacks.
The extra hit that Shock Lance does hits a random raid member, nothing to do about it.
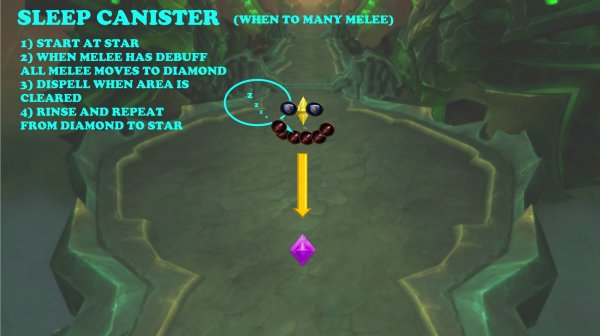
Sleep Cansiter
Boss targets a random player (melee targeted as well).
After some second, that player falls asleep for 20 seconds.
When this player is dispelled, the removal causes a gas explosion.
The gas explosion affects any player within 7 yards and players affected will fall asleep for 8 seconds (can be dispelled as well).
Tactic: Sleep Canister
Make sure that all players are spread out from each other, at least 7 yards.
If u see a player close to you asleep, make sure you are not close to that player.
This affects melee as well!
Extra tactic if you are too many melee (for some reason)
Have 2 markers on the circular platform, one on top and one on bottom.
Ranged spread out on the sides.
Tank boss on top marker first.
As soon as a melee is sleep, entire melee (tanks and dps) moves to the bottom marker.
Do not dispel the melee player until tank has moved boss to bottom maker and all melee followed.
When a melee is asleep again, you move to top marker again, and so on.
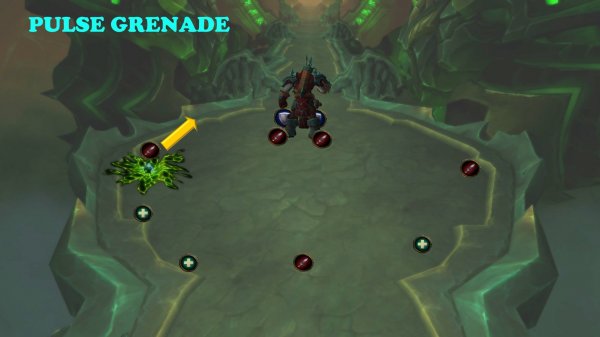
Pulse Grenade
Boss throws grenades next to random players.
Coming close to one will cause it to explode and do high nature damage.
The grenade explosion will also cause a knock back to any player within 3 yards.
Tactic: Pulse Grenade
Move away from the grenade and make sure that you are spread from other players.
All players need to make sure that you are spread from everyone else because players might come close to you when they have to move away from the grenade.
Infernal Rockets
If a player is not close to the fight, like if a player is on the wrong platform or a player is to slow to pass the bridge while entire raid has already done that, this will trigger Infernal Rockets.
Getting hit does intermediate fire damage and leaves a stacking debuff that increase 25% fire damage taken for 30 seconds.
PHASE 2 – CONTRACT TO KILL
- In this phase there are different abilities compared to phase 1. Players still need to be spread to tackle the abilities.
- Players will be blasted from a legion ship that does dmg over a big space of the platform and it is very important that the targeted players must stand still and other players move away instead.
- Tanks takes a dmg over time debuff instead of dmg taken increased. The stack will be less before tank swap.
Sever
Boss slashes the tank and cause very high physical damage.
This slash also puts a stacking debuff that does damage every 2 seconds for 18 seconds.
Tactics: Sever
Use a defensive cooldown (active mitigation) on every Sever.
Tank swap at 3 stacks.
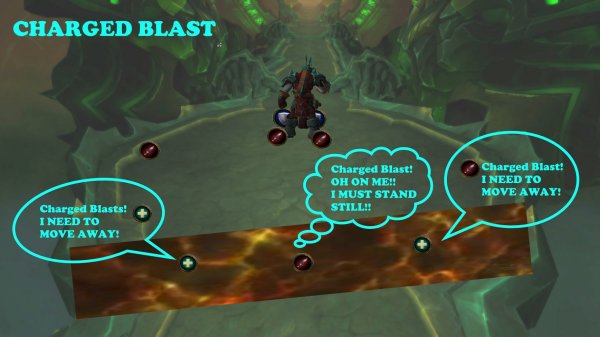
Charged Blasts
Legion ships targets 2 random players.
After 5.5 seconds, the ship shoots a fire line across the platform.
This does high fire damage to any player being hit by it.
It also puts a debuff that does damage every 3 sec for 18 seconds.
Tactics: Charged Blasts
A big line will be marked on the platform on the where the targeted players stands.
When the targeted player moves, the line move with the player.
If you are targeted by the ship, DO NOT MOVE.
Other players move from you.
This is something that will cause a wipe if players don´t sort this proper.
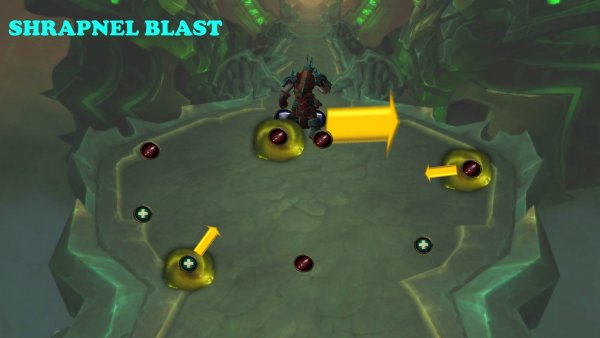
Shrapnel Blast
Boss targets you (a circle on the ground around player) and after a second, he throws a mine.
The mines will do intermediate dmg when standing close to one.
It will also do bleed debuff to anyone hit within 4 yards.
The bleed does physical damage every 2 seconds for 30 seconds.
Tactics: Shrapnel Blast
Stay spread all the time.
Move away fast as soon as a there is a circle on the ground under you.
Have players with good defensive abilities/immunities to step on the mines to remove them from the platform.
Infernal Rockets
If a player is not close to the fight, like if a player is on the wrong platform or a player is to slow to pass the bridge while entire raid has already done that, this will trigger Infernal Rockets.
Getting hit does intermediate fire damage and leaves a stacking debuff that increase 25% fire damage taken for 30 seconds.
PHASE 3 – THE PERFECT WEAPON
- In this phase you will have abilities from other phases but now, they are empowered instead.
- Main change on empowered is that the stacking debuff from taking damage from various abilities will not go away.
The debuff will stay until the player dies.
Empowered Shock Lance
Boss does an extra hit ability that does very high physical damage.
The hit will also put a stacking debuff that last until the player dies.
The debuff makes the player take 10% increased damage.
The hit will also do nature damage on another player.
Tactic: Empowered Shock Lance
The best is to have tanks with immunity abilities to remove the debuff.
Take as many stacks as you can handle (4 stacks approx) then use an immunity spell, tank swap and other tank does the same. When you don’t have any more immunities, tank boss until you die.
Paladin tanks are good here
A paladin can bubble himself and also BoP the other tank when needed.
Empowered Pulse Grenade
The grenade will be stuck on a player instead of next to the player for 30 seconds.
During these 30 seconds, it will do damage to any player within 5 yards and knocks them back.
This happens every 2 seconds (15 times).
Tactic: Empowered Pulse Grenade
All players need to make sure that you are spread from everyone else.
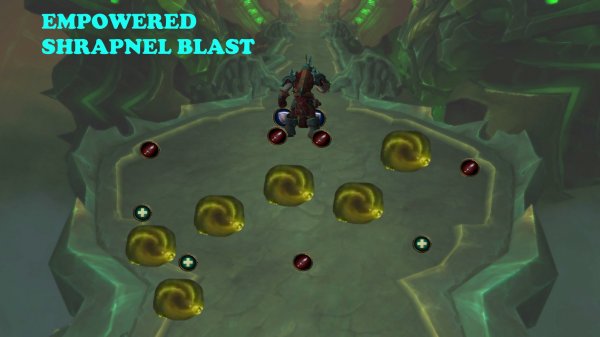
Empowered Shrapnel Blast
Several locations on the ground will be bombarded with fire balls.
Getting hit does very high damage and puts a debuff that does damage every 2 seconds until the player dies.
Tactic: Empowered Shrapnel Blast
Everyone stay spread.
Move fast as soon as you see the marked locations that will be bombarded.
Empowered Infernal Rockets
If a player is not close to the fight, like if a player is on the wrong platform or a player is to slow to pass the bridge while entire raid has already done that, this will trigger Infernal Rockets.
Getting hit does intermediate fire damage and leaves a stacking debuff that increase 25% fire damage taken and doesn’t disappear until player dies.
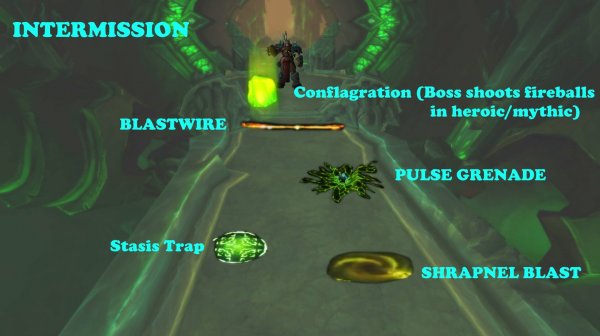
INTERMISSION
In this intermission, you need to run through the bridge to the other platform where boss is.
There are many obstacles on the bridge in which you must survive and enter the other platform with all players at the same time (more or less).
This intermission is what will cause most wipes in raids. If you can handle this, then the encounter will be much better. Having as many players alive as possible after first and second intermission will enable you to kill boss on third phase which is a dps race against time and you need all your players.
Interrupting boss (Conflagration) will end the intermission.
Have at least 5 in graphic settings, otherwise you will not see some of the obstacles.
Seared Skin
If players are standing on the burning edges of the bridge, they will suffer high fire damage ever 1 sec
This will also leave a stacking debuff that increase damage taken by 75% in heroic (50% in normal) for 1 min.
Stasis Trap
Stepping on one does high fire damage and stuns players within 3 yards for 8 seconds.
Pulse Grenade
Standing close to a grenade makes it explode.
Explosion does high Nature damage and a knockback to any player within 3 yards of the explosion.
ON HEROIC: Being hit also increase dmg taken from nature dmg.
Blastwire
Triggering a wire makes it explode.
The explosion does high fire damage to ALL PLAYERS.
Shrapnel Blast
Standing close to a mine makes it explode.
The explosion does moderate physical damage and leaving a debuff that does damage every 2 seconds for 30 seconds.
Conflagration
NORMAL MODE
Boss jumps to the other platform.
Drops traps from time to time and gathers power (Does fire damage to all players and increase dmg done by 3% for 20s, the effect grows the longer time it takes)
Interrupting boss enters next phase.
HEROIC MODE
Boss jumps to the other platform and shoots Fire balls towards your direction and gathers power (Does fire damage to all players and increase dmg done by 3% for 20s, the effect grows the longer time it takes). The fire balls move slowly.
Getting hit does high fire damage and reduce movement speed by 50% for 8 sec.
Interrupting boss enters next phase.
Tactic: Intermission
Move as one.
Use AoE heal/dmg reduction when you have to pass a Blastwire that is in the way.
Note: Blastwire seems to only be up on second intermission.
Have players with immunity (Paladin/hunters) to run over Stasis Traps/Pulse Grenades ahead of other players.
Warlock portal works perfect here.
When to Bloodlust/Timewarp/Heroism
Pop it on third phase because that phase is a dps race against time.
Other posts
- Best Consumables in WoW Midnight Patch 12.1: Flasks, Food, Runes & Potions
- Ultimate Guide to Farming Timewarped Badges in WoW Midnight (2026)
- Gearing ALTS EASIER in this UPDATE in 12.0.7
- World of Warcraft 12.0.7 Revelations Roadmap: Your Complete Content Release Schedule
- MRGM Caught Red-Handed Stealing WoW PTR Discoveries – The Predictable Pattern of Content Theft Continues
- The BEST Midnight Season 1 DPS Tier List Guide
- Midnight Pre-Patch Event Guide: Twilight Ascension Rewards, Rare Timers, and Collectibles
- Endeavor: A Deeper Dive Into WoW’s Expansive New System
- LOADS of Extra Decors You Did NOT Know About!
- World of Warcraft Players Score Exclusive Housing Decor with Diablo 4: Lord of Hatred Pre-Order


