OVERVIEW
(Fast Tactics)
- Boss puts a stacking debuff on players with its abilities.
Remove the stack when players are around 10 stacks.
Place a marker on the platform and ALL players stack up, then you trigger the boss to get under ground and jump up on your location. This clears the stacks.
Boss gets 10% increased stacking buff when this happens. - Tanks closest to boss, and stand next to each other.
- No players on or behind boss (HEROIC), only tanks.
- Ranged players stay spread (HEROIC).
- Boss turns to random location and does big frontal dmg. Stay closer to boss so it is easier to dodge it.
- Healers beware of heavy raid heals when raid has higher stacks of debuff.
- Healers beware of the 3 players furthest away from boss, they take more dmg and stacking debuff.
- Does swirls on the ground, mainly on melee players.
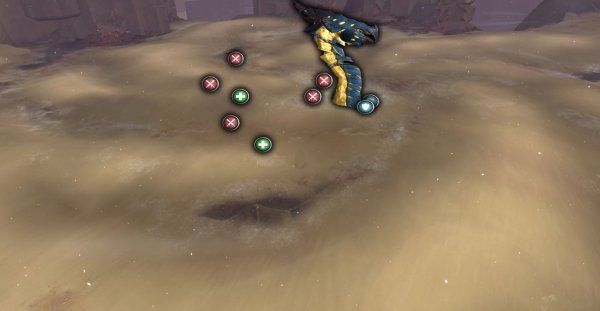
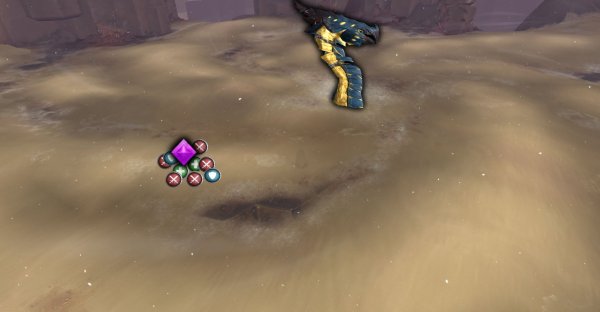
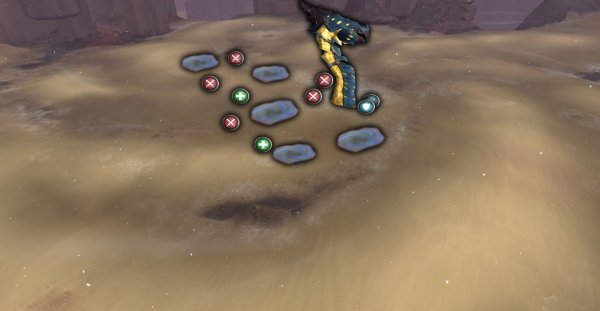
POSITIONING & MARKERS
- Place a marker on ranged distance from boss.
- Make sure there is a new marker to stack up on after each Ravening Burrow.
POSITIONING
- Tanks next to each other and closest to boss.
- Ranged stand little closer to boss.
- No players on or behind the tanks (HEROIC MODE).
- Ranged stand spread (HEROIC MODE).
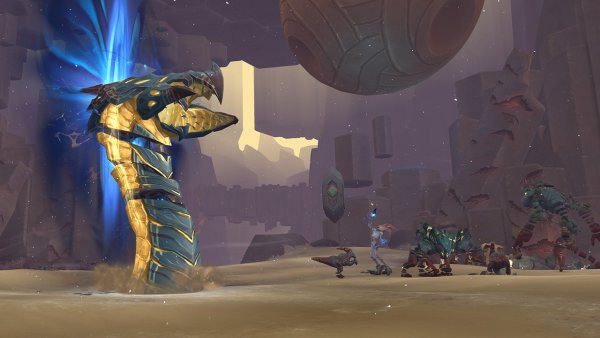
BOSS ABILITIES & TACTICS
Skolex
In this fight you will only fight the boss without any phases or intermissions.
Ephemera Dust
- This is a stacking debuff that players get when taking dmg from different boss abilities.
- The debuff does low Cosmic dmg every 1.5 sec, and stacks.
- The only way to clear this stacking debuff is to trigger the boss doing Ravening Burrow.
- Healers beware of heavier dmg when players have higher stacks of the debuff.
Riftmaw and Rend (Tanks)
- Boss will hit main tank with Rend 3 times in a row, periodically.
- Rend does very high physical dmg and leaves a debuff that does moderate dmg every 1.5 sec for 26 sec.
- When boss reaches 100 energy it does a combo of 3 attacks between Riftmaw and Rend. Boss will always do 2 Riftmaws in that combo.
- Riftmaw is a bigger slam on main tank that does high physical dmg and leaves a debuff that increase dmg taken by Riftmaw by 500% for 4 sec.
- HEROIC MODE
Rend and Riftmaw are frontal cone attacks.
Tanks will stand next to each other and closest to boss.
No other players stands on or behind the tanks.
Tactics: Riftmaw and Rend
- When Rend
If your tank can take 3 hits of Rend then it is fine.
Otherwise, tank swap after 2 Rends. - When 100 energies
Tank swap as soon as boss does the first Riftmaw in the 3 hit combo attack.
Wormhole Jaws (Tanks / Melee)
- Boss does physical melee dmg on the next closest player within 10 yards.
- If no second player are in range, it will hit main target twice.
Tactics: Wormhole Jaws (Tanks / Melee)
- Tanks stand closest to boss.
- Melee stands max melee range from boss.
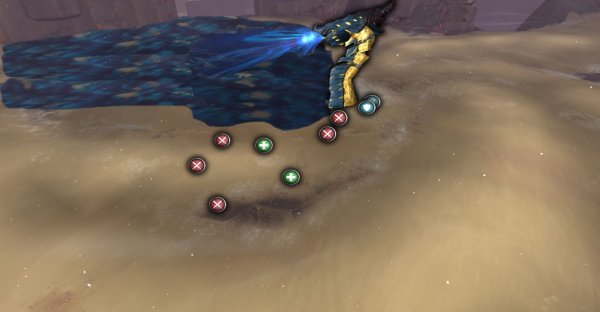
Ravening Burrow
- During the encounter you will get a stacking debuff (Ephemera) from different boss abilities.
- The only way to remove this debuff is to trigger the boss doing Ravening Burrow.
- When ALL players are stacked, the boss detects this and goes underground towards the players and jumps up.
- This does high physical damage and a knockback and boss consume all debuffs from all players.
- If no players are on the location where boss jumps up it does a shockwave with high dmg and 10 stacks of the Ephemera Dust debuff.
- Every time boss does Burrow, it leaves a rift on that location that does deadly dmg to any player within 20 yards of it.
- Every time boss does Burrow, it gets 10% extra dmg done.
Tactics: Ravening Burrow
- You must balance clearing the raid stacks and not giving boss to many stacks of 10% increased dmg.
- Place a marker on range distance from boss.
- The general starting point
When raid is around 8-10 stacks of Ephemera debuff, ALL players stack up on that marker. - If the boss does to much dmg, then go for higher stacks before stacking up.
- Always place a new marker where it fits during the fight for the raid to stack up.
- Healers beware of heavier dmg when players have higher stacks of the debuff.
Retch
- Boss turns to a random player location and shoots a big frontal cone damage.
- Getting hit does high shadow dmg and leaves a debuff that does moderate dmg every 1.5 sec for 12 sec.
- Getting hit will also make the player teleport twice.
Tactics: Retch
- This must be dodged.
- Stand closer to boss so it is easier to move away.
- Use class abilities to move away fast.
- Healers beware if a player is hit.
Devouring Blood
- Blood from boss lands on the platform. Swirls on ground shows the impact location.
- Getting hit does high Shadow damage and leaves a debuff that does shadow damage every 1.5 sec and reduces haste by 20% for 18 sec.
Tactics: Devouring Blood
- The swirls of impact are easy to spot.
- Dodge the swirls.
Dust Blast
- Boss does moderate dmg to 3 players further away.
- This adds the debuff Ephemera Dust.
- HEROIC MODE
Players close to targeted players (10 yards) will also get hit.
Tactics: Dust Blast
- HEROIC MODE
Ranged Stay spread.
Destroy
- If no player is in melee range of boss, it will do deadly dmg to a single player.
Tactics: Destroy
- Tanks be on your toes and make sure you are at boss when ever it is out.
Dust Flail
- Boss does moderate dmg to all players that adds the debuff Ephemera Dust.
Other posts
- World of Warcraft 12.0.7 Revelations Roadmap: Your Complete Content Release Schedule
- MRGM Caught Red-Handed Stealing WoW PTR Discoveries – The Predictable Pattern of Content Theft Continues
- The BEST Midnight Season 1 DPS Tier List Guide
- Midnight Pre-Patch Event Guide: Twilight Ascension Rewards, Rare Timers, and Collectibles
- Endeavor: A Deeper Dive Into WoW’s Expansive New System
- LOADS of Extra Decors You Did NOT Know About!
- World of Warcraft Players Score Exclusive Housing Decor with Diablo 4: Lord of Hatred Pre-Order
- Brawler´s Guild 2025 GUIDE
- Legion Remix Decor will be available after Legion Remix
- Professions Unpacked: Your Guide to Crafting Housing Decor with Reagents from Every Era


