In this fight, your raid will use specific anima powers to defeat the boss.
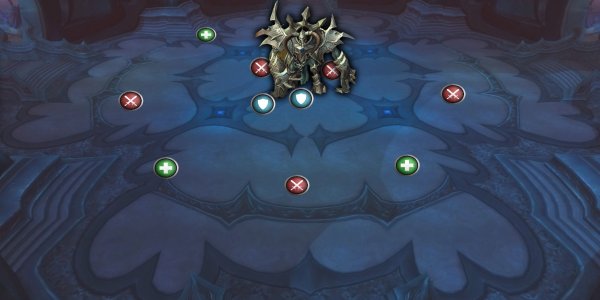
When entering the raid, you will se a Torghast looking environment with patrolling adds, 4 Goliath adds spread out in different locations, and urns to break like in Torghast and also souls to free.
In the center, there is a platform where the boss is located.
The boss spawns in a room in the center when all adds are dead.
Overview – Fast Tactics
- Your raid will use specific anima powers to defeat the boss.
- Each player will have a maximum of 4 powers.
- Some powers are good for handling boss abilities and some are good for dmg/defense/healing.
- Based on your raid setup, you might need anima powers for handling boss abilities.
- Stand spread around the boss.
- Tanks will tank swap at each slam, called overpower.
- When boss does Chain (an arrow on your head), make sure that player stand behind a player that can soak the chain the boss throws with an immunity or anima power against getting stunned.
- When Redators Howl (a purple circle around you), make sure you are spread from other players. Any player inside your circle gets feared for several seconds and can fear others.
- When hungering mist, the platform becomes dark. Find the light and run and stand on it before the explosion. This happens 3 times. Use movement abilities (druids roar and shamans wind rush). There are anima powers that helps here (Satchel of the Hunt / Oddly Intangible Key / Negation Well)
- When grasp of death a targeted player takes heavy dmg. Interrupt it and Healers beware. There is an anima power to help here (Erratic Howler)
- Boss will periodically cast enrage on him to increase haste and dmg and this stacks. Druids use soothe or hunters use Tranquility to remove it. There is an anima power to help here (Disembodied Mystic Hands).
- When boss reaches 10% health all anima powers are removed and boss starting to hunt players down. Run away from boss (kite) as much as possible and kill it before it kills everyone in the raid.
- Heroic Mode – Boss spawns 1 out of 3 remnants (a circle on the ground with smaller orbs around it). They must be soaked. You get a stacking debuff when soaking. 5 stacks in total before it is removed, and different players can take some stacks each.
- Soaking physical makes you take more physical dmg for 1.5 min.
- Soaking magical makes you take more magical dmg for 1.5 min.
- Soaking fire does fire dmg periodically for 1.5 min. - Bloodlust / Timewarp / Heroism at 10% health.
Anima Powers
First, we going to talk about the anima powers.
You can have a maximum of 4 anima powers.
You get the anima powers by killing a Goliath add and there are 4 of them in total. They drop a big orb and clicking on it will make it drop a small one for you.
You always get 3 anima powers to choose from every time you click on an anima orb.
These anima powers have stuff that does dmg, gives stats etc, things that you have seen in Torghast. But some of these powers are very useful for your raid that some players will choose because they will help a lot with the boss mechanics.
The anima powers are not spec/class specific, instead they are powers that no matter what class or spec you are, you can use it.
If you want to change your anima powers, you can actually do that. There are siphons on each of the 4 entrance to the boss room. You can choose to remove all your anima powers and but then you must run back and click on the 4 big orbs again to get the small anima orb again. It will always be random powers that comes up.
Hopefully, blizzard will change this and make so that you change anima power at the siphon, instead of running back to where the goliath was killed and click on the orb there. Otherwise, you will probably have players running front and back to get certain anima powers needed especially for the boss abilities. Also, all this will be logged and theorycrafted on what the best anima power is and players will reset their anima and run front and back between orbs and the siphon until they are satisfied.
You will find all anima powers in the end and also which ones that your raid should pick due to handling boss abilities.
Positioning
Boss tanked in center.
Ranged spread around boss.
Melee spread around boss.
Abilities and Tactics
Boss has:
- 7 abilities in Raid Finder
- 8 abilities in Normal Mode (The Jailer´s Gaze added)
- 9 abilities in Heroic Mode (The Jailer´s Gaze and Remnant of Forgotten Torments added)
- We don’t know what is added on mythic mode yet.
Overpower (Tanks)
- Boss slams main tank that does very high Physical dmg and a 4 sec stun.
- You get a debuff- Crushed Armor.
- This debuff makes dmg taken by 200% for 20 sec.
Tactics: Overpower (Tanks)
- Tank swap at every slam.
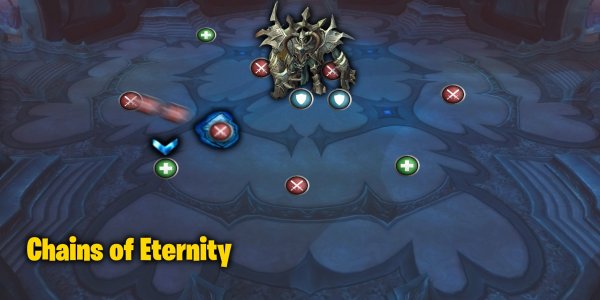
Chains of Eternity
- Boss targets a random player (an arrow on your head)
- After 8 seconds the boss throws a chain on the targeted player.
- Anyone in the way gets stun heavy dmg plus pulled into boss and takes deadly dmg.
Tactics: Chains of Eternity
The tactic is to stop the stun, so you don’t get pulled into boss.
This can be fixed in 2 ways:
- Player with the anima power Ever-Beating Heart (immune to stuns and fear) stands in front of targeted player and soaks.
Have a marker on the player with that anima power so targeted player knows where to run behind. - Players with immunities (ice block, Blessing of Protection, cloak etc.) can stand in front and soak the hit.
Predators Howl
- Boss puts a debuff on several players (A purple circle around each player)
- If any player gets inside the circle (within 5 yards) they get feared for 8 sec.
Tactics Predators Howl
- Make sure you are spread from each other all the time, with one exception:
- If you have the Ever-Beating Heart (immune to stuns and fear) Anima power, then you can stack on other players that has it.
This together with the anima power Huddled Carvings (damage and healing done is increased by 30% while within 5 yds of at least 2 other players) is a perfect combination. - This can also be dispelled.

Hungering Mist
- The entire platform is dark except for a small part of the platform.
- This small part changes position 3 times.
- If a player does not stand in the lighter part before boss images do a blast, they will take deadly dmg.
Tactics: Hungering Mist
- The lighter part where entire raid must stand inside changes position 3 times and it goes relatively fast when it changes and to move to the next position before images blows the darker area.
- Use speed movement abilities when changing to the next position.
- Druid roar and shaman wind rush are amazing during this for fast movement speed.
- There are some anima powers that can help players that are slow:
- Satchel of the Hunt (You grant all allies within 20 yards an additional 30% movement speed)
- Oddly Intangible Key (You take 90% less damage from area of effect attacks.=
- Negation Well (Greatly increase the power of your jumps. Your movement speed is also increased by 20%.)

Grasp of Death
A random player gets a debuff by the Jailer’s Grasp.
This debuff does high dmg every 2 sec for 40 seconds.
Tactics: Grasp of Death
- To remove this, it has to interrupted.
- Was hard to understand what it actually is that we must interrupt, but there is an anima power called Erratic Howler that does shadow dmg and interrupts (within 20 yards) in random intervals that seemed to work.
- Healers beware and top that player up.
- Targeted player uses defensives to survive it.
Fury of the Ages
Boss will periodically put a stacking enrage buff on him.
This does dmg and haste increased by 25%
Tactics: Fury of the Ages
- Druids (soothe) and hunters (Tranquilizing Shot ) can remove this enrage on the boss.
- There is also an anima power that can remove it as well and add it on yourself instead.
- Disembodied Mystic Hands
Your attacks have a chance to steal a beneficial Magic or Enrage effect from your target, applying it to yourself.
Normal (and harder) mode - extra boss ability
The Jailers Gaze
- When boss reaches 10% health it does a 6 sec cast called The Jailer´s Gaze.
- During this cast you cannot move. After the 6 sec you get a knock back.
- Boss will remove all your anima powers.
- Boss will chase you down one by one and one hit kill you when he reaches you.
- It´s a race against time.
Tactics: The Jailers Gaze
- Blood lust / Time Warp / Heroism after the knockback.
- Use movement ability when boss targets you and run away as long as possible until you die.
- Kill boss before entire raid is dead.
Heroic (and harder) mode – extra boss ability
Remnant of Forgotten Torments
There 3 types of memories that the boss will activate.
The look of a memory is a circle on the platform with a bigger orb above it and 5 smaller orbs around it.
The Torment must be soaked.
When soaking you get a stacking debuff based on the torment.
After 5 debuffs, the torment is gone.
- Upper Reach might
The color of the big orb is gray with a weapon inside it.
When this is up, it does 50% increased physical dmg on raid.
Soaking a debuff does 10% increased physical dmg for 1.5 min on the player soaking it and stacks up to 5 times before its gone. - Mortregar echoes
The bigger orb is black.
When this is up, it does 50% increased magical dmg on raid.
Soaking a debuff does 10% increased magical dmg for 1.5 min on the player soaking it and stacks up to 5 times before its gone. - Soulforge heat
The color of the big orb is a fire orb
When this is up, it does moderate fire dmg periodically to all players.
Soaking a debuff does low fire dmg every 5 sec for 1.5 min and stacks up to 5 times before its gone.

The layout of this will probably change in later builds before live because it was hard to distinguish the physical and magical torment.
Tactics: Remnant of Forgotten Torments
A torment must be soaked until all orbs are gone and that equals 5 stacks of that debuff that you soak.
The increased dmg you take when soaking is either Physical or Magical. Therefore, plan what player should do the soaking of each.
Tanks can soak the magical dmg since the boss dmg on tanks is physical dmg.
Players with good defensives or immunities should do the soaking of the increased physical dmg and the fire debuff.
Different players can also soak and take some stacks each.
There are also anima powers that can help here with the soaking:
- Ephemeral Effigy
You take 25% less Physical damage and suffer 15% more Magic damage. Taking Physical damage has a chance to increase your movement speed by 25% for 6 sec. - Resonating Effigy
You take 25% less Magic damage and suffer 15% more Physical damage. Taking Magic damage has a chance to increase your movement speed by 25% for 6 sec. - The Stone Ward
Shields you for 20% of your maximum health. This absorb refreshes every 30 sec.
Different Anima Powers that you can get
The Anima powers you should have in the Raid
Satchel of the Hunt
You grant all allies within 20 yards an additional 30% movement speed.
This is good, when you don’t have druids to speed boost you. During the fight, you have to run away from darkness 3 times and stack in a small area. Slow players will have difficulties to run to each area in time before the darkness does heavy dmg.
Disembodied Mystic Hands
Your attacks have a chance to steal a beneficial Magic or Enrage effect from your target, applying it to yourself.
This could be useful because the boss enrages several times during the fight and should in general be removed by a hunter or a druid ability.
Ephemeral Effigy
You take 25% less Physical damage and suffer 15% more Magic damage. Taking Physical damage has a chance to increase your movement speed by 25% for 6 sec.
A good choice for the player that has to soak the physical dmg remnant.
Erratic Howler
While in combat, release an uncontrolled howl at random intervals. This howl inflicts Shadow damage to enemies within 20 yds and interrupts spells.
It seems that this is the only thing that interrupts the boss ability to do “Grasp of Death” that does heavy dmg on target player during the fight. This is a MUST HAVE on at least one player in the raid. Since it does dmg as well, I would say that several players should pick this one. Then you will do more dmg on boss and at the same time higher chances on interrupting the Grasp of Death boss ability.
Ever-Beating Heart
You become immune to Fear and Stun effects.
Boss targets several players with a circle under them. Anyone in the circle will fear and this is a pain if you are several melee players. If you are melee heavy raid, then every melee should pick this to hinder getting feared.
Huddled Carvings
Your damage and healing done is increased by 30% while within 5 yds of at least 2 other players.
This together with “Ever-Beating Heart” that stops yo from getting feared is a perfect combo. 3 Melee (even tanks) can stack up all the time and much more dmg and at the same time not getting feared. Even works with ranged.
The Stone Ward
Shields you for 20% of your maximum health. This absorb refreshes every 30 sec.
Good for Remnant soakers.
Also good for the player that stands in front of the chain. This is a good combo with Ever-Beating Heart.
Oddly Intangible Key
You take 90% less damage from area of effect attacks.
Good choice for players that have difficulties to run away from darkness in time.
Negation Well
Greatly increase the power of your jumps. Your movement speed is also increased by 20%.
Good choice for players that have difficulties to run away from darkness in time.
Resonating Effigy
You take 25% less Magic damage and suffer 15% more Physical damage. Taking Magic damage has a chance to increase your movement speed by 25% for 6 sec.
Good choice for player that soaks the magical Remnant pool.
Anima powers that boost your dmg and stats
Lumbering Form
While in combat, your size is increased by 100% and you automatically knock back ALL players and enemies that come within 2 yds of yourself.
This is a trolling ability. There are times where your raid must stack in a small area. Having this might kick players out of the area so they take dmg instead.
Tremorbeast Heart
Primary stat increased by 15%, and regenerate health every 5 sec.
Obleron Talisman
Mastery increased by 12%.
Obleron Spikes
Critical strike increase by 12%
Stoneflesh Figurine
When below 40% maximum health, you reduce all damage taken by 40% and your own movement speed by 40%.
Potent Acid Gland
Your attacks have a chance to launch a glob of acid, inflicting Nature damage and increasing damage you inflict on that target by 25%
Blade of the Lifetaker
Your attacks have a high chance to steal health from the enemy equal to 10% of your maximum health.
Elethium Diffuser
Inflicts Shadow damage equal to 50% of all the damage you receive, split amongst enemies within 10 yds, but you are no longer able to step backwards.
Elethium Weights
Your Strength, Agility, Stamina, and Intellect are increased by 30%, but you are no longer able to jump.
Heart-Seeking Fang
While in combat, leech 3 health from a random enemy within 15 yds every 2 sec. This damage and healing is doubled if the target is suffering from a Bleed effect.
Leeching Strikes
Increases the caster's leech by 100% for 20 sec.
Obleron Endurance
Maximum health increased by 45%.
Obleron Ephemera
Versatility increased by 12%.
Obleron Winds
Haste increased by 12%.
Obleron Venom
Critical damage and healing increased by 18%.
Overgrowth Seedling
Increases your armor by 100% and reduces the power cost of most abilities by 30%.
Overwhelming Power
Increases the movement speed of the caster by 100% for 15 sec.
Pulsing Rot-hive
Your attacks have a chance to attach decayfly larvae in the target, inflicting 9 Nature damage every 1 sec for 6 sec. When this effect expires, the larvae hatch from within the target to fight for you.
Soulward Clasp
Your abilities have a chance to create a zone of soul empowerment nearby. Any player may collect this to gain 25% damage and healing done and 25% movement speed for 10 sec.
Spectral Oats
While running, you take 10% less damage and inflict 10% more damage, as well as heal for 5% of your maximum health every 1 sec.
Spiked Skin
Attackers take damage each time they attack you for 20 sec.
Ten of Towers
Increases damage done by 10% and reduces damage taken by 10%. Upon death, detonate and stun ALL players and enemies within 10 yds for 10 sec.
Twisted Samophlange
While in combat, you periodically steal power from a nearby ally within 5 yds. Their damage and healing done is reduced by 25% and yours is increased by 50%.
V'lara's Cape of Subterfuge
Your attacks have a chance to cause you to fade away, reducing your threat for 6 sec. While you are under this effect, your critical strike chance is increased by 50%.
Other posts
- Best Consumables in WoW Midnight Patch 12.1: Flasks, Food, Runes & Potions
- Ultimate Guide to Farming Timewarped Badges in WoW Midnight (2026)
- Gearing ALTS EASIER in this UPDATE in 12.0.7
- World of Warcraft 12.0.7 Revelations Roadmap: Your Complete Content Release Schedule
- MRGM Caught Red-Handed Stealing WoW PTR Discoveries – The Predictable Pattern of Content Theft Continues
- The BEST Midnight Season 1 DPS Tier List Guide
- Midnight Pre-Patch Event Guide: Twilight Ascension Rewards, Rare Timers, and Collectibles
- Endeavor: A Deeper Dive Into WoW’s Expansive New System
- LOADS of Extra Decors You Did NOT Know About!
- World of Warcraft Players Score Exclusive Housing Decor with Diablo 4: Lord of Hatred Pre-Order


