Background
Intended to herald the Jailer´s reign on Azeroth, the first Lich King. Ner´zhul proved unworthy in his master´s eyers. The last remnants of the fallen orc´s twisted soul were encased in spiked Shadowsteel, condemned to everlasting torment for his failure. All who cross his path will share in his suffering.
Overview
- You will fight only the boss in a single phase.
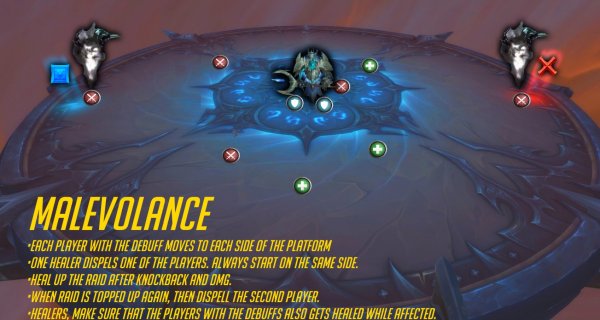
- Have two markers on each side of the platform opposite from each other. Each player with the Malevolence debuff moves to each marker. Dispell one of them first. If does knockback on all players. Heal up the raid then dispell the second player which also does knockback on all players. Players with the debuffs, make sure you face the center when you get dispelled and face away from platform when the other player gets dispelled. In this way, you don’t get knocked off the platform.
On Heroic, the dispell leaves pools, don’t touch them. Place next debuff next to the previous pool.
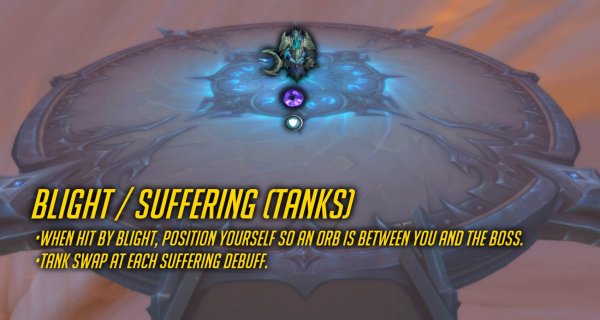
Healers beware. - When an orb spawns that takes 95% reduced dmg and does dmg to entire raid. Tank position yourself so the orb is between you and the boss. When boss reaches 100 energy it shoots you and that will also hit the orb. When done, nuke the orb. When destroyed, a player must pick it up and run to the edge to throw it out. Healers beware.
- For the rest of the fight, dodge swirls and lines on the platform.
- Tank swap each Suffering.
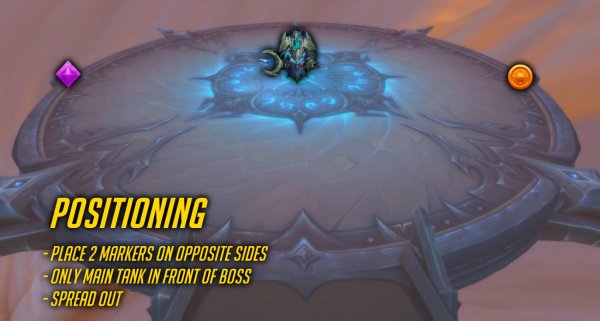
Positioning
Have two markers on opposite sides.
Ranged
Spread around the platform.
Melee
Behind boss
Tanks
Main tank in front of boss
Off tank behind boss.
Abilities and Tactics
Orb of Torment and Suffering
-
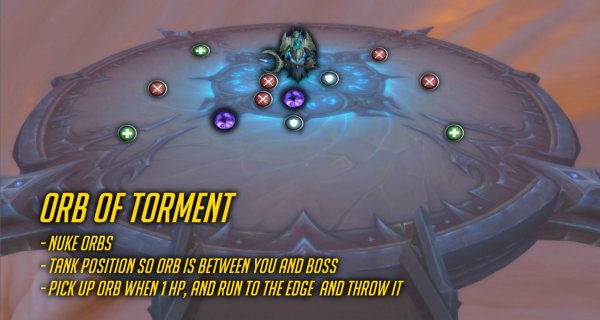
Orb of Torment
- Boss spawns a big orb periodically.
- This orb is charged from start. When it is takes 99% reduced dmg.
This can only be removed from the boss ability “Suffering”. - This orb also puts debuffs on several players that does moderate shadow dmg every 3 sec for 15 sec.
- When the orb is destroyed it becomes smaller and can be carried and thrown out of the platform. When carried it does shadow dmg every 3 sec and reduce movement speed by 30%.
Suffering (Tanks)
When boss reaches 100 energy, he shoots in a straight line the main tank with high Shadow dmg.
This also hits anyone between the boss and the tank.
The hit leaves a debuff that increase dmg taken from Suffering by 500% for 30 sec.
If this straight line shot hits and orb it deactivates it so players can destroy it and throw it out.
Tactics: Orb of Torment and Suffering
- When an orb spawns, main tank must move and position behind the orb, so the orb is between the boss and the tank. Remember that boss shoots when he reaches 100 energy.
- When orb is broken, prio dps it down.
- When destroyed, have a class that can move fast to the edge after picking it up, for example a demon hunter.
- Once you are close to the edge with an orb, an extra action button pops up and you throw the orb out of the platform when you click on it.
- Raid, make sure not to stand between boss and main tank, because you risk getting hit by the Suffering.
- Healers beware of raid heal when orb is up, and then heal the player that picked up the orb.
- Boss will spawn more orbs before reaching 100 energy, so healers beware of stacking debuff dmg on players.
Malevolence
- Boss puts debuffs on 2 players that lasts for 21 sec.
- When debuff expires or removed it does a knockback on all players from the players location (the players that had the debuff) and does moderate shadow dmg.
- The debuff also does dmg to the player (doesn’t state that in the journal).
- HEROIC MODE (Lingering Malevolence)
On Heroic mode, this debuff also leaves a pool on the ground when it expires or removed. The pool does high Shadow dmg every second a player stands on it.
Tactics: Malevolence
- Each player with the debuff moves to each side of the platform opposite from each other. Have two markers.
- One healer dispels one of the players. Always start on the same side. For example, always dispell right side first so the raid is ready on which side the knockback will come from.
- Heal up the raid after knockback and dmg.
- When raid is topped up again, then dispell the second player.
- Healers, make sure that the players with the debuffs also gets healed while affected.
- Players with the debuffs, make sure you face the center when you get dispelled and face away from platform when the other player gets dispelled. In this way, you do not get knocked off the platform.
- HEROIC MODE
Debuffed players just stand on each side still but move clockwise and stand next to the previous pool.
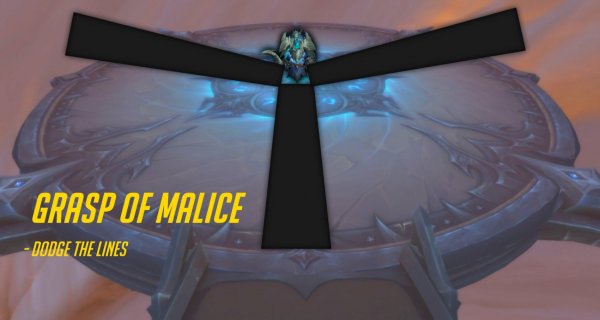
Grasp of Malice
- Boss summons 3 lines on the platform all metting in the center.
- When the lines explode they do very high Shadow dmg and a knock back to players on the lines.
Tactics: Grasp of Malice
- Dodge the lines
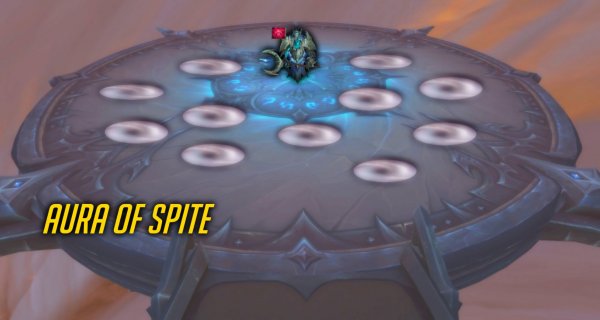
Aura of Spite
- Boss puts an aura on himself that does low dmg every 3 sec to all players.
- Also several swirls on the platform.
- After 2 sec, shadow missiles hit those locations.
- At 80%, 60% and 30% health, a piece of boss armor shatters.
- Based on armor piece shattered, we get more swirls (more missiles) and more often on the platform.
- Getting hit does moderate Shadow dmg and a 3 sec silence.
Tactics: Aura of Spite
- You must dodge the swirls.
- Always have your eyes on the swirls, because sometimes you have to dodge them by running to a swirl that spawned some sec later than the first one and then move out of the last swirl before impact.
Shatter
Periodical moderate / high shadow dmg to entire raid.
Tactics: Shatter
Healers beware.
Other posts
- World of Warcraft 12.0.7 Revelations Roadmap: Your Complete Content Release Schedule
- MRGM Caught Red-Handed Stealing WoW PTR Discoveries – The Predictable Pattern of Content Theft Continues
- The BEST Midnight Season 1 DPS Tier List Guide
- Midnight Pre-Patch Event Guide: Twilight Ascension Rewards, Rare Timers, and Collectibles
- Endeavor: A Deeper Dive Into WoW’s Expansive New System
- LOADS of Extra Decors You Did NOT Know About!
- World of Warcraft Players Score Exclusive Housing Decor with Diablo 4: Lord of Hatred Pre-Order
- Brawler´s Guild 2025 GUIDE
- Legion Remix Decor will be available after Legion Remix
- Professions Unpacked: Your Guide to Crafting Housing Decor with Reagents from Every Era


