Background
The dreadlord Tichondrius, once leader of the nathrezim, was slain by the newly awakened power of none other than Illidan Stormrage. Reconstituted in the Twisting Nether, Tichondrius returns to watch over Gul’dan on behalf of the Legion, ensuring that the orc warlock does not once again fail his masters
Overview
This fight has 2 phases but when entering the first phase the 2nd and 3rd time, there will be adds included as well.
The encounter will look like this
Phase 1: You will only fight boss (he summons blobs as well)
Phase 2: You will fight bats only, and gain an essence from them that increase dmg and healing.
Phase 1 + one type of adds: Exactly like phase 1 but with Spellguard adds.
Phase 2: You will fight bats only, and gain an essence from them that increase dmg and healing.
Phase 1 + two types of adds: Exactly like phase 1 but with Spellguards and a Watcher add.
Each phase 1 lasts for 1 min and 30 sec.
Phase 2 lasts for 30 sec only.
The most important part in this encounter is the positioning. If you stand where you are supposed to during the encounter, this fight is easy. If anyone in the raid screws up with positioning, it may wipe the raid.
Boss has 5 abilities in phase 1 in which 4 of them are divided in 2 since they are associated with each other. So basically, it´s like the boss has 3 abilities. Carrion Plague and Seeker Swarm are associated. Feast of Blood and Vampiric Aura are associated.
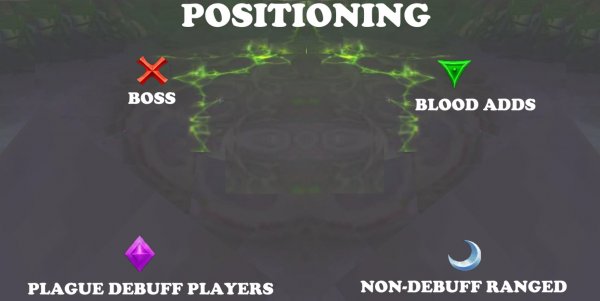
Positioning
There are 5 main things that happens in this encounter, which lead us to having 5 positions.
Top left side (cross): Tank boss there
Top right side (Triangle): Kill the adds there
Bottom left side (diamond): Carrion Plague debuff players move there.
Bottom right side (moon): NON-debuff ranged stands there.
Everyone soft spread from each other.
Abilities and tactics
PHASE 1 – LORD OF THE NATHREZIM
In this phase, you will fight the boss and some blobs that he summons.
Boss has 5 abilities
- Carrion Plague
- Seeker Swarm
- Vampiric Aura
- Feast of Blood
- Echoes of the Void
Carrion Plague and Seeker Swarm
Boss puts a debuff on several random players.
This does shadow damage every second for 40 seconds.
Some seconds later: Boss will target the same players that got the first debuff (Carrion Plague).
Boss shoots a wave of shadow damage on those players and any other player between boss and targeted players.
All players hit by the shadow wave will get Carrion Plague again.
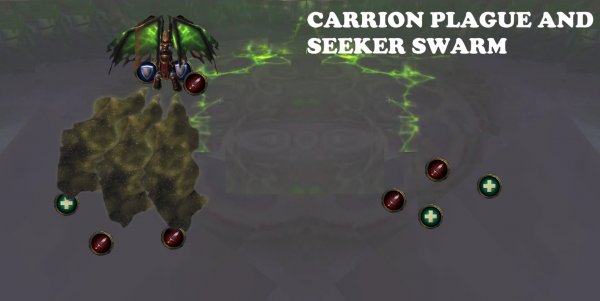
Tactics: Carrion Plague and Seeker Swarm
Raid
Targeted players with Carrion Plague debuff runs to bottom left side of the room (diamond marker) and spread.
NON-targeted players will stand on the bottom right side of the room (moon marker)
Melee
Make sure that you are not standing between boss and diamond marker!
Healers
Beware of Heavy raid damage for a long time
Tanks are not affected by the debuff.
Feast of Blood and Vampiric Aura
Boss marks the tank that is tanking boss.
Puts a debuff (Feast of Blood) that increase their Physical damage taken by 15%.
This will also summon 3 adds called Tainted Bloods that fixates the tank with the debuff.
The adds get 300% benefit from Vampiric Aura as well.
Vampiric Aura is a buff that the boss has
Adds that are 30 yards within the boss will be healed for 700% of the melee damage the adds to on players.
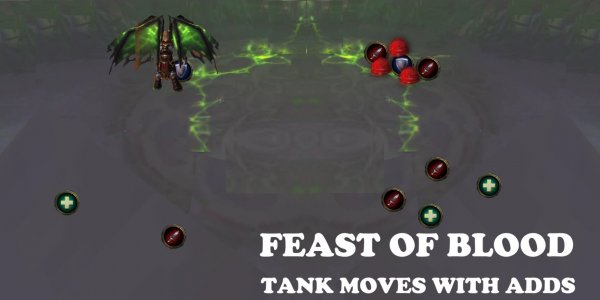
Tactics: Feast of Blood and Vampiric Aura
Tanks
Tank boss on left right side (Cross)
Move to top right side when you have Feast of Blood debuff (Triangle).
DPS
All dps AoE nuke the Tainted blood adds fast when a tank has the debuff (when blobs adds spawn).
Echoes of the Void
Boss makes 4 pillars(Fel Spires) rise up from the ground.
Boss shoots out shadow damage every 0.5 sec for 8 sec which also increase with each tick.
Tactic: Echoes of the Void
Run fast behind a pillar so the pillar is between you and boss.
There are 4 pillars (Fel Spires) located near the four markers:
Cross: Boss position
Triangle: Blood blobs position
Diamond: Debuff players
Moon: Non-debuff players
Move to the pillar that is closest to you.
In this way, players should be equally spread out on the pillars.
Beware that pillars do knockback if you stand above one when it comes out.

PHASE 2: SHADOW OF TERROR
This phase lasts for 30 seconds.
In this phase, boss turns into bats and puts you in an illusion phase.
Two things happen in this phase
- Carrion Nightmare
Boss shoots a big line of shadow damage across the room.
If a player is hit by it, it does deadly damage. - Phantasmal Bloodfang
Bat adds called Phantasmal Bloodfang, spawns and attacks.
More and more spawns faster and faster.
When a bat dies, an essence is created (Essence of Night)
When a player steps on the Essence, this Essence increase all damage and healing by 30% to that players during phase 2 and also 30 seconds into the phase after.
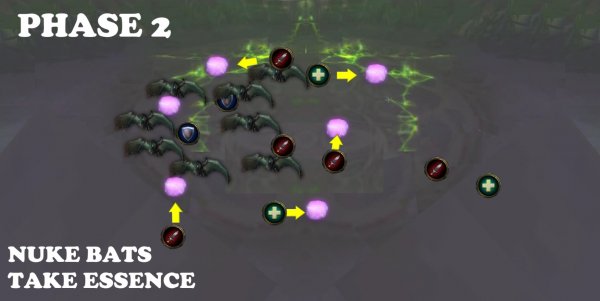
TACTIC: PHASE 2
Tanks and Dps
Nuke the bats
Raid
Dodge the Shadow lines (Carrion Nigthmare).
Each player MUST run on an essence to gain the dps/healing buff.

PHASE 1 WITH SPELLGUARDS
After phase 2 has occurred the 1st time, phase 1 will start again with spellguard adds.
Everything that happens in phase 1 will still happen.
The extra thing coming in this phase are special adds called Felsworn Spellguard.
2 adds per wave, will spawn from the two doors in the back.
Felsworn Spellguard
This add has 2 abilities
Rapid Pursuit
Movement speed increased by 15% for the rest of the fight and stacks as well.
This speed buff occurs every 6 seconds.
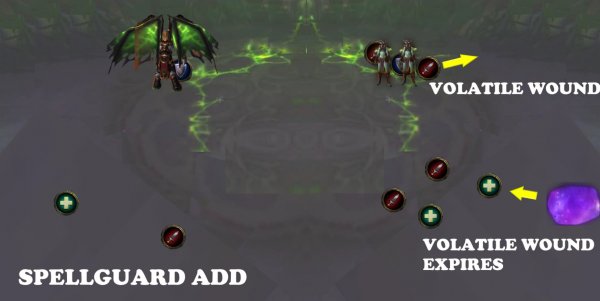
Volatile Wound
Does Arcane damage and a stacking debuff that increase damage taken by 5% for 8 sec.
When the debuff expires, a Nether Zone is created.
The Nether Zone does high Arcane damage every second to players within the nether zone area.
Tactic: Felsworn Spellguard
Tanks
The tank that is not tanking boss needs to tank the adds.
Tank the adds on diamond
Use defensive cooldowns.
Dps
Focus nuke one add at a time (mark add with skull).
Raid
If you get the Volatile Wound, move to the edge of the room (you have 8 sec) and wait until the debuff expires.
Move away from the cloud that is created under you and move back to position.
PHASE 1 WITH WATCHER AND SPELLGUARDS
After phase 2 has occurred the 2nd time, phase 1 will start again with Legion adds.
Everything that happens in phase 1 will still happen.
The extra thing coming in this phase are 2 special adds called Sightless Watcher together with Felsworn Spellguards.
Felsworn Spellguards
Have the same ability as before (see above).
Sightless Watcher
This add has 1 ability (in normal)
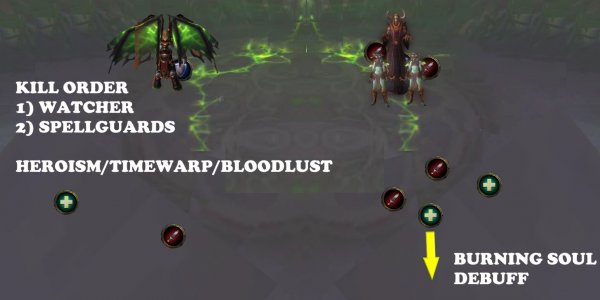
Burning Soul
The add targets a random healer every 6 seconds and puts a debuff that does damage every second and drains mana every second for 30 seconds.
Dispelling this cause an explosion that does high fire damage to all players within 8 yards.
Tactic: Watcher and Spellguards
Dps
Kill the Watcher first, before the Spellguards.
Use dps cooldowns on this phase.
Use Heroism/Timewarp/Bloodlust
Tanks
The tank that is not tanking boss needs to tank the adds.
Tank the adds on diamond.
Use defensive cooldowns.
Healers
The healer that gets the debuff needs to make sure that he stands 8 yards from the raid.
The best is that the healer dispels its own debuff since that player will know the best when it’s clear to dispel.
Raid
If you get the Volatile Wound, move to the edge of the room (you have 8 sec) and wait until the debuff expires.
Move away from the cloud that is created under you and move back to position.
When to use Bloodlust/Heroism/Timewarp
Use on the Third phase when there are watcher adds and spellguards. Nuke watcher first.
Other posts
- World of Warcraft 12.0.7 Revelations Roadmap: Your Complete Content Release Schedule
- MRGM Caught Red-Handed Stealing WoW PTR Discoveries – The Predictable Pattern of Content Theft Continues
- The BEST Midnight Season 1 DPS Tier List Guide
- Midnight Pre-Patch Event Guide: Twilight Ascension Rewards, Rare Timers, and Collectibles
- Endeavor: A Deeper Dive Into WoW’s Expansive New System
- LOADS of Extra Decors You Did NOT Know About!
- World of Warcraft Players Score Exclusive Housing Decor with Diablo 4: Lord of Hatred Pre-Order
- Brawler´s Guild 2025 GUIDE
- Legion Remix Decor will be available after Legion Remix
- Professions Unpacked: Your Guide to Crafting Housing Decor with Reagents from Every Era


