Background
This colossal doom lord, one of the largest and mightiest creatures in the armies of the Legion, was defeated at the Broken Shore through the combined might of the greatest heroes of the Horde and the Alliance. Having recovered from his wounds, Krosus emerges from the bay between the Nighthold and the Tomb of Sargeras to crush anyone who would oppose the Legion.
Overview
This fight is a typical boss fight when it comes to stationary bosses.
The fight is one phase only.
You will fight Krosus on a broken bridge.
The boss stands still, except after he breaks a portion of the bridge infront of him and has to move to raid afterwards.
This fight is a dps fight because the boss will do an ability called Slam (every 30s) in which every third Slam will bread a portion of the bridge and after 12 slams, the entire bridge breaks and raid wipes.
Apart from the dps race, tanks have the biggest job here. There are several abilities in which the tanks need to handle.
Positioning
There are two different types of positioning.
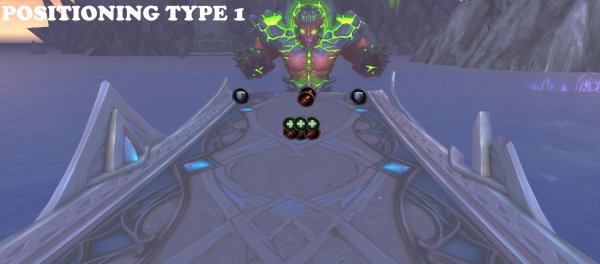
Positioning type 1
Tanks
One tank stands on left side of boss.
One tank stand on right side of boss.
Melee
Stand in the middle in front of boss.
Ranged
Stand in the middle, further back from melee.
Reason
If the raid has problems moving away from the beam that boss shoots from his hand, then stack in the middle so it will be easier to move left or right and dodge the beam.
It will also be easier to heal (AoE) when entire raid takes damage from Orb of Destruction and Slam.
The “bad” thing is that players will maybe not have time to soak the fire orbs.
Positioning type 2
Tanks
One tank stands on left side of boss.
One tank stand on right side of boss.
Melee
Stand in the spread out in the middle in front of boss.
Ranged
Spread out further back behind tanks and melee.
Reason
If the raid has problems to soak the fire orbs, then this is a good way to position.
The “bad” thing is that players may have problems to move left/right, away from the big beam the boss does.

Abilities and tactics
This boss has 6 abilities and one phase.
Searing Brand
Boss puts a stacking debuff on tank.
This debuff does fire damage every second for 18 seconds.
Tactic: Searing Brand
Tank swap at 8 stacks.
Boss puts this debuff on tanks very often but have in mind that he does the other abilities as well that will make the timepoints of debuffs differ.
Fel Beam
The boss will shoot a beam of Fel energy from one of his hands.
The beam covers half of the platform.
The hand he shoots from is random.
Getting hit by the beam does deadly damage.
Tactic: Fel Beam
The only way to know which hand he will shoot from is to be prepared and look at what hand he will start raising.
Move to left side of the platform when he raises right hand.
Move to right side of the platform when he raises left hand.
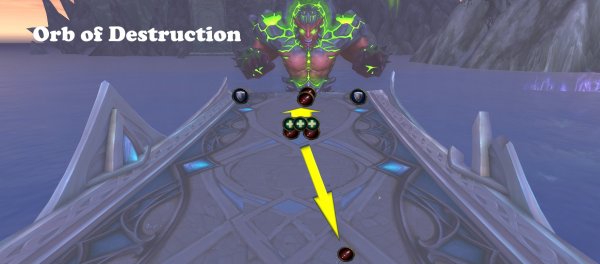
Orb of Destruction
Boss will target a random ranged player.
After 5 seconds, the target is hit by a fel orb that explodes on the target.
The damage is deadly to the raid.
But the further away the raid is from the explosion, the lesser damage they take.
Tactic: Orb of Destruction
Ranged
Targeted player must run away behind the raid as far as possible (you have 5 seconds).
Use class abilities to move faster.
Let the orb hit you, then run back to your position.
The rest of the ranged players move forward to boss, to minimize the damage taken from the explosion.
Move back to positions after explosion.
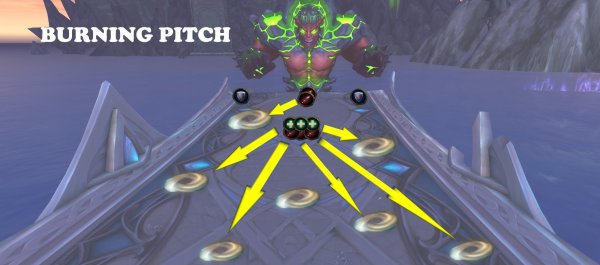
Burning Pitch
Boss shoots out fire globs from his shoulders.
The fire globs hit random locations on the platform.
Each fire glob does high fire damage to anyone within 3 yards of impact.
If any fire orb doesn’t hit a player, that orb turns into a Fire Elemental add at impact.
Fire elemental add (Burning Ember)
This add shoots firebolts at a random player that explodes when it hits the player.
This does fire damage to all players within 5 yards of the detontaiton.
Tactic: Burning Pitch
Raid
Stand spread
You can see the landing positions of the fire orbs on the ground.
Run to the positions where the orbs will land and soak the orb (take the damage).
Use defensive spells to lower damage taken from the orbs.
Dps
When (if) add(s) spawn, prio nuke them down fast and interrupt the firebolts they shoot.
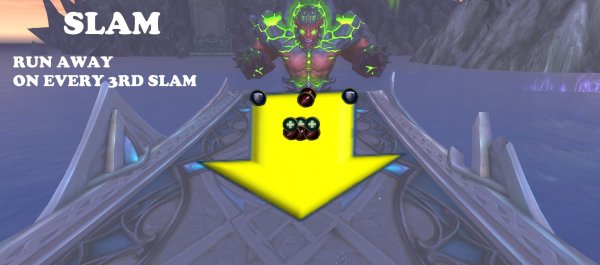
Slam
Boss slams both his fists on the bridge (every 30 seconds).
This creates a shockwave that does deadly damage to the entire raid.
The damage can be reduced by standing under the fist.
Player standing under the first takes huge physical damage.
Every third slam will destroy a portion of the bridge.
After 12 slams, the entire bridge is broken.
Tactic: Slam
Tanks
Tank positioning: One tank on left side, the other tank on right side of boss.
Tanks need to stand under each hand.
Use defensive cooldown to reduce the damage taken from the first slam.
Raid
After every third slam: Run away from boss so you won’t fall in the water when boss destroys the bridge.
Isolated Rage
If boss doesn’t have any melee player to attack, he will do damage to all players every 0.5 seconds.
Tactic: Isolated Rage
Tanks
When players run away from slam, tanks need to run back fast to melee range to reduce the damage from isolated rage.
When to use bloodlust/Heroism/Timewarp
Do it at pull.
Other posts
- Gearing ALTS EASIER in this UPDATE in 12.0.7
- World of Warcraft 12.0.7 Revelations Roadmap: Your Complete Content Release Schedule
- MRGM Caught Red-Handed Stealing WoW PTR Discoveries – The Predictable Pattern of Content Theft Continues
- The BEST Midnight Season 1 DPS Tier List Guide
- Midnight Pre-Patch Event Guide: Twilight Ascension Rewards, Rare Timers, and Collectibles
- Endeavor: A Deeper Dive Into WoW’s Expansive New System
- LOADS of Extra Decors You Did NOT Know About!
- World of Warcraft Players Score Exclusive Housing Decor with Diablo 4: Lord of Hatred Pre-Order
- Brawler´s Guild 2025 GUIDE
- Legion Remix Decor will be available after Legion Remix


