Background
From his youth, the nightborne Tel’arn was fascinated by plant life: the resilience and adaptability of weeds, the ability of simple grass to harness the power of the sun, the way a tree may be divided into two, or two branches grafted into one. Aided by the energies of the Nightwell, he has transformed himself to the point that he is scarcely recognizable as a nightborne elf. He now considers himself something far, far greater.
Overview
This fight is divided in 3 phases.
The boss summons images of himself
You will first fight 1 boss in phase 1, then 2 bosses in phase 2 and 3 bosses in phase 3.
The abilities from start will continue the rest of the fight and while the fight progresses, more abilities will occur.
The health pool of the boss and images are shared.
Phase 1
You fight 1 boss at start, the main boss (The High Botanist).
He has 4 abilities in phase 1:
- Recursive Strikes
- Solar Collapse
- Parasitic Fetter
- Controlled Chaos
Phase 2 – Main boss HP: 75%
An image will spawn (Solarist Tel´arn).
You will now fight the main boss (High Botanist) and an image (Solarist).
Main boss will have 3 abilities instead of 4.
The Solarist image will use Solar Collapse instead of Main boss, and also 2 more abilities (flare and Summon Plasma Spheres).
Main boss
* Recursive Strikes
* Parasitic Fetter
* Controlled Chaos
Solarist Image
* Solar Collapse
* Flare
* Summon Plasma Spheres
Phase 3 – Main boss HP: 50%
One more Image will spawn (Naturalist Tel´arn)
Main boss will change name to Arcanist Tel`arn instead of The High Botanist.
You will now fight main boss (Arcanist Telárn), the Solarist and the Naturalist.
Each one of them has 3 abilities each:
Arcanist (was before High Botnaist)
* Call of Night
* Recursive Strikes
* Controlled Chaos
Naturalist
* Toxic Spores
* Grace of Nature
* Parasitic Fetter
Solarist
* Solar Collapse
* Flare
* Summon Plasma Spheres
Positioning
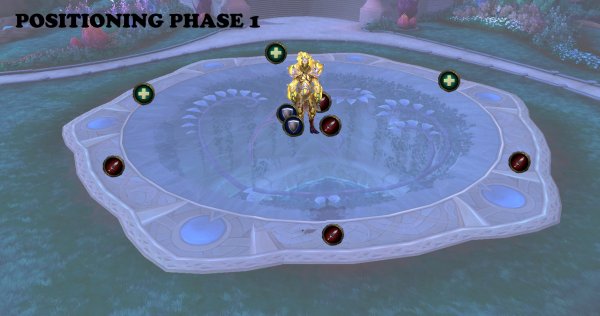
Phase 1
Tanks
Tank boss in the middle of the platform (in the center of the circle).
Melee
Stand spread around the boss.
Ranged
Spread out around the boss, along the circle on the ground.
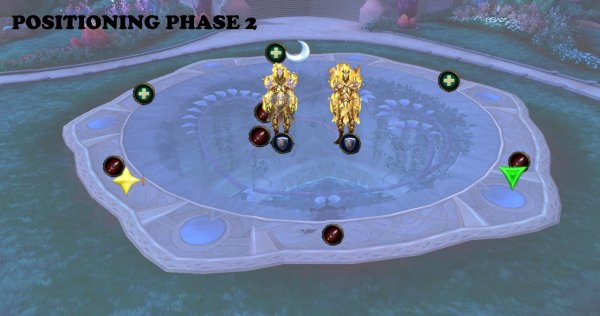
Phase 2
Tanks
Tank High Botanist in center.
Tank Solarist next to Botanist (5 yards between).
Melee
Stand behind Botanist.
Stay at least 5 yards away from Solarist.
Ranged
Spread out around the bosses, along the circle on the ground.
3 markers for Plasma Spheres spawn points (Star, Moon, Triangle)
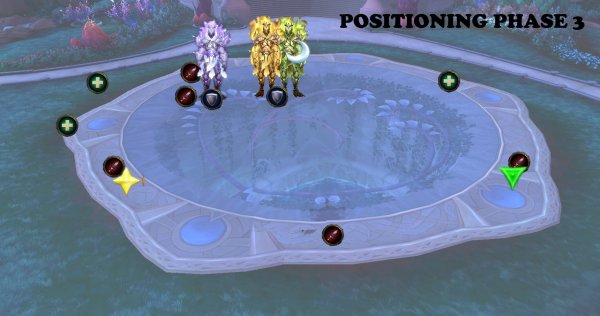
Phase 3
Tanks
Tank the 3 bosses on top right side of the circle.
1 tank on Arcanist (his name was Botanist in phase 1 and phase 2)
1 tank on Solarist and Naturalist.
Make sure that Solarist is 5 yards from Arcanist.
Melee
Stand behind Arcanist
Stay at least 5 yards away from Solarist.
Ranged
Spread out around the bosses, along the circle on the ground.
Abilities and Tactics
Phase 1 – The High Botanist
Recursive Strikes
The boss puts a debuff on its primary target (tank) every 1.5 second (approx).
This debuff does 15% increased damage taken
Boss will also do 15% of his melee damage on any player with the debuff (most likely off tank).
Tactic: Recursive Strikes
Tanks
The goal is to tank swap when the debuff is gone on the player that will taunt.
This occurs around 8 stacks.
Tanks will take a lot of damage in this fight and needs to plan and have a flow in their defensive cooldowns.
Healers
Tanks will take a lot of damage in this fight.
Therefor, the healers needs to keep an extra eye on tanks when there are raid damage because more damage than the Recursive Strike can be critical for tanks.
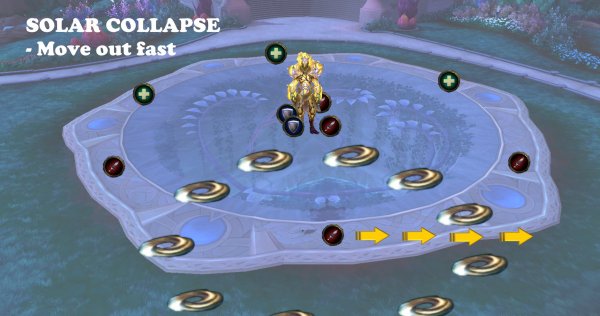
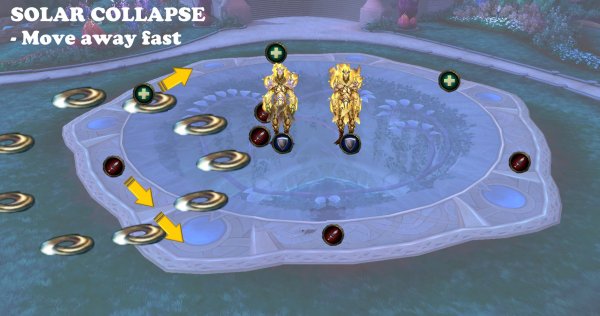
Solar Collapse
Boss targets a player and summons 12 pulsating solar energy balls around that player.
The solar energies starts from a far distance around the player and moves towards that player very fast.
Each pulse it does while moving in to the player, does fire damage to all players within 4 yards och each solar energy ball.
Tactics: Solar Collapse
Tanks
Tank the boss in the middle.
Melee
Stand spread around the boss.
Ranged
Spread out around the boss, along the circle on the ground.
Raid
Move away fast if the solar energy ball is targeting you or close to you.
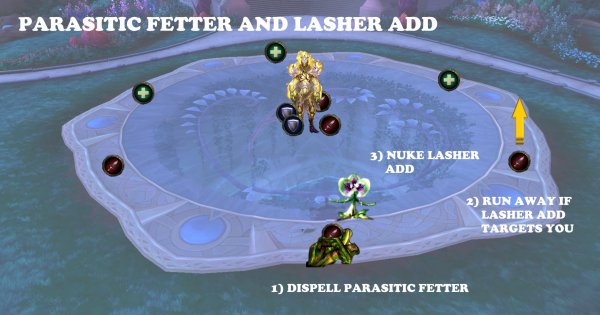
Parasitic Fetter and the Lasher add
The boss targets a random player and roots the player in place (debuff called Parasitic Fetter).
This does damage every second until dispelled.
Each damage tick increase the next damage tick by 10% (Higher tick damage over time)
When dispelled, an add will spawn, called Parasitic Lasher.
This add targets the closest player and hunts that player.
If it reaches the player, it enter the player and afflicts them with Parasitic Fetter debuff.
When the debuff is dispelled again, the add comes out again with the same health it had before it entered the player.
The Lasher add also grow every 3 seconds and increase movement speed by 25%.
At 5 stacks, it will be immune to slow, stun etc.
Tactic: Parasitic Fetter and the Lasher add
Make sure that the raid is spread (see positioning, phase 1, above)
Dispel the player that is rooted (Parasitic Fetter)
Person targeted by the add must run away fast, use class spells to move faster.
Players need to slow, stun grip etc. the add while nuking it down fast.
Add is prio one to nuke.
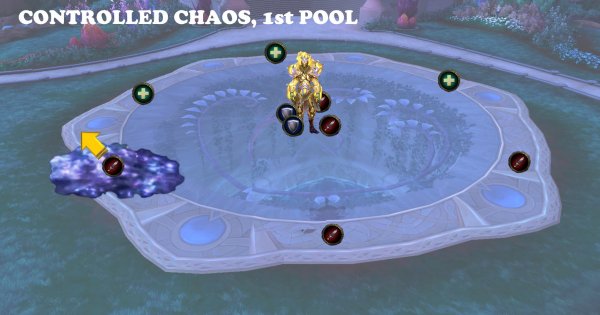
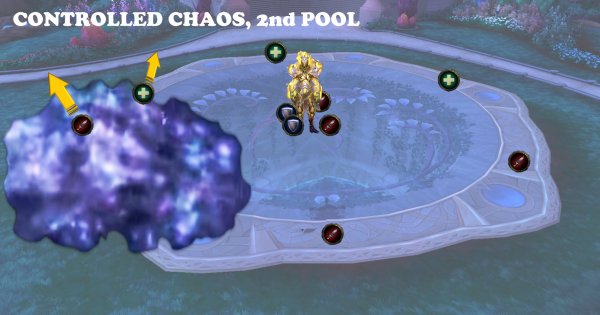
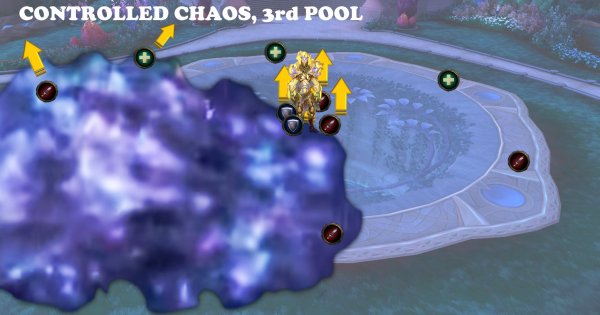
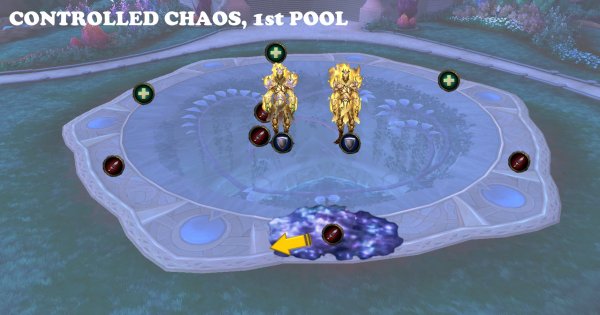
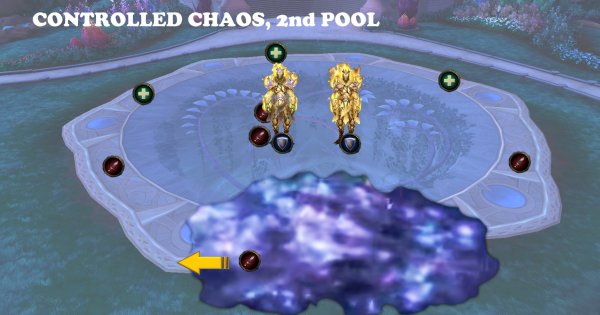
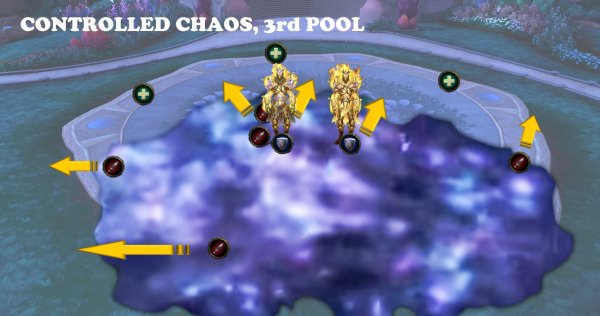
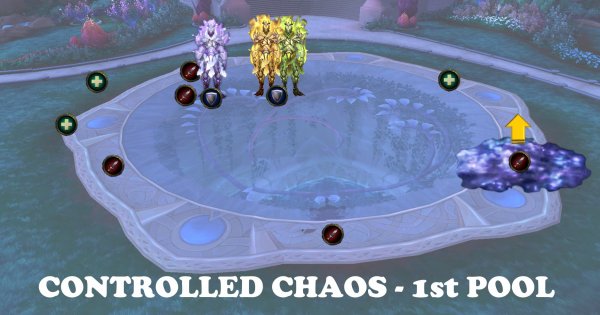
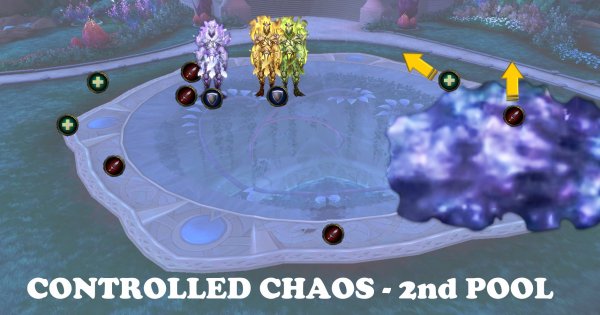
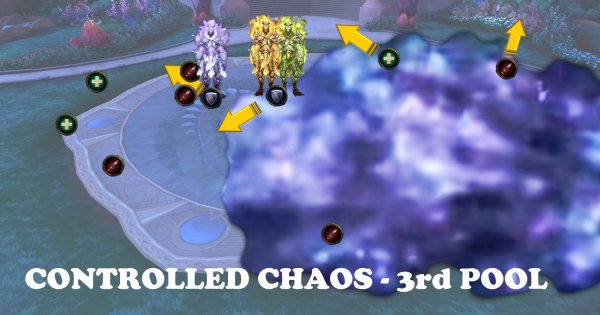
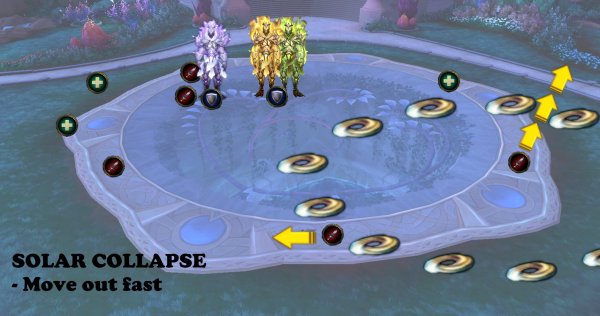
Controlled Chaos
Boss targets a players location.
A purple circle (10 yards radius) will spawn on that position and after some seconds it will explode.
A second, bigger circle (20 yards radius) will spawn on that position and after some seconds it will explode.
A third, even bigger circle (30 yards radius) will spawn on that position and after some seconds it will explode.
Each explosion does very high (deadly damage).
Tactics: Controlled Chaos
Raid
Make sure that the raid is spread (see positioning, phase 1, above).
Run away fast from the first circle and keep running away far since 2 more circles will spawn.
After all 3 circles spawned and exploded, run back to your position.
Healers
During this ability, you need to raid heal at the same time you need to dodge the circles.
Use any class healing ability/talent you have that makes it easier for you to heal while moving.
Use cooldowns to heal up the raid when this is over.
PHASE 2 – NIGHTOSIS
In this phase, the boss will summon an image of himself, called Solarist Tel`arn.
You will fight the boss (High Botanist) and Solarist at the same time.
Main boss will have 3 abilities instead of 4.
The Solarist image will use Solar Collapse instead of Main boss, and also 2 more abilities (flare and Summon Plasma Spheres).
High Botanist
The tactic will be the same when it comes to the abilities that High Botanist has, which are
- Recursive Strike
- Controlled Chaos
- Parasitic Fetter
Recursive Strikes
The boss puts a debuff on its primary target (tank) every 1.5 second (approx).
This debuff does 15% increased damage taken
Boss will also do 15% of his melee damage on any player with the debuff (most likely off tank).
Tactic: Recursive Strikes
Tanks
The goal is to tank swap when the debuff is gone on the player that will taunt.
This occurs around 8 stacks.
Tanks will take a lot of damage in this fight and needs to plan and have a flow in their defensive cooldowns.
One tank on Arcanist (the ones that does Recursive Strikes)
One tank on the Solarist.
Healers
Tanks will take a lot of damage in this fight.
Therefor, the healers needs to keep an extra eye on tanks when there are raid damage because more damage than the Recursive Strike can be critical for tanks.
Controlled Chaos
Boss targets a players location.
A purple circle (10 yards radius) will spawn on that position and after some seconds it will explode.
A second, bigger circle (20 yards radius) will spawn on that position and after some seconds it will explode.
A third, even bigger circle (30 yards radius) will spawn on that position and after some seconds it will explode.
Each explosion does very high (deadly damage).
Tactics: Controlled Chaos
Raid
Make sure that the raid is spread (see positioning, phase 1, above).
Run away fast from the first circle and keep running away far since 2 more circles will spawn.
After all 3 circles spawned and exploded, run back to your position.
Healers
During this ability, you need to raid heal at the same time you need to dodge the circles.
Use any class healing ability/talent you have that makes it easier for you to heal while moving.
Use cooldowns to heal up the raid when this is over.
Parasitic Fetter and the Lasher add
The boss targets a random player and roots the player in place (debuff called Parasitic Fetter).
This does damage every second until dispelled.
Each damage tick increase the next damage tick by 10% (Higher tick damage over time)
When dispelled, an add will spawn, called Parasitic Lasher.
This add targets the closest player and hunts that player.
If it reaches the player, it enter the player and afflicts them with Parasitic Fetter debuff.
When the debuff is dispelled again, the add comes out again with the same health it had before it entered the player.
The Lasher add also grow every 3 seconds and increase movement speed by 25%.
At 5 stacks, it will be immune to slow, stun etc.
Tactic: Parasitic Fetter and the Lasher add
Make sure that the raid is spread (see positioning, phase 1, above)
Dispel the player that is rooted (Parasitic Fetter)
Person targeted by the add must run away fast, use class spells to move faster.
Players need to slow, stun grip etc. the add while nuking it down fast.
Add is prio one to nuke.
Solarist
This image boss has 3 abilites:
- Solar Collapse
- Flare
- Summon Plasma Spheres
Solar Collapse
Same as phase 1 but instead, it’s the Solarist that does this.
Boss targets a player and summons 12 pulsating solar energy balls around that player.
The solar energies starts from a far distance around the player and moves towards that player very fast.
Each pulse it does while moving in to the player, does fire damage to all players within 4 yards och each solar energy ball.
Tactics: Solar Collapse
Tanks
Tank the boss in the middle.
Melee
Stand spread around the boss.
Ranged
Spread out around the boss, along the circle on the ground.
Raid
Move away fast if the solar energy ball is targeting you or close to you.
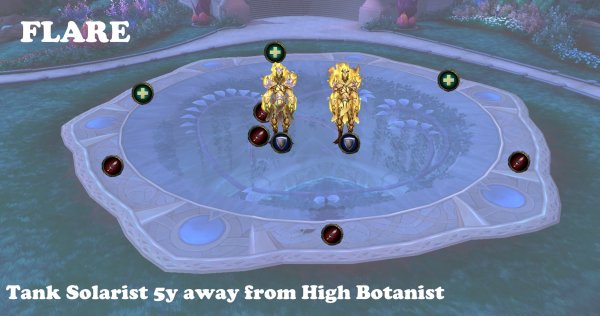
Flare
Solarist blasts the tank with fire damage that also does damage to players within 4 yards.
Tactic: Flare
Tank High Botanist in center.
Tank Solarist next to Botanist (5 yards between).
Melee: Stand behind Botanist and at least 5 yards away from Solarist.
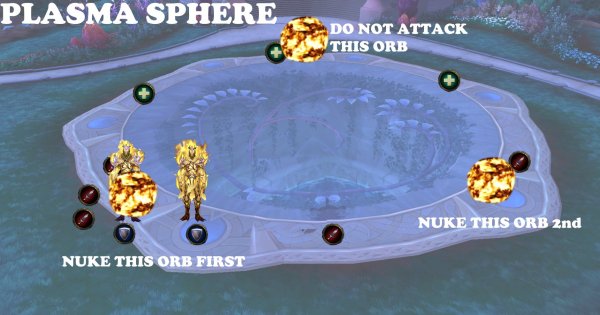
Summon Plasma Spheres
Solarist summons 3 Plasma Spheres on specific locations.
The spheres lose 4% health every 0.5 second.
When a Sphere dies it explodes and does high fire damage to all players.
It will also put a debuff on players(Plasma Explosion) which increase damage taken from sphere explosion by 100% for 5 seconds.
Tactics: Plasma Spheres
The locations of the Orbs are (spawning at the same time):
1st Orb on bottom left side of the circle on the platform.
2nd Orb on bottom right side of the circle on the platform.
3rd Orb on top middle side of the circle on the platform.
Tanks
Tank the bosses on 1st Orb spawning location.
DPS
Nuke 1st Orb fast (Use dps cooldowns)
Nuke 2nd Orb fast and make sure it dies 5 seconds after the first Orb so the debuff wears off.
Do not dps 3rd Orb at all. Let it explode after the 12.5 seconds have passed.
Make sure you are single target dps here and not using less dps just to boost your dps meter with more cleave dmg.
Healers
Use Healing cooldowns and make sure the raid is healed up after each explosion.
Raid needs to be healed up again every 5 second.
PHASE 3 - PURE FORMS
One more Image will spawn (Naturalist Tel´arn)
Main boss will change name to Arcanist Tel`arn instead of The High Botanist.
You will now fight main boss (Arcanist Telárn), the Solarist and the Naturalist.
Each one of them has 3 abilities each:
Arcanist (was before High Botnaist)
* Call of Night (new phase 3 ability)
* Recursive Strikes (same as phase 1)
* Controlled Chaos (same as phase 1)
Naturalist
* Toxic Spores (new phase 3 ability)
* Grace of Nature (new phase 3 ability)
* Parasitic Fetter (same as phase 1)
Solarist
* Solar Collapse (same as phase 1)
* Flare (same as phase 1)
* Summon Plasma Spheres (same as phase 1)
Arcanist
Call of Night
The Arcanist boss will put a debuff on several random players.
The debuff has two outcomes:
1) If any players with the debuff are 5 yards close to each other, The debuff does Arcane damage to all players within 100 yards.
2) If any player with the debuff is NOT 5 yards close to a non-debuffed player, The debuff does Arcane damage to all players within 100 yards.
Tactics: Call of Night
Player with debuff: Stand where you are so you don’t run around and come close to other debuffed players.
Player with no debuff: Stand on players that have the debuff.
Recursive Strikes
The boss puts a debuff on its primary target (tank) every 1.5 second (approx).
This debuff does 15% increased damage taken
Boss will also do 15% of his melee damage on any player with the debuff (most likely off tank).
Tactic: Recursive Strikes
Tanks
The goal is to tank swap when the debuff is gone on the player that will taunt.
This occurs around 8 stacks.
Tanks will take a lot of damage in this fight and needs to plan and have a flow in their defensive cooldowns.
One tank on Arcanist (the ones that does Recursive Strikes)
One tank on the other two (Naturalist and Solarist)
Healers
Tanks will take a lot of damage in this fight.
Therefor, the healers needs to keep an extra eye on tanks when there are raid damage because more damage than the Recursive Strike can be critical for tanks.
Controlled Chaos
Boss targets a players location.
A purple circle (10 yards radius) will spawn on that position and after some seconds it will explode.
A second, bigger circle (20 yards radius) will spawn on that position and after some seconds it will explode.
A third, even bigger circle (30 yards radius) will spawn on that position and after some seconds it will explode.
Each explosion does very high (deadly damage).
Tactics: Controlled Chaos
Raid
Make sure that the raid is spread (see positioning, phase 1, above).
Run away fast from the first circle and keep running away far since 2 more circles will spawn.
After all 3 circles spawned and exploded, run back to your position.
Healers
During this ability, you need to raid heal at the same time you need to dodge the circles.
Use any class healing ability/talent you have that makes it easier for you to heal while moving.
Use cooldowns to heal up the raid when this is over.
Naturalist
Toxic Spores
Naturalist boss shoots 2 Toxic Spores at a random player location.
The spore lasts for 2 min.
If a player comes into contact with a spore, it will explode and do ticking Nature damage to that player for 12 seconds.
Tactic: Toxic Spores
These spores last for 2 minutes, which means, they will be there during almost entire phase 3.
The spores need to be soaked.
Have certain players with good defensive cooldowns (non-tanks) to soak the spores.
Wait until at least 4 spores have spawned if you will use immune spells like Divine Shield and soak them all at once.
Rest of the raid needs to stay away from them.

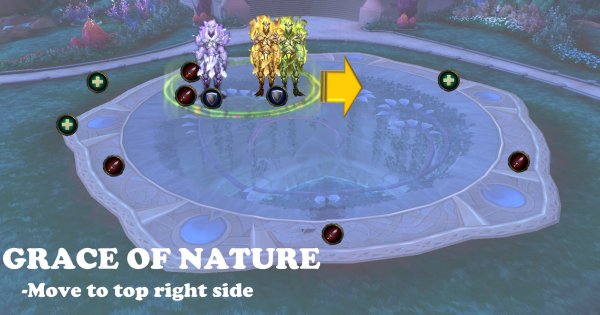
Grace of Nature
Naturalist summons a pool of energy that heals the bosses if they are inside the pool.
The heal does 3% of maximum health every 3 seconds.
Tactics: Grace of Nature
Tanks
Start tanking the bosses on top left side first.
Move to top right side when a healing pools is created.
Leave bottom side free stand there only when the orbs (plasma spheres) are summoned.
Parasitic Fetter and the Lasher add
The boss targets a random player and roots the player in place (debuff called Parasitic Fetter).
This does damage every second until dispelled.
Each damage tick increase the next damage tick by 10% (Higher tick damage over time)
When dispelled, an add will spawn, called Parasitic Lasher.
This add targets the closest player and hunts that player.
If it reaches the player, it enters the player and afflicts them with Parasitic Fetter debuff.
When the debuff is dispelled again, the add comes out again with the same health it had before it entered the player.
The Lasher add also grow every 3 seconds and increase movement speed by 25%.
At 5 stacks, it will be immune to slow, stun etc.
Tactic: Parasitic Fetter and the Lasher add
Make sure that the raid is spread (see positioning, phase 1, above)
Dispel the player that is rooted (Parasitic Fetter)
Person targeted by the add must run away fast, use class spells to move faster.
Players need to slow, stun grip etc. the add while nuking it down fast.
Add is prio one to nuke.

Solarist
This image boss has 3 abilites:
- Solar Collapse
- Flare
- Summon Plasma Spheres
Solar Collapse
Same as phase 1 but instead, it’s the Solarist that does this.
Boss targets a player and summons 12 pulsating solar energy balls around that player.
The solar energies starts from a far distance around the player and moves towards that player very fast.
Each pulse it does while moving in to the player, does fire damage to all players within 4 yards och each solar energy ball.
Tactics: Solar Collapse
Tanks
Tank the boss in the middle.
Melee
Stand spread around the boss.
Ranged
Spread out around the boss, along the circle on the ground.
Raid
Move away fast if the solar energy ball is targeting you or close to you.
Flare
Solarist blasts the tank with fire damage that also does damage to players within 4 yards.
Tactic: Flare
Tank High Botanist in center.
Tank Solarist next to Botanist (5 yards between).
Melee: Stand behind Botanist and at least 5 yards away from Solarist.
Summon Plasma Spheres
Solarist summons 3 Plasma Spheres on specific locations.
The spheres lose 4% health every 0.5 second.
When a Sphere dies it explodes and does high fire damage to all players.
It will also put a debuff on players(Plasma Explosion) which increase damage taken from sphere explosion by 100% for 5 seconds.
Tactics: Plasma Spheres
The locations of the Orbs are (spawning at the same time):
1st Orb on bottom left side of the circle on the platform.
2nd Orb on bottom right side of the circle on the platform.
3rd Orb on top middle side of the circle on the platform.
Tanks
Tank the bosses on 1st Orb spawning location.
DPS
Nuke 1st Orb fast (Use dps cooldowns)
Nuke 2nd Orb fast and make sure it dies 5 seconds after the first Orb so the debuff wears off.
Do not dps 3rd Orb at all. Let it explode after the 12.5 seconds have passed.
Make sure you are single target dps here and not using less dps just to boost your dps meter with more cleave dmg.
Healers
Use Healing cooldowns and make sure the raid is healed up after each explosion.
Raid needs to be healed up again every 5 second.
When to use bloodlust/Heroism/Timewarp
Use it when boss is at 50%, when all 3 bosses are out.
Other posts
- World of Warcraft 12.0.7 Revelations Roadmap: Your Complete Content Release Schedule
- MRGM Caught Red-Handed Stealing WoW PTR Discoveries – The Predictable Pattern of Content Theft Continues
- The BEST Midnight Season 1 DPS Tier List Guide
- Midnight Pre-Patch Event Guide: Twilight Ascension Rewards, Rare Timers, and Collectibles
- Endeavor: A Deeper Dive Into WoW’s Expansive New System
- LOADS of Extra Decors You Did NOT Know About!
- World of Warcraft Players Score Exclusive Housing Decor with Diablo 4: Lord of Hatred Pre-Order
- Brawler´s Guild 2025 GUIDE
- Legion Remix Decor will be available after Legion Remix
- Professions Unpacked: Your Guide to Crafting Housing Decor with Reagents from Every Era


