Background
As he bravely fought to save the Chamber of the Heart, Ra-den was pulled into Ny´alotha where he as fallen victim to N’zoth’s whispers. The despair he harbored for so long has overwhelmed the last of his hope, rendering his corruption complete. Now the former Highkeeper will stop at nothing to do the Old God´s bidding.
Fast Tactics
You will fight boss during 2 phases.
PHASE 1
- Tank swap after each Nullifying Strike
- Two portals will open on each side of the platform. Two orbs will come out and move to boss.
Orb 1 – Vita
Orb 2 – Void - You must destroy one and the other will be immune and move to boss.
Each time they spawn, you must destroy a different orb, not the same 2 times in a row. - Both orbs (Vita and Void) will be unleashed when it touches boss and later on unstable.
Vita Unleashed
Does raid dmg
Vita Unstable
Debuff on random player. Debuff bounces to the player furthest away. All stack on boss. Player with debuff runs out together with another player that runs furthest away. Run back in after debuff expires. Make sure you have a new player that runs out to take next debuff. Do this 5 times.
Void Unleashed
Heal absorbs on raid. Heal up fast to remove it.
Void Unstable
Stand on the small circle before the missile lands there and soak it. Happens several times.
- Nuke adds when they spawn.
- Big circle on player = everyone stacks on that player, except tanks.
PHASE 2
- Entire raid takes splash dmg during entire phase.
- Boss increase dmg during entire phase.
- Tank swap each debuff.
Tanks take ticking dmg that = half of their health 5 times. Healers beware. - Linked players run away from each other fast to break the bond.
- Bloodlust/Timewarp/Heroism on phase 2.
Abilities and Tactics
This fight consists of 2 phases.
PHASE 1
You will fight boss and there are two portals on the side of the platform.
Each portal will periodically spawn and orb, one Vita and one Void.
The Orbs will travel to boss and empower him.
Nullifying Strike
When boss reaches 100 energy – he does very high shadow dmg and also puts a debuff.
This debuff decreases tanks max health by 20% for 25 sec.
Tactics – Nullifying Strike
Tank swap after each Nullifying Strike.
Essence of Vita
This essence will travel to boss.
It can be destroyed.
If boss does not receive Vita essence 2 times, he triggers Overwhelming Rage, this increases boss dmg done by 300%.
If not destroyed and touching boss and empower him with Vita energy.
Unleashed Vita
When touches boss it will do very high nature dmg to entire raid.
Healers beware of high inc dmg when orb touches boss.
Unstable Vita
One player will get targeted and dmg for very high Nature dmg.
After 7 sec, this ability will jump to the player furthest away from him and do same dmg.
After 7 sec, this ability will jump again to the player that is furthest away from this player.
This will happen 5 times.
Also, every time a player is hit, that player gets the instability debuff that increases dmg taken by 300% from Unstable Vita/Unstable Void.
Tactics: Unstable Vita
Have two markers on each side of boss.
Tank boss in middle between markers
RAID stacks on boss
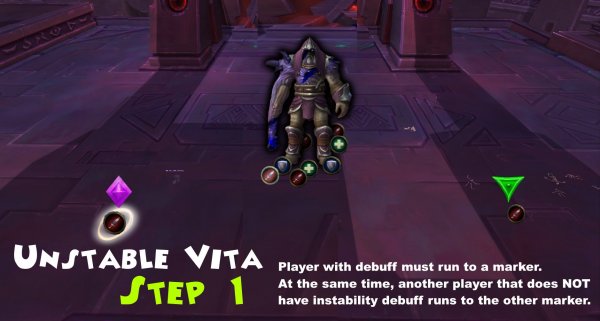
Step 1
Player with debuff must run to a marker.
At the same time, another player that does NOT instability debuff runs to the other marker.
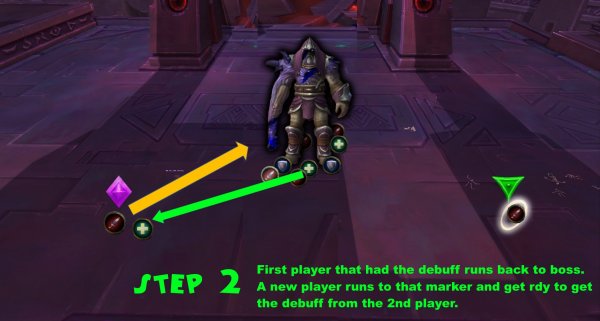
Step 2
First player that had the debuff runs back to boss.
A new player runs to that marker and get rdy to get the debuff from the 2nd player.
Step 3
3rd player runs back and a new one replaces that player.
Make sure this happens so that 5 players will do this because all 5 stacks needs to be done.

The add – Crackling Stalker
This add shots chain lightning at up to 5 players.
Tactics the add – Crackling Stalker
Prio kill add as soon as it spawns.
Essence of Void
This essence will travel to boss.
It can be destroyed.
If boss does not receive Void essence 2 times, he triggers Overwhelming Rage, this increases boss dmg done by 300%.
If not destroyed and touching boss and empower him with Void energy.
Unleashed Void
When orb touches boss it will apply a shield that absorb healing taken and puts a debuff that does low shadow dmg every 3 sec for 40 sec on all players.
Tactics – Unleashed Void
Healers must heal this through in order to remove the absorb shield.
Stack up when this happens and heal up the raid.
Unstable Void
Boss launches a missile random location. After the hit, it will be launched up again and hit another location. This can happen up to 5 times (based on raid size)
The hit will do very high Shadow dmg and puts the Instability Exposure debuff (increase dmg taken from the Unstable Vita/Unstable Void by 300% for 30 sec. )to all players that are hit.
If no one gets hit – it will trigger Unstable Void Burst.
This burst will do high Shadow dmg to all players in the raid. It will also put Instability Exposure debuff to all players and it will also silence all players for 8 sec.
Tactics – Unstable Void
Make sure you have several players that will soak this small circle on the ground.
Do not have the same player soaking, if that doesn’t have an immunity.
The add – Void Hunter
This add will launch a void energy (big circle on the platform) on the location largest group of players.
This blast will do 1.4 million dmg BUT split among the players getting hit.
This will also put a debuff that reduces healing taken by 50%.
Tactics – The add Void Hunter
Every player stacks up on this circle EXCEPT for tanks.
Top up raid as much as possible after impact.
PHASE 2
Ruin
Boss does low/moderate dmg to entire raid every 2 seconds during entire phase 2.
Tactics – Ruin
Healers beware that raid will take dmg during entire phase 2, except for all the other boss abilities.
Decaying Strike (Tanks)
Boss does a heavy physical dmg that also puts a debuff on main tank (Decaying Wound).
This debuff does Shadow dmg based 50% of the tank´s health every 2 sec for 10 sec.
Tactics – Decaying Strike (Tanks)
The less health, the less dmg the debuff does, the less healing needed
Healers beware – the debuff lasts for 10 sec. if you heal up the tank to full health when the tank stil has the debuff, then it goes down to half hp again. You need to balance the heals and keep the health around 50% of the tanks health while the tank has that debuff. Then when debuff is gone, you heal the tank up to max again.
Void Eruption
Several locations of the platform will be marked with swirls before they blast.
Standing on it/close to it (12 yards) does very high Shadow dmg.
This happens around every 30 sec.
Tactics – Void Eruption
Tanks will be in charge of where to move. Starts at middle then move when needed.
Raid stacks behind boss.
Charged Bonds
Boss marks 2 random players that becomes linked together.
These 2 players will take dmg every seconds and the dmg will also increase by 20% every second.
If players are more than 40 yards away from each other, the link will break.
Tactics – Charged Bonds
Run away from each other at least 40 yards to break the link.
Be fast. Run to each side.
Gorge Energy
- Boss will periodically gain Lingering Energies
- One Lingering Energy stack will increase the boss dmg by 10%.
- Each stack will last for the rest of the fight.
Tactics – Gorge Energy
- Kill boss before he is to powerful and one-shot the raid.
- Use all dps cooldowns you have when 2nd phase starts.
- Use bloodlust/Timewarp/heroism
- Healers before of heavy dmg the longer this phase 2 lasts.
When to Bloodlust/Timewarp/Heroism
When 2nd phase starts.
Other posts
- Gearing ALTS EASIER in this UPDATE in 12.0.7
- World of Warcraft 12.0.7 Revelations Roadmap: Your Complete Content Release Schedule
- MRGM Caught Red-Handed Stealing WoW PTR Discoveries – The Predictable Pattern of Content Theft Continues
- The BEST Midnight Season 1 DPS Tier List Guide
- Midnight Pre-Patch Event Guide: Twilight Ascension Rewards, Rare Timers, and Collectibles
- Endeavor: A Deeper Dive Into WoW’s Expansive New System
- LOADS of Extra Decors You Did NOT Know About!
- World of Warcraft Players Score Exclusive Housing Decor with Diablo 4: Lord of Hatred Pre-Order
- Brawler´s Guild 2025 GUIDE
- Legion Remix Decor will be available after Legion Remix


