As usually, these tactics are my own and does not mean they are the most optimal.
Background Story
Elerethe once a mighty druid and adept shapeshifter, was led down a dark path by the belief that she was betrayed by her closest allies. Her consciousness now resides in the nightmare, damning her to an existence of fear, confusion and hatred.
Overview
This fight is divided in two phases depending on what form the boss takes. The boss can take two different forms:
- A spider
- A Roc
The fight is taking place on 3 platforms, connected to each other with spider webs that functions as bridges. I have named them 1-3 and you start the fight on platform 1.
You will know when the boss will enter next phase by looking at her power bar. At the start of the fight she has 0 and it ticks up to 100. At 100, she will transform in to a Roc and 2nd phase starts. On phase 2 it will be the same thing, power bar ticks from 0 to 100.
The fight is all about positioning and placing venomous pools that spawns from players and also from spider adds when they die. On phase 2 you need to position whirlwinds on the right place.
Also, there are loads of eggs that you need to watch out from because touching them will break them and small spiders will spawn.
PHASE 1: SPIDER FORM
When the boss is in spider form, she has 4 abilities.
You will know when the boss will enter next phase by looking at her power bar. At the start of the fight she has 0 and it ticks up to 100. At 100, she will transform in to a Roc and 2nd phase starts.
The setup of this phase is to control the Venomous pools that spawns from players (Necrotic Venom) and adds that die (Venomous Spiderlings).
The tactic of this phase is to make sure all pools that spawns are placed on one side of the platform.
The rotation of boss abilities is the same:
- Necrotic Venom
- Feeding Time (Followed by Vile Ambush)
- Necrotic Venom
- Web of Pain
- Necrotic Venom
- Feeding Time (Followed by Vile Ambush)
- Necrotic Venom
- Web of Pain
- Entering Phase 2
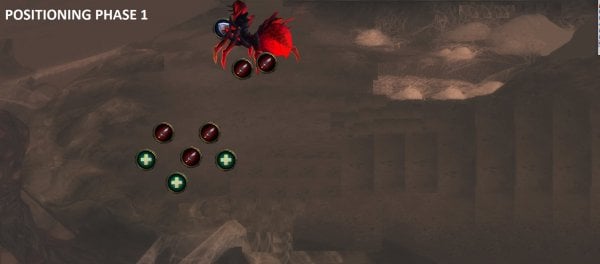
Positioning Phase 1
Tank boss on the top left corner facing away from platform.
Melee behind boss
Ranged on bottom side
Leave right side free.
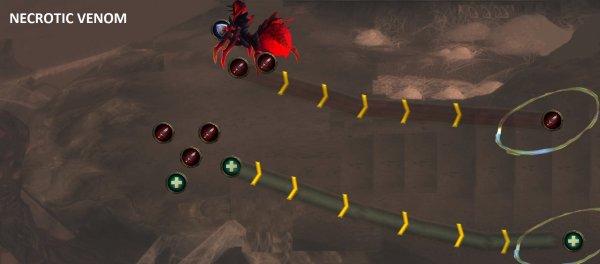
Necrotic Venom
Shoots necrotic poison on random players.
After 10 seconds the Poison bursts and does ticking Nature damage on the player and each tick also leaves a necrotic pool under the player.
This does damage to nearby players.
Tactic: Necrotic Venom
Player(s) hit by Necrotic Venom
Getting hit by the poison creates a circle around you so you will know you got hit and how big the poison spreads.
Move to left side fast when having the debuff and wait until it bursts. Let the pools drop off then move back fast to position after it´s done (6 ticks).
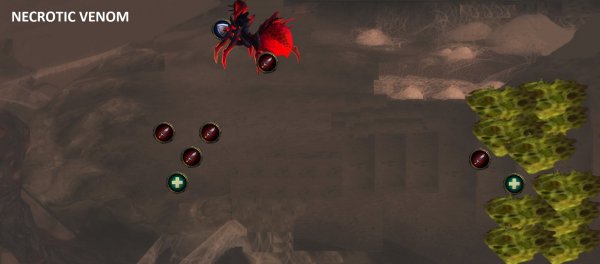
Make sure to move as far as possible on right side and start placing the pools there.
Later on at the fight, make sure to place the pools just next to the pools that are already on the ground. In this way you will minimize the size of the pools that will cover a big part of the platform.
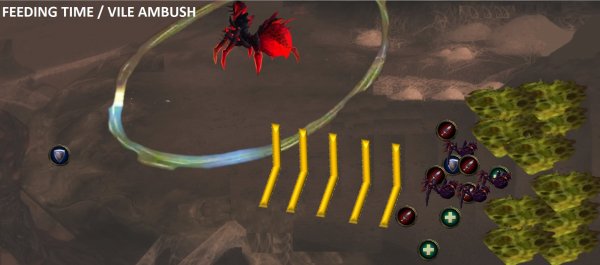
Feeding Time followed by Vile Ambush
The boss climbs into the web and calls out adds called Venomous Spiderlings, to “feed”.
The Venomous Spiderlings leaves a venomous pool when they die, that does damage if you stand in it.
They also put a poison on a player that ticks and stacks.
Vile Ambush
The boss targets a random player and drops on the player with Vile Ambush which does loads of damage (instant kill) and knocking back all targets.
The damage decreases the further away players are.
Tactic: Feeding Time and Vile Ambush
Raid
Entire raid moves to right side of the platform and stack up all the adds (away from the big circle that shows the biggest impact).
After all the Spiderlings are dead, move back to previous position.
DPS
Kill all the Spiderlings that spawned.
Move back to position again.
Healers
Heal up the raid fast since entire raid takes a lot of damage from Vile Ambush and adds
Main Tank
After boss lands pick her up and tank her on top left corner again (same position as before).
Off tank
Tank the spiders on the right side of the platform so the pools they leave behind when dead will be placed far to the right side.
Tank swap before next spiders so the first tank doesn’t get overwhelmed with poison dots.
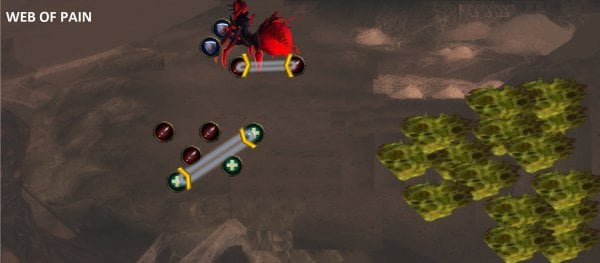
Web of Pain
The boss connects two players with a web.
All the damage taken from the web is transformed to the one tanking boss.
The damage increases when the players separate more than 20 yards.
Tactic: Web of Pain
The two players connected together will have 2 lines between them.
Stack with each other until it is over.
More than one pair can be affected by Web of Pain.
Healers
Tanks take heavy damage here, make sure they are healed up.
PHASE 2: ROC FORM
Phase 2 starts on the same platform as phase 1.
You will know when the boss will enter next phase by looking at her power bar. At the start of the fight she has 0 and it ticks up to 100. At 100, she will transform in to a Spider and 1st phase starts.
Boss transforms into a Roc and does Gathering Clouds directly, followed by Dark Storm (flies to another platform).
After Gathering Clouds, players will pick up feathers which gives you increased jump height and move to the other platform the boss is positioned.
Boss will do the ability Twisting Shadow when he lands on the other platform. Players will still be on the move to the boss platform when she does this.
When the boss is in Roc form, she has 5 abilities. Boss Ability rotation in phase 2:
* Gathering Clouds (This is only performed at start of phase 2)
* Dark Storm (This is only performed at start of phase 2)
* Twisting Shadow
* Raking Talons
* Razor Wings
* Twisting Shadow
* Raking Talons
* Razor Wings
* Twisting Shadow
* Raking Talons
* Razor Wings
* Twisting Shadow
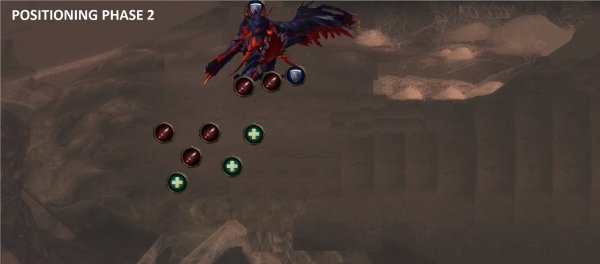
Positioning Phase 2
Tank boss on the upper left corner and have the wall behind you (boss does knockback later on).
Ranged on bottom side
Melee and off tank behind boss.
Leave right side free.
Gathering Clouds
The boss does Gathering Clouds and prepares to fly to another platform.
The boss shoots quills (for 8 seconds) at all players doing physical damage every second and pushes back everyone.
When Gathering Clouds is finished the boss will leave feathers around it (Shimmering Feather).
Tactic Gathering Clouds
If you catch a feather, it grants you
* Increased jump height
* Leap ability into the Spiderlings which will instantly kill them
Healers
Use Healing cooldowns to heal up the raid.
Raid
Use defensive cooldown and push forward the push back.
Make sure you are on a spot with no eggs behind you.
Dark Storm comes directly after Gathering Clouds, so pick up the feathers when this ability is done.
Dark Storm
The boss creates a storm and flies to another platform.
The storm does shadow damage every second and the damage increases 5% every seconds until the player enter the eye of the storm.
Eye of the Storm
If you are in Eye of the Storm during the dark storm, you will be protected from the storm.
Tactic: Dark Storm
Raid
Your aim on this phase is to move to the other platform were the boss is, which is where the Eye of The Storm is as well.
When moving to the other platform, make sure not to touch the whirlwinds that have spawned all over the platforms.
When moving to the other platform, make sure not to touch the eggs on the way since spiders will spawn from them. These eggs are also on the spider web bridge between platforms.
Make sure to take the feather that drops from boss after she does Gathering Clouds and jump your way to the next platform (you cannot jump all the way to next platform with one jump).
Healers
Heal the raid while moving to the other platform.
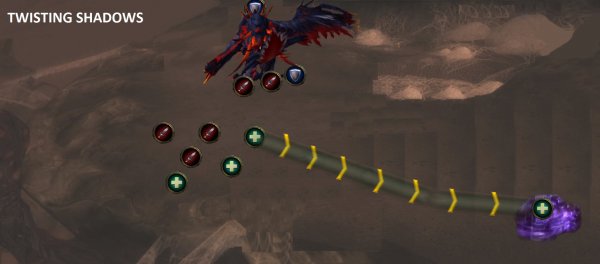
Twisting Shadows
The boss starts forming shadow tornadoes on random players which will appear after 10 seconds at the player destinations.
The tornadoes will pull nearby players into them.
The tornadoes do Shadow damage every 1 sec for 4 seconds.
Players can disperse Venomous Pool when the dark winds are forming.
Tactic: Twisting Shadows
When you are targeted by Twisting Shadow
The Tornado will spawn on you after 10 seconds.
Move to the right side and wait until the tornado develops, then move back to your position.
Raking Talons
The boss does very high damage to the one tanking and increases damage taken from Raking Talons by 100% per stack.
Tactics: Raking Talons
She repeats this cast 2 times very fast.
Tanks
Use defensive cooldown
Tank Swap at each Raking Talon.
Razor Wings
Boss does high Shadow damage to players in a cone in front of the boss.
Tactic: Razor Wings
This ability comes directly after Raking Talons.
Raid
Stand behind boss
Tank
Make sure you have the wall behind you because the boss does a knockback as well.
Use defensive cooldown. Remember that this comes directly after Raking Talons, so you have already used a defensive cooldown for that.
The Spiders
Surging Egg Sacs
These eggs are around the platform, and if you run into these eggs, they break and Skittering Spiderlings (small spiders) come out. These spiders attack in numbers when released from their eggs.
If eggs are broken for various reasons, gather them up and AoE them down asap.
The eggs are all over the sides of each platform and on the spider web bridges between platforms.
Venomous Spiderling
These spiders come from the web during the encounter (check above) and they have two abilities:
Dripping Fangs
Poisons the player and does Nature damage every second and it stacks.
Venomous Pool
The spiders form pools that does Nature damage every second when standing on it.
Other posts
- Gearing ALTS EASIER in this UPDATE in 12.0.7
- World of Warcraft 12.0.7 Revelations Roadmap: Your Complete Content Release Schedule
- MRGM Caught Red-Handed Stealing WoW PTR Discoveries – The Predictable Pattern of Content Theft Continues
- The BEST Midnight Season 1 DPS Tier List Guide
- Midnight Pre-Patch Event Guide: Twilight Ascension Rewards, Rare Timers, and Collectibles
- Endeavor: A Deeper Dive Into WoW’s Expansive New System
- LOADS of Extra Decors You Did NOT Know About!
- World of Warcraft Players Score Exclusive Housing Decor with Diablo 4: Lord of Hatred Pre-Order
- Brawler´s Guild 2025 GUIDE
- Legion Remix Decor will be available after Legion Remix


