Background
Pulled by the Jailer´s chains from a distant, unknown realm, this malfunctioning guardian seeks to protect the inscrutable knowledge known as “cyphers”. It uses the last of its power to obliterate any who would attempt to plunder the secrets of its enigmatic makers.
Overview – Fast Tactics
- Boss has an energy bar. Reaching 0 energy will do loads of dmg on the raid every 5 sec.
- There are 3 energy cores that increase boss energy bar when the boss is close to a core.
- To increase the boss energy bar, you must have him close to a core.
- Having boss close to a core does raid dmg, but there is a defensive circle under the core to stand in.
- Boss is linked to a core for 20 sec then it explodes and if you are 15 yards close to the core you take really high dmg. If you are further away than 15 yards you take “only” high dmg. Run away and healers heal up the raid.
- Kill the boss before all 3 cores are down and he starts killing you.
- Bring boss to a core just before he reaches 0 energy.
- There are some boss mechanics to handle:
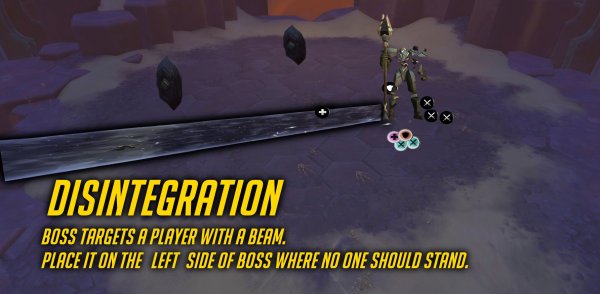
- When boss targets you with a big beam, stand still and players move away from you.
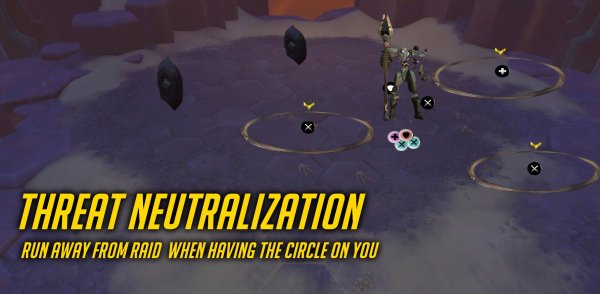
- When boss puts an arrow with a circle around you, run away from raid before explosion.
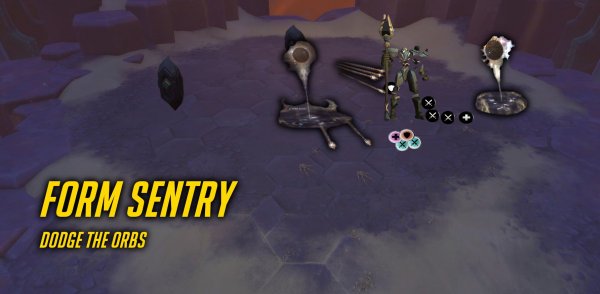
- When boss spawns orbs that travels around, dodge them. Don’t stand in the circle under the orbs, they will do dmg and silence you.
- Normal mode: tank swap each Sunder, NO ONE stands near that tank, it does splash dmg.
- Heroic mode: Mark one tank that takes sunder and mark the other tank that takes Obliterate. Raid stack up on obliterate tank. - Easy? Well, here comes the tricky part.
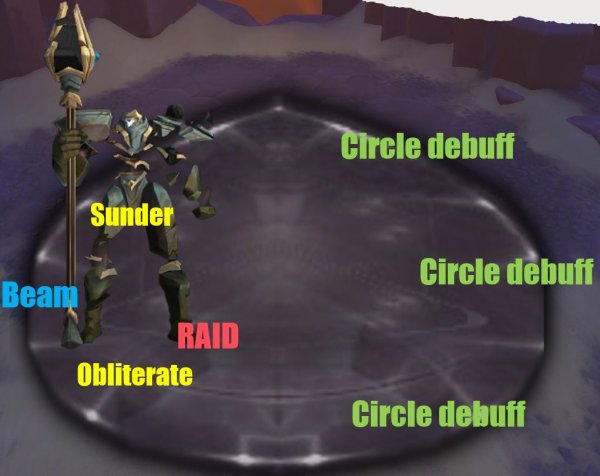
You have to deal with boss mechanics when inside the energy core circle, and here it how you handle it.
- Tank boss on the far left side of the circle.
- One tank on top left side for Sunder
- One tank on bottom left side for Obliterate
- Raid on the right side of bottom tank.
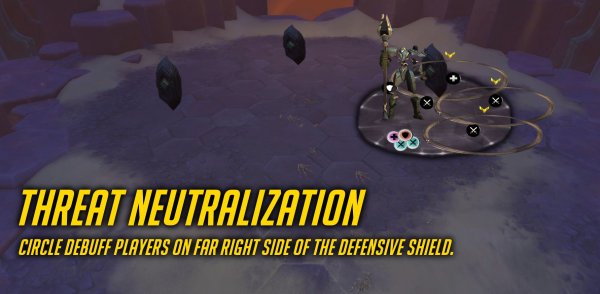
- Circle debuff players (Threat Neutralization) on far right side.
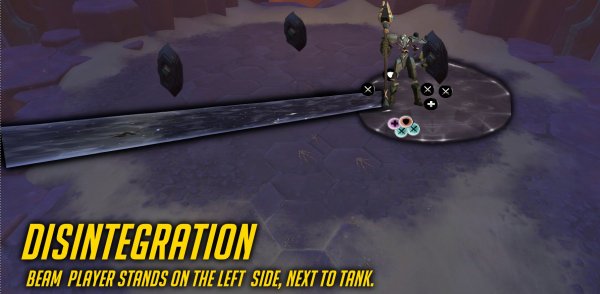
- Beam (Disintegration), top left next to tank.
Positioning
When not charging boss with Core
- Tank getting hit by Sunder stands on top side (no other players).
- Heroic mode: Tank getting hit by Obliterate stands on bottom side and raid stand close
- Normal mode: Raid Spread out around the boss except for top side.
- Heroic mode: Raid stand in range to obliterate tank when you have to soak.
When charging boss with Core
- Tank the boss on the far left side of the circle.
- One tank on top left side for Sunder
- One tank on bottom left side for Obliterate
- Raid on the bottom side
- Circle debuff players (Threat Neutralization) on far right side.
- Beam (Disintegration), top left next to tank.
Abilities and Tactics
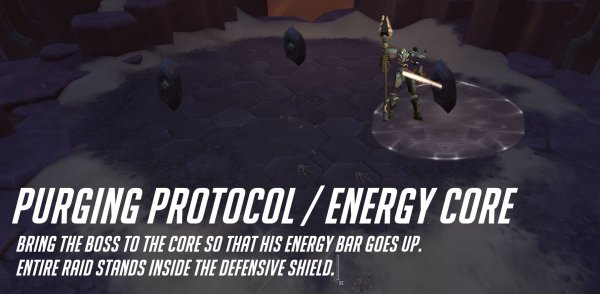
Purging Protocol and the Energy Cores
- Boss has an energy bar.
- When boss reaches 0 energy, he will pulsate very high Arcane dmg to all players every 5 sec and increase dmg done by this ability by 100%.
- The only thing that increases boss energy bar is an energy core.
- There are 3 energy cores that are available directly from start.
- If the boss gets close to an energy core, he will get linked to it and the core will charge the boss energy for 20 seconds.
- The boss gains 5 energy every 1 sec, meaning a full core will increase the boss energy by 100.
- When the boss and the core are linked:
- it creates a defensive field for the players. They will take 85% reduced dmg inside this field.
- The core does very high Arcane dmg to all players every 1 sec (Unstable Energy). - When the core is done charging boss energy it will explode (Meltdown) and do extremely high Arcane dmg to players within 15 yards of the core and very high Arcane dmg to players that are further than 15 yards of the core.
Tactics: Purging Protocol and the Energy Core
- At pull, pull the boss and bring him to a core directly. Ranged can stand close to a core from start.
- If your raid can handle some damage before taking the boss to a core, then do that, to save time.
- While inside the core, you will take reduced dmg but healers beware anyway.
- You have to deal with boss mechanics while inside a small area every time you charge the boss energy (see tactics below).
- Run away fast from the core when it is done charging, so you take as little dmg as possible. It is still high dmg, so healers beware, and top raid fast up every time a core explode.
- You have only 3 cores, so this is a dps check.
- Bring boss to a core just before he reaches 0 energy.
Elimination Pattern (Tanks)
Boss does a combination of 2 abilities (only combination of Sunder on Normal mode):
Sunder
- Boss slams the ground on main tanks location.
- This does very high physical dmg to players within 6 yards of the impact.
- Leaves a debuff that increases dmg taken from sunder by 200% for 20 sec.
Obliterate (HEROIC MODE)
- Boss hits the main tank with very high physical dmg and extremely high Arcane dmg split among players within 6 yards of the main tank.
- All players hit by the effect take 500% increased dmg from Obliterate by 12 sec.
Boss does Sunder followed by an Obliterate directly after, every 40 sec.
This is little wierd since the debuffs only lasts for 20 and 12 sec. We will see how this looks live.
Tactics: Elimination Patter
Normal mode tactics
- No one stands near the main tank that takes the Sunder hit.
Heroic Mode tactics
When outside the defensive circle:
- Mark the Sunder tank (blue)
- No one stands near the main tank.
- Mark the Obliterate tank (moon)
- Raid stack up on Obliterate tank to share dmg.
Form Sentry
- Boss spawns an orb that circles around him for 40 sec.
- After 30 seconds, he spawns another orb, so you have to deal with 2 orbs for 10 sec.
- Maximum 2 orbs up at a time.
- Under the orb is a circle. This circle does Arcane dmg and silence players if they are inside it.
- The orb also shoots low/moderate Arcane dmg to random players.
Tactics: Form Sentry
- Always make sure to avoid getting close to the orb.
- You cannot dmg the orbs or cc them.
Threat Neutralization
- Boss targets several players (3?) with an arrow and a big circle around them.
- After 4 sec, they explode and anyone inside the circle will take moderate/high Arcane dmg.
Tactics: Threat Neutralization
- In general run away from raid when having this circle on you.
- This circle spawns on players when the raid needs to be inside the core area.
The raid will always be on left side and debuffs will always be on the right side on the core area.
Disintegration
- Boss targets a random player with a big beam that follows the players movement.
- After a very short time he shoots very high Arcane dmg towards that direction.
- Any player hit will also be stunned for 6 sec and a debuff that does low/moderate Arcane dmg for 6 sec.
Tactics: Disintegration
Stand still and players move away from you instead that you run around to find an empty location.
If inside the defensive shield (core)
- Always stand to the left side of the platform.
- In this way no one will get hit since no one is supposed to stand there (right side is for circle debuff, top is for alone tank and button is for stacking on tank)
Other posts
- World of Warcraft 12.0.7 Revelations Roadmap: Your Complete Content Release Schedule
- MRGM Caught Red-Handed Stealing WoW PTR Discoveries – The Predictable Pattern of Content Theft Continues
- The BEST Midnight Season 1 DPS Tier List Guide
- Midnight Pre-Patch Event Guide: Twilight Ascension Rewards, Rare Timers, and Collectibles
- Endeavor: A Deeper Dive Into WoW’s Expansive New System
- LOADS of Extra Decors You Did NOT Know About!
- World of Warcraft Players Score Exclusive Housing Decor with Diablo 4: Lord of Hatred Pre-Order
- Brawler´s Guild 2025 GUIDE
- Legion Remix Decor will be available after Legion Remix
- Professions Unpacked: Your Guide to Crafting Housing Decor with Reagents from Every Era


