Background
Once a fatescribe entrusted with Korthia´s countless secrets, the Mawsworn seized Roh-Kalo and bound him to the Jailer´s will. With Torghast´s power at his disposal, Roh-Kalo seeks to author a new fate for the Shadowlands.
Overview
- This fight has 3 phases.
PHASE 1
- Run away left or fight side when having a big circle on you, so it explodes away from raid.
- Tank run away to the top side of the platform when having the thick black circle on you.
When explosion, an add will spawn that you MUST kite.
Dps prio nuke the add and cc it. - Stay away from center so it will be easier to dodge the beams that shoots out from the sides in a cross pattern.
PHASE 2
- Will happen two times, when boss reaches 70% and 40% health.
- There are 6 circles on the platform, boss will realign some of them. Your job is to put them back before 40 sec passed, or entire raid dies.
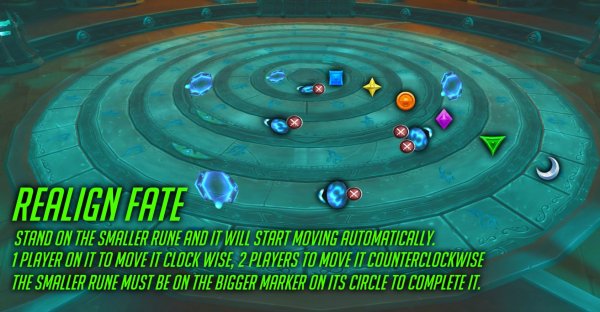
- A rune marker and a bigger marker will spawn. Stand on the smaller rune marker and the circle will move. The rune marker must align with the bigger marker.
- Targeted players will be able to move the runes (on testing it was anyone, but got it is now changed on the dungeon journal).
- If one player stands on a rune it will move clockwise.
If two players stands on a rune it will move counterclockwise.
See which one is fastest, especially the bigger circles that takes longer time to move.
The smaller circles goes faster and only one player is needed. - Rest of the raid stands on bottom side of the platform.
Tanks pick up the adds and bring them there.
AoE nuke the adds and interrupt their cast. - Loads of orbs will spawn that does high dmg and slows you, dodge them.
PHASE 3
- Starts after phase 2 when boss is at 40% health.
- Boss will do exact same abilities as in phase 1.
- Boss will also realign the circles and you have 30 sec instead of 40 sec to put them back in the same way you did in phase 2.
- This time, anyone can move the circles by standin on the smaller marker.
Have 6 markers on the platform, one for each marker.
Have 6 markers on 6 players that will handle the markers on this phase. Each players marker handles their circle marker.
Have some backups for the bigger circles incase you need to move it counterclockwise instead if that is the fastest way.
Positioning
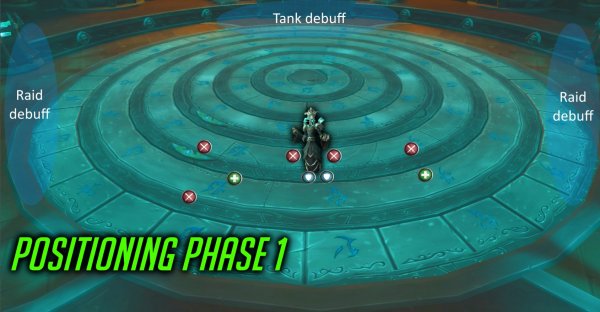
Phase 1
- Tank boss between bottom side of the platform and center.
- Raid spreads around.
- Top side is for tank debuff.
- Left and right is for raid debuff.
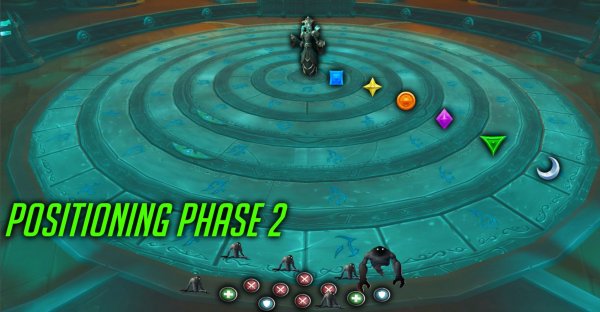
Phase 2
- Have a marker on each circle for easier callouts and for phase 3.
- Raid on bottom side of the platform.
- Only players handling the runes will be on the circles.
- Tank brings adds to bottoms side.
Phase 3
- Tank boss between bottom side of the platform and center.
- Raid spreads around.
- Top side is for tank debuff.
- Left and right is for raid debuff.
During Extemporaneous Fate
- Have a marker on each circle so assigned players handles their circle.

Abilities and Tactics
PHASE 1
Fated Conjunction
- Boss spawns a 6 sec charge from 2 sides of the platform (opposite each other).
- After 6 sec, the beams shoot into the platform, crossing each other.
- Getting hit from a beam does very high Shadow dmg and a debuff that increase dmg taken from these beams by 50% for 1 min.
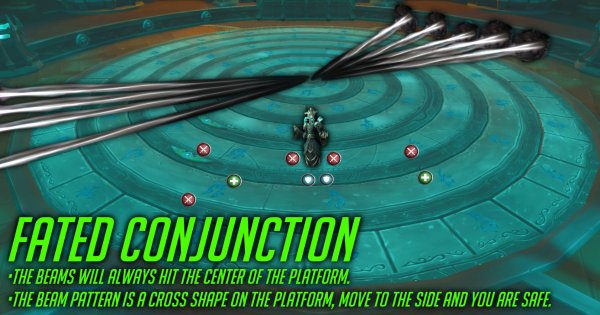
Tactics: Fated Conjunction
- The beams will always hit the center of the platform.
- The beam pattern is a cross shape on the platform, move to the side and you are safe.
Call of Eternity
- Boss puts an 8 sec debuff on several players (based on raid size).
- Players with debuff have a circle around them.
- This debuff does moderate shadow dmg every 2 sec for 8 sec.
- If any player is inside the circle after 8 sec when it explodes, they will take very high shadow dmg.
- HEROIC MODE – The explosion leaves an Echo of Eternity on that location. 8 sec later, you get another explosion that does very high shadow dmg to any player within 20 yards.
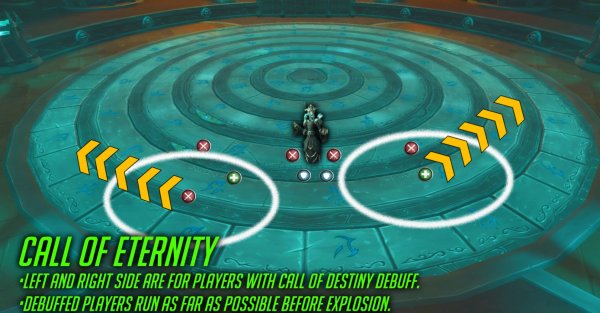
Tactics: Call of Eternity
- Left and right side are for players with Call of Destiny debuff. (The top side if for the tank debuff Invoke Destiny).
- Debuffed players run as far as possible before explosion.
- Raid, make sure you are not on the sides of the platform during the fight.
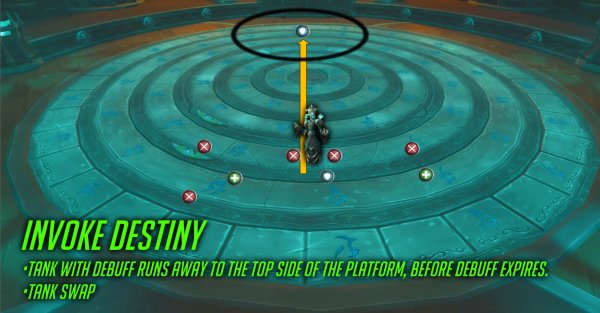
Invoke Destiny (tanks)
- Boss puts a debuff on main tank.
- When debuff ends after 8 sec, it does high damage to all players. The further away from players, the less dmg they take.
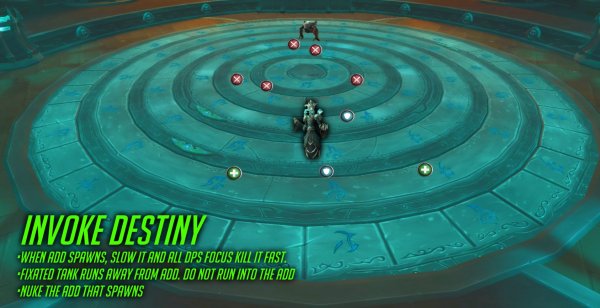
- An add (Shade of Destiny) will also spawn and fixates the tank.
- The mark makes the tank take 75% increased dmg until the add dies.
- If the add reaches the tank or reaches full energy it erupts and puts a debuff on all players that does high shadow dmg every 2 sec for 10 sec.
- When the add is killed it shatters to smaller adds (Fatespawn Anomaly) that hits nearby players with moderate shadow dmg.
Tactics: Invoke Destiny
- Tank with debuff runs away to the top side of the platform, before debuff expires.
- Tank swap
- When add spawns, slow it and all dps focus kill it fast.
- Fixated tank runs away from add. DO NOT run into the add
- Nuke the add that spawns
- . The dmg is not on you, it is the raid that takes heavy dmg.
Diviner´s Probe
Boss gain stacks of Diviners Probe every time he attacks a new player.
He uses the stacks to do high shadow dmg on the tank.
Tactics: Diviner´s Probe
- The tank swap is generally on every Invoke Destiny but keep your eyes on the stacks boss has.
- Tank swap if needed.
Twist Fate
- Boss puts debuff on several players that does low/moderate Shadow dmg every 2 sec for 6 sec.
Tactics: Twist Fate
- Healers beware.
PHASE 2
- When boss reaches 70% health and 40% health, you enter phase 2.
- Boss will start pushing all players away from him, and cast Realign Fate.
- During phase 2, boss takes 99% reduced dmg.
- Boss will realign the circles on the platform and you have to align them back before boss casts Darkest Destiny that kills all players. Aligning the circles interrupts this.
- Boss will also spawn waves of adds.
- Boss will also spawn loads of small orbs.
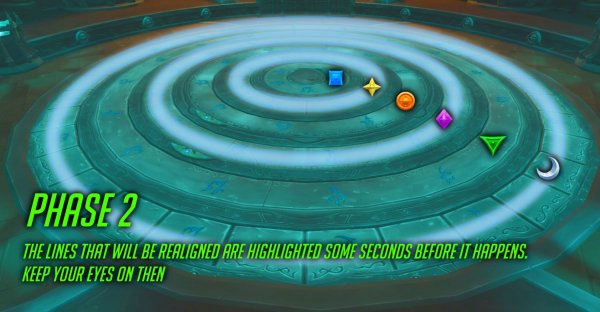
Realign Fate
- Boss rearranges 4 of the 6 circles, not all.
- Several players will be targeted to be able to realign the circles.
- You have 40 sec to realign the circles, or the entire raid dies.
- There are 6 circles on the platform.
- Each circle has several runes on them.
- When boss realigns some of the circles, your job is to place the small rune marker in to the bigger marker shaped like arrows.
- You move the rune by standing on it.
- The small marker will move left or right based on number of players that stand on it.
If you want to move it clockwise, then odd number of players stands on it, meaning 1 player stands on it.
If you want to move it counterclockwise, then even number of players stands on it, meaning 2 players stand on it.
Tactics: Realign Fate
- During testing, anyone was able to realign circles. But now on the dungeon journal, it is stated that “Several players are revealed as having Runic Affinity and are capable of manipulating the position of the Loom´s rings”.
- Have a marker on each of the 6 circles.
If anyone can move the runes
Put a marker on 6 players, the same makers that are on the rings.
These players will handle their circle, if it is realigned.
Stand on the smaller rune and it will start moving automatically.
Have 2 backup players if the marker has to move counterclockwise instead. Because some circles, especially the outer ones might take to long if you will move it clockwise for reaching its destination. You have 40 sec from start of phase 2. Therefore, it is smarter to have 2 players on that marker and move it counterclockwise instead.
If random players are marked for handling runes
Make sure that each realigned rune has a player on it as fast as possible.
Stand on the smaller rune and it will start moving automatically.
Marked players that are not standing on a rune must be ready to stand together with someone else, incase it goes faster to move it counterclockwise.
Other stuff in phase 2
Unstable Accretion
The marked players for the runes will have a debuff on them until the runes are realigned. This does low/moderate shadow dmg every 3 sec.
Tactics: Unstable Accretion
Have assigned healers for healing these players. Because the rest of the raid will be on the bottom part of the platform fighting adds.
The adds
- Waves of Fatespawn Monstrosity spawns during this phase.
- These adds casts Despair that puts a debuff on to all players within 40 yards.
This debuff does high shadow dmg and reduce movement speed by 33% for 6 sec. - The boss will empower some of the adds, that will increase their physical dmg by 10% every 8 sec.
Tactics: The adds
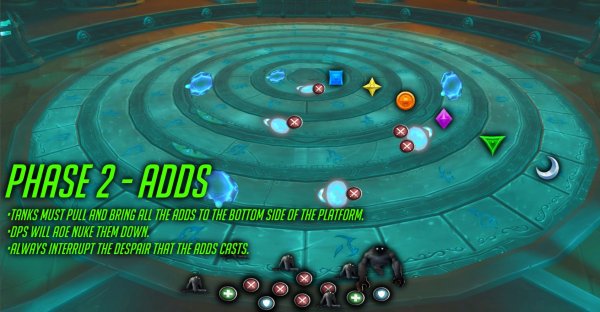
- Tanks must pull and bring all the adds to the bottom side of the platform.
- Dps will AoE nuke them down.
- Always interrupt the Despair that the adds casts.
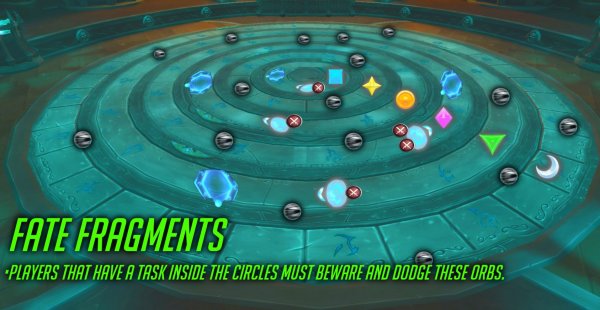
Fate Fragments
- Boss will also spawn loads of small orbs during this phase.
- Touching an orb will do very high shadow dmg and reduce movement speed by 33% for 7 sec.
Tactics: Fate Fragments
- Players that have a task inside the circles must beware and dodge these orbs.
PHASE 3
Phase 3 starts after you have entered phase 2 the second time. Meaning after phase 2 when boss has 40% health.
During this phase, you will handle boss mechanics from phase 1 and Extemporaneous Fate which is similar to phase 2.
Extemporaneous Fate
- Similar to phase 2.
- Boss will rearrange the circles and players have 30 sec (instead of 40 sec) to put them back or the raid dies (Darkest Destiny).
- In this phase, anyone can handle the runes (compared to phase 2).
Tactics: Extemporaneous Fate
- Have a marker on each circle.
- Put a marker on 6 players, the same makers that are on the rings.
- These players will handle their circle, if it is realigned.
- Stand on the smaller rune and it will start moving automatically.
- Have 2 backup players if the marker has to move counterclockwise instead. Because some circles, especially the outer ones might take to long if you will move it clockwise for reaching its destination. You have 40 sec from start of phase 2. Therefore, it is smarter to have 2 players on that marker and move it counterclockwise instead.
Boss abilities
Same boss abilities as in phase 1 (see above).
Other posts
- Gearing ALTS EASIER in this UPDATE in 12.0.7
- World of Warcraft 12.0.7 Revelations Roadmap: Your Complete Content Release Schedule
- MRGM Caught Red-Handed Stealing WoW PTR Discoveries – The Predictable Pattern of Content Theft Continues
- The BEST Midnight Season 1 DPS Tier List Guide
- Midnight Pre-Patch Event Guide: Twilight Ascension Rewards, Rare Timers, and Collectibles
- Endeavor: A Deeper Dive Into WoW’s Expansive New System
- LOADS of Extra Decors You Did NOT Know About!
- World of Warcraft Players Score Exclusive Housing Decor with Diablo 4: Lord of Hatred Pre-Order
- Brawler´s Guild 2025 GUIDE
- Legion Remix Decor will be available after Legion Remix


