Shriekwing
This fight has two phases
Phase 1 when boss gets the Blood up.
Phase 2 when boss has reached 100 Blood
Positioning
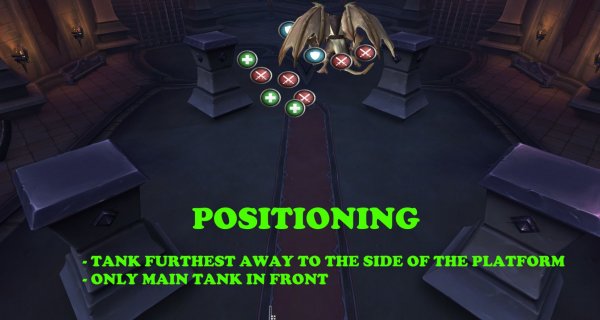
Phase 1
Tank boss furthest back to the side of the platform.
Raid behind boss.
Only main tank in front.
Phase 2
Spread out and dont be close to boss.
Phase 1
Tank swap each Exsanguinating Bite
Run away from raid when you have Echolocation (red arrow on head).
Hide behind pillar when boss does Earsplitting Shriek.
HEROIC MODE: Dodge the beams that boss shoots out.
Phase 2
No tanking here. Boss starts at middle and searches for players.
Stay away from boss.
Hide behind pillar when boss does Earsplitting Shriek.
Dodge the beams that boss shoots out.
Huntsman Altimor
During entire fight
- Make sure you are spread (Boss does a frontal dmg on random target).
- Stand still when targeted with red arrow by boss. The raid moves away from you.
Don’t stand between boss and player with arrow (Melee beware)
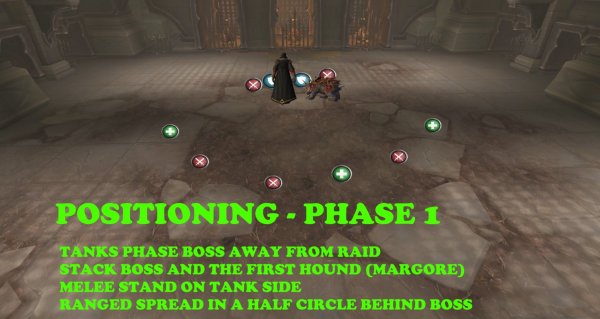
Margore (Phase 1)
- Stack the boss and hound.
- Tank swap at 2 stacks of Jagged Claws bleed.
- Stack up on player with big red circle and soak.
- Heroic mode – The soak puts a debuff. Not to many soak.
Bargast (Phase 2)
- Split the boss and Bargast. Alternative, move Bargast away every 30 sec when it will cast Rip Soul.
- Healers must heal the Soul to that spawns from the hound tank before it reaches the boss. Heal to full health.
- CC the 2 adds that spawns and wait until 40 stacks before you nuke them (they get a stacking debuff that increase dmg taken).
- Stun/fear/knockback when add casts Deathly Roar.

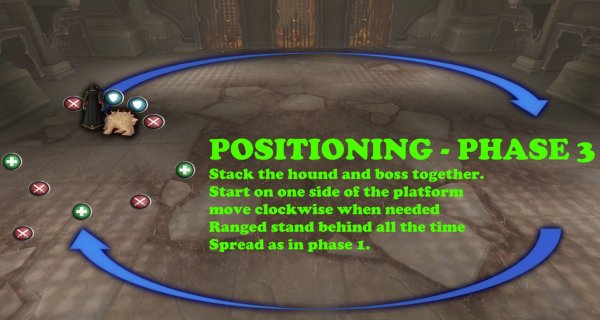
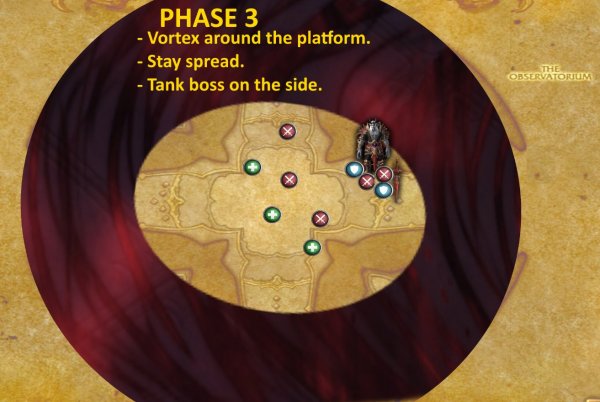
Hecutis (Phase 3)
- Stack boss and hound and start fighting on the outer side of platform.
- Move clockwise when needed to reduce dmg stacks on hound. Less stacks less dmg increase.
BUT, then dog moves, it does raid dmg. - Bloodlust/Timewarp/Heroism on this phase.
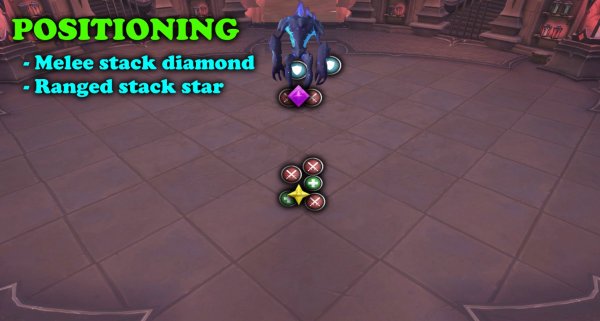
Hungering Destroyer
- Positioning: Ranged stack up further back. Melee stack up behind boss. Tanks face boss away from raid.
- Stack up in your group when white Circle around a player so they take health back from pother players.
- Spread when all players have a dark circle around them. HEROIC – Soak the orbs that spawns (one each or players with immunity).
- Run away from boss when he sucks you in.
- Tank swap at 4-5 stacks on boss (not on tank).
- Run to the side when having arrow on your head.
Artificer Xy’mox
- 2 random players get debuff that spawn portal on players feet when expired throughout the fight (only 2 portals on platform per time)
- Start of fight: Place a portal on far-right side and one on far-left side.
- 40% boss health: Place a portal in the middle and one on the far-left side.
- Tank boss on far-left side.
- Tank debuff runs to upper corner and let it blow off there.
- Phase 1 (100% HP) – Run away from fixating adds (use portals to move faster).
- Phase 2 (70% HP) – 4 seeds will spawn, pick them up and move all seeds to far right side and keep tank side free and raid stacks there. Use portals to move it faster and players that move fast.
- Phase 3 (40% HP) – Place portal in middle now and one on the edge. Use the portal when boss sucks you in. Run away from middle or you die when boss does “Edge of Annihilation”.
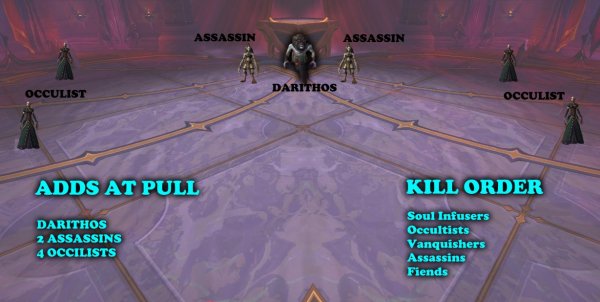
Sun King's Salvation
Two phase fight rotation
Phase 1 you deal with adds and heal Kaelthas.
Phase 2 you deal with a Shade of Kaelthas and 3 phoenixes.
Phase 2 starts at 40% Kaelthas HP and then again at 90%.
Phase 1 starts at pull and when Shade is at 50%.
Phase 1
Stay spread
Heal Kaelthas by using the pedestals between the add waves.
Heal the Essence fonts to 100% when Occulists die and drops them (it heals Kaelthas).
Heal Kaelthas after picking up orb that Soul Infusers drop when dead (it boosts your heal).
First time its to 40% health.
Second time its to 90% health.
Adds kill order: Soul Infusers > Occultists > Vanquishers > Assassins > Fiends
Soul Infusers – Kill before reaching Kaelthas.
Occultists - Interrupt to group up on Vanquisher add.
Vanquishers – Tank it. Swap at 4 stacks. Kill all other adds on on top of this for cleave dmg.
Assassins – Raid spread (they charge). Stack these adds. Turns to stone and heals full hp, beware.
Fiends – Trash in the end. AoE if alive after all other adds are dead.
Phase 2
Tank boss on side of platform and phase Shade away from raid.
Raid behind boss
No one in front of boss except for main tank (boss does frontal cleave)
Ember Blast - Soak players with red circle (or use immunity)
Heroic mode: Watch out for boss frontal dmg (Blazing Surge) on random players.
Bloodlust/Timewarp/Heroism on phase 2 (When attacking Shade).
Lady Inerva Darkvein
- She has four abilities.
- Each ability has a power level 1-3.
- The power is activated through 4 containers (one for each ability). Each container has a bar that fills up.
- You click on a container to drain it so it doesn’t level up. But boss will make 1 at a time become immune to drain and will hit level 3.
- Assign players to drain the containers.
- Ability 1 – Desire
Happens when boss reaches 100 energy and it´s a big dmg on tank + debuff.
Tank swap at 2 stacks. - Ability 2 – Bottle Anima
Boss throws several bottles on the ground that does high shadow dmg to players within 3 yards. If no players are hit, it does high shadow dmg to all players.
Spread out and run and stand on the circle where the impact of a bottle will be. - Ability 3 – Sin
3 orbs will spawn that does dmg to closest player.
Remove them with the 3 players that has beams connected between them.
Connected players must make sure that the beams hit the orbs at the same time to remove them. - Ability 4: Concentrated Anima
3 random players with a circle around them and an arrow on them. After 10 sec it does dmg and spawns add on each circle. Two casters and 1 melee.
Targeted players stack up on boss so all adds stack there (adds don’t move).
Tank big add. Interrupt casters. Kill casters first. Single target dmg.
Power up abilities
- Desire is immune and gets filled to rank 3 first.
Level 2 – debuff on tank is copied to random players. Healers beware.
Level 3 –Tank debuff explodes when expired. Run away from raid before expiration. - Bottled Anima gets filled to rank 3 second.
Level 2 – pools spawn on bottle location. Beware.
Level 3 - – Bottles will bounce and hit the ground 2 times in total. soak each bottle two times. - Sin is immune and gets filled to rank 3 as third.
Level 2 – Standing inside the beams of 3 players does dmg. Try to avoid it.
Level 3 – The beams from the orbs rotates. - Concentrated Anima is immune and gets filled to rank 3 as the last one.
Level 2 – Debuffed players are rooted. Stand closer to each other when that container gets filled.
Level 3 – Each debuff shoots fragments on all directions when expired that does tons of dmg. Dodge them.
The council of Blood
- You will fight 3 bosses at the same time.
- These bosses do NOT share health.
- When a boss dies, the other two get their health back up to 100%.
- When a boss dies, the other two get an extra ability each.
- Each boss has 2 main abilities.
- When one boss dies, the other 2 gets full health and an extra boss ability each.
When the 2nd boss dies, the last boss gets full health and another boss ability. - When a boss gets 50% health, you enter intermission and have to dance.
The main abilities
Stavros
Teleports behind tank and does a rush toward tank.
Melee must fight this boss from the side of him, not in front or behind.
Several players are targeted in pairs and must find each other to remove dmg on them.
Also, dmg circles spawns under them several times.
Players must find each other fast and run together until pools stops spawning.
Freida
Casts Bolt of power that does raid dmg.
Must be interrupted.
Niklaus
Summons an add that runs to the boss and shields him.
Kill that add asap.
The extra boss abilities
Stavros 1st extra ability
Dancing adds spawns on the platform that must be dodged.
Stavros 2nd extra ability
Entire platform is full of dancers.
One pair of dancers can be killed and must be killed before time runs out and it’s a raid wipe.
Freida 1st extra ability
Does heavy raid dmg periodically.
Freida 2nd extra ability
Summons soul spikes that impale tank plus a increase dmg taken debuff.
Same time, entire raid takes dmg as well.
Niklaus 1st extra ability
Summons small adds that attacks raid.
Bring boss to the adds and cleave dmg on them while attacking boss.
Niklaus 2nd extra ability
Summons a big add that does very heavy dmg and must be tanked and tank swap asap.
Full nuke on that add.
Kill Order
- Stavros
- Frieda
- Niklaus
The dance
Whenever a boss reaches 50% health, they will retreat to the balcony and players have to dance.
Each player gets a position to stand on. It is highlighted with light. Run in to it to start the dance.
You will have to move accordingly (left, right, up, down).
Watch the positioning of the small goblin NPC. Face the same direction as the NPC.
You have to do the same as they do.
The platform has a square form shape. Move an entire square, when you move.
If you failed in anyway (didn’t run to the light, danced wrong moves) you will be sent to a cage on the side of the platform and die.
Tanks
Main tank on Stavros
Off tank on Niklaus.
Tank swap needed
Sludgefist
- Tank boss away from pillars.
- Make sure off-tank is closest to boss, melee at max melee range.
- Targeted player (tank) when boss does Hateful Gaze runs behind a pillar so boss hits it. No one stands in between. This happens when boss reaches 100 energy. Dont let boss hit a wall, thats a wipe.
- Chain linked players must stack together. Don’t break if you BOTH can´t use any good defensive or immunity. It´s gone after 56 sec.
- Run away from boss when you see a big circle around him (Destructive Stomp).
- Bloodlust/Heroism/Timewarp at 20% health. That’s when boss enrages and does more 20% more dmg and faster melee attacks.
- Heroic Mode: 3-4 players stack up on the player that is slammed with the big chain. You will be dragged to boss and split the dmg when reaching boss.
Stone Legion Generals

Raid Stacks
Tank boss and face away from raid.
Phase 1 and 3
When targeted by Wicked Blade run to those markers. Make sure no one is between you and the boss throwing this Blade.
Stand there When targeted by Crysallize. Raid help soaking it.
Phase 2 and 3
Place circle on star side when Reverberating Eruption.
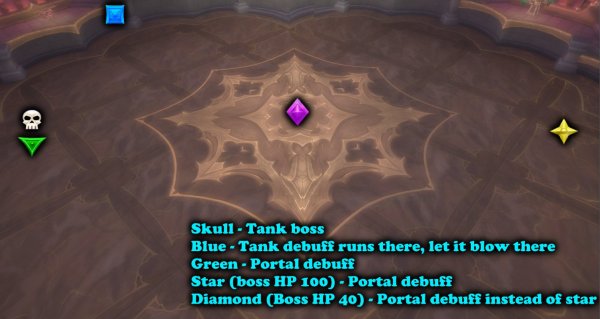
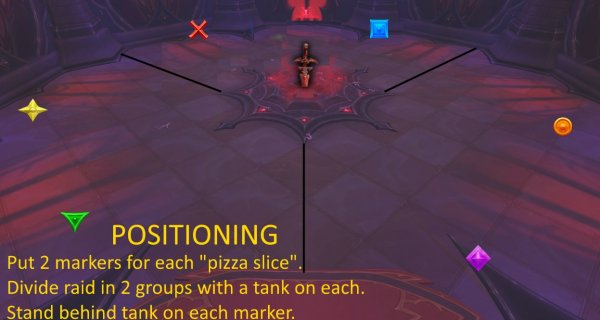
Sire Denathrius
This fight has 3 phases and 1 intermission.
Phase 1
- Phase 1 has a mini enrage because the boss must have 70% health to get to phase 2 before the platform is covered with anima.
- There is a dagger in the middle of the platform (Remoria). When boss reaches 100 energy, 1/3 of the platform is covered in a pizza slice anima that reduces all healing taken by 100% and does Shadow dmg every sec when standing on it.
- At the start of the fight, every player gets 5 stacks of a debuff, called Burden of Sin.
- Every 2 sec, it does Shadow dmg per stack the player has.
- Players must remove at least 3 stacks before phase 1 ends.
- Players must be hit by the boss´s frontal cast, called Cleansing Pain to remove Burned of Sin before they run out of space, to avoid Ravage.
- Each hit removes 1 stack of Burden of Sin.
- The frontal cast (Cleansing Pain) also spawns an add (Echo of Sin) next to each player for each stack that is removed.
- Each add casts shadow dmg to all players every 2 sec and cannot be crowd controlled. Must be AoE nuked fast.
- Boss will also cast Blood Price that does dmg to all players that have the same amount of stacks of Burden of Sin.
- Divide the raid in 2 groups with a tank on each group. Tank swap after each front cast (Cleansing Pain) so that each group will get the hit every 2nd
- HEROIC MODE - After each frontal cast, two boss images will spawn and mark 2 random players (a line between the image and the player) and charge them (Blood Price). The charge must be soaked otherwise it heals boss. Soak by standing on the line, not on the player.
Intermission
- When boss reaches 70% health, he teleports to the middle and pushes everyone back.
- Players must run in to the center where boss is before 15 sec or they die.
- Each stack they have left of Burden of Sin will put a 20% slow.
- Players cannot use abilities in this intermission.
Phase 2
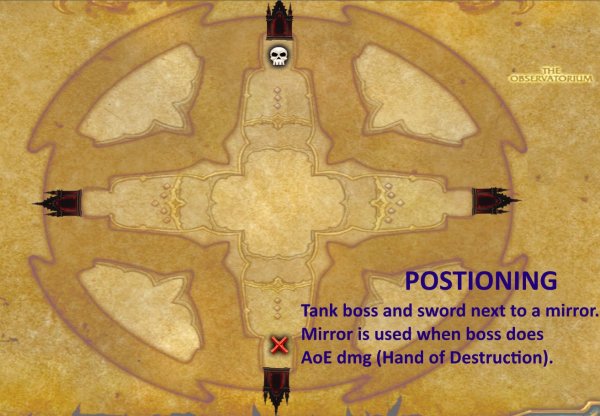
- The platform is cross shaped with a mirror on each side. The corners got small platforms.
- On phase 2, you will fight the boss, his floating dagger and waves of adds.
- One tank must be on boss and one tank must be on the dagger Remornia.
- Adds will not be tanked.
- Tank swap each Wracking Pain
- Tank the boss and dagger next to a mirror. When boss does AoE Hand of Destruction, run through the mirror so you get teleported to the other side and take less dmg.
- When boss has 100 energy, big blades will swipe through the platform. Dodge the Red lines on the platform.
- 4 adds will spawn periodiacally. 2 on main platform and 2 on side platforms. Ranged on the ones on the side platforms. Nuke them fast.
- The Dagger will target a player. Move away from that player fast. The dagger will rush at the player and does dmg to anyone in the way as well.
Phase 3
- Starts when boss has 40% health.
- He will cast a mealstorm on the platform so that you cant use side mirrors. Running out from platform will kill you pretty fast.
- Boss will have the dagger on his hand now instead.
- Boss spawns an image of himself that does
- 1 ability from phase 1: The cone shaped anima. Move to the side.
- 1 ability from phase 2: The big blades that swipes through the platform. Dodge them
- Tank swap when getting the scorn debuff or after Shattering pain.
- Shattering pain does a combo on tank and ends with an AoE blast on raid. Tank use defensives, healers heal up raid as well.
- Boss targets 5 players that he will slash. This leaves a debuff within 9 yards. Stay pread.
HEORIC MODE – Leaves spheres when debuff ends that must be soaked or wipe. - Boss pulls all to him and does the blast (same as phase 2 – Hand of Destruction). You can only run far away now because there are no mirrors to use. Use defensives.
- Bloodlust / Timewarp / Heroism
Other posts
- Ultimate Guide to Farming Timewarped Badges in WoW Midnight (2026)
- Gearing ALTS EASIER in this UPDATE in 12.0.7
- World of Warcraft 12.0.7 Revelations Roadmap: Your Complete Content Release Schedule
- MRGM Caught Red-Handed Stealing WoW PTR Discoveries – The Predictable Pattern of Content Theft Continues
- The BEST Midnight Season 1 DPS Tier List Guide
- Midnight Pre-Patch Event Guide: Twilight Ascension Rewards, Rare Timers, and Collectibles
- Endeavor: A Deeper Dive Into WoW’s Expansive New System
- LOADS of Extra Decors You Did NOT Know About!
- World of Warcraft Players Score Exclusive Housing Decor with Diablo 4: Lord of Hatred Pre-Order
- Brawler´s Guild 2025 GUIDE


