Background
Mistress Sassz´ine has spent a lifetime binding the denizens of the ocean to her dark will. With this power, she summons nightmares from the briny depths to wash away any who dare challenge her.
Overview
In this encounter, you will fight a Naga boss in 3 phases that loops over and over until boss is dead.
The platform is circular covered by an aquarium looking dome.
Boss will summon Stalker adds during the entire fight and puts a debuff on main tank that also does damage to the entire raid. The boss will also target players and shoot arrows (Hydra shots) that
Phase 1 starts at pull.
The boss has 3 abilities in phase 1.
She will summon several tornadoes (slicing tornado) that travels through the room from one wall, to the other.
She will summon murlocs (Consuming Hunger) that jumps on players backs and immune to dmg.
She will summon pools of jellyfishes (Thundering Shock) on the ground (which knocks the murlocs of players backs).
Phase 2 starts when boss health is at 70%
In this phase, the boss will take help from bigger sea monsters.
Boss summons an Octopus that is attached on the outside wall of the platform. The Octopus shoots ink pools on the platform.
Boss summons a shark, in which the shark head is on the bottom side of the platform. The shark sucks players to him to eat up.
Boss summons a big wale that jumps up from the bottom platform and lands again through the platform.
Phase 3 starts when boss health is at 40%
In this phase, the boss will use some of the same abilities from phase 1 (Consuming Hunger. Slicing Tornado) and 2 (Summon Ossunet, Call Vellius) but now they are empowered instead.
She will summon the Octopus with the ink pools, that does more damage and 50% slow instead of 35%.
She will summon the big wale that jumps up and smashes the ground.
She will summon tornadoes.
She will summon Murlocs
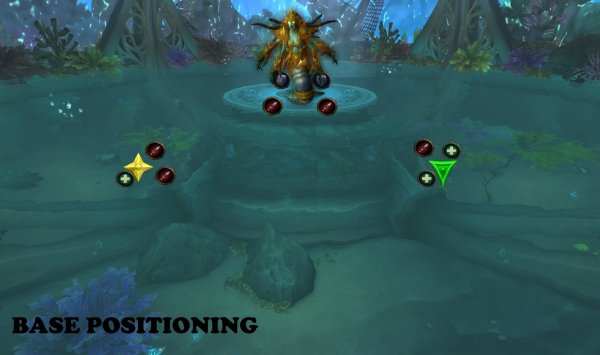
Positioning
Since there are abilities that will occur during the entire encounter, you need a base positioning.
The base positioning will be what the raid will aim for when there are no other mechanics to move away from.
The base positioning must be followed during the entire fight and only move away from positions when other mechanics require movements.
Abilities and tactics
Abilities during all 3 phases
There are 3 abilities that will occur during the entire fight and are not phase dependent.
One is a tank debuff (Burden) and the other is adds spawn (Stalkers) that needs to be tanked and nuked. Boss will also shoot Hydra shots that needs to pass players to reduce damage.
In Raid Finder mode, you will not have Hydra shot.
In mythic mode, you will have one extra ability: Delicious Bufferfish (Pick up fish that gives 2% extra dmg and 350 mana every 1 sec up to 50 stacks)
Burden of Pain
Boss puts a debuff on main tank.
This does shadow damage every second.
100% of all physical damage the tank takes while having this debuff will be shared to entire raid.
Tactic: Burden of Pain
Tank Swap each Burden.
Use mitigation to minimize damage taken, so raid takes less damage.
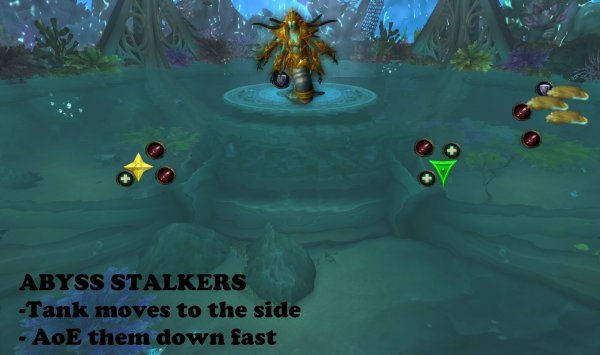
Abyss Stalkers
Boss summons 3 adds.
The adds do melee shadow dmg.
When a stalker add dies, it leaves a pool on the ground for 20 sec, that does shadow dmg, and hit chance reduced by 75%.
Tactic: Abyss Stalkers
Off Tank
Pick up the adds asap and moves them to the edge of the room.
Dps
AoE nuke the adds fast.
In this way, the pools that develops when they die, are on the side, away from raid.
Extra tactic for heroic+: kill these adds in a way so that they develop the pools in a line since these pools will remove whirlwinds.
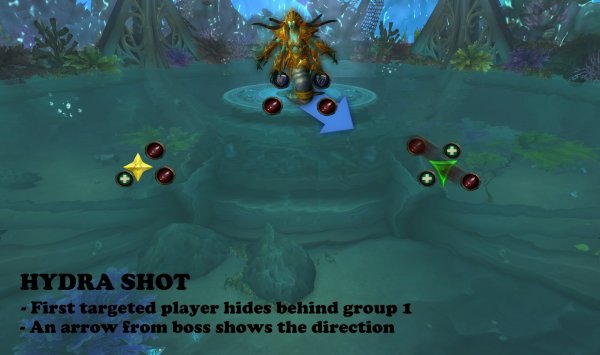
Hydra shots
Boss targets a player.
After 6 seconds, she shoots arrows on that player that does 3 million in physical damage.
Players standing in front of the arrows share damage with targeted player.
Each player hit, gets a debuff called Hydra Acid.
The debuff does ticking damage and if players get 2 or more stacks, they are stunned for 6 seconds.
Tactic: Hydra shots
It is very important that players know their positioning during the entire fight since this ability will be during the whole fight.
The ranged players needs to be divided in 2 groups.
Group 1 – on star triangle
Group 2 – on star marker
First player targeted by Hydra shot, needs to hide behind group 1.
Next player targeted by Hydra shot, needs to hide behind group 2.
Third player targeted by Hydra shot, needs to hide behind group 1.
And so on..
So not the same group gets the Acid debuff every time.
Have at least 3 ranged players in each group.
If there is not enough ranged, the melee players need to help: divide the melee in two groups and have them positioned between boss and their marker (star/triangle).
PHASE 1 – TEN THOUSAND FANGS
Phase 1 starts at pull.
The boss has 3 abilities in phase 1.
She will summon several tornadoes (slicing tornado) that travels through the room from one wall, to the other.
She will summon murlocs (Consuming Hunger) that jumps on players backs and immune to dmg.
She will summon pools of jellyfishes (Thundering Shock) on the ground (which knocks the murlocs of players backs).
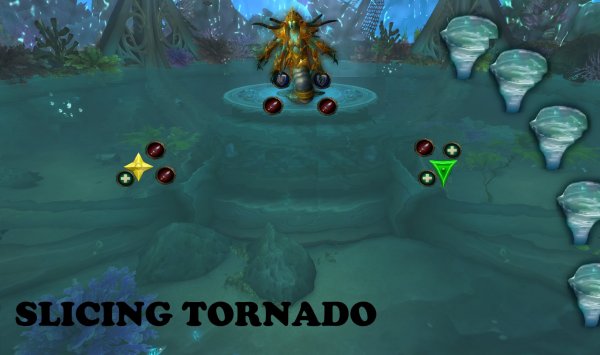
Slicing Tornado
Boss summons tornadoes that travels from one side of the platform, to the other, with a gap between each tornado.
Getting hit leaves a debuff that does physical damage every second for 20 seconds.
Tactic: Slicing Tornado
The tornadoes comes in a line next to each other with a gap between each other.
The tornadoes can come from any direction in the room.
Make sure to always check where they come from and dodge them.
Make sure to come back to your position again because of other abilities.
Remember: If a tornado touches the green pool (from dead Abyss stalkers) they will vanish, so you can use that by standing behind them as well.
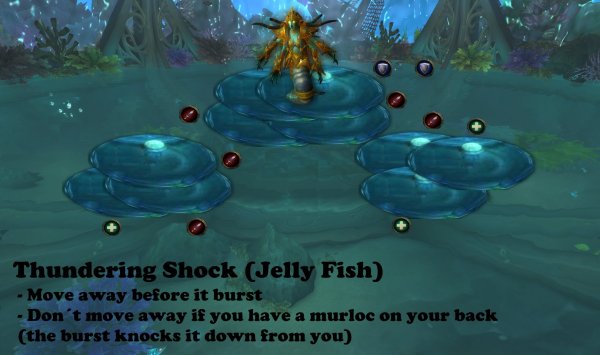
Consuming Hunger and Thundering Shock in heroic mode
Boss summons murlocs called Razorjaw Waverunners.
These murlocs jumps on players backs and are immune to damage.
Murloc on a player does physical dmg every 2 seconds.
Boss also targets several/all players and summons jellyfishes underneath them (Thundering Shock).
After 3 seconds they burst. Standing on the jellyfish does high dmg and stuns for 4 seconds.
This also knocks a murloc of the players back.
Murlocs shoot water blast at players that are low range. The blast does high dmg.
Normal mode: Just kill murlocs directly, nothing special.
Tactic: Consuming Hunger and Thunder Shock in Heroic mode
Player with a murloc must stay on the jellyfish when boss casts Thundering Shock.
This knocks the murloc of the player and can now be attacked.
Player with no murloc on their back, must move away fast before the jellyfish explodes.
Dps
Kill the murlocs as soon as they are knocked of players.
Interrupt the water blasts.
Healers
Dispel players with Thundering Shock debuff if they got hit by the jellyfish burst.
Players standing on pools take heavy dmg.
Beware and heal them back up.
PHASE 2 – TERRORS OF THE DEEP
Phase 2 starts when boss health is at 70%
In this phase, the boss will take help from bigger sea monsters.
Boss summons an Octopus that is attached on the outside wall of the platform. The Octopus shoots ink pools on the platform.
Boss summons a shark, in which the shark head is on the bottom side of the platform. The shark sucks players to him to eat up.
Boss summons a big wale that jumps up from the bottom platform and lands again through the platform.
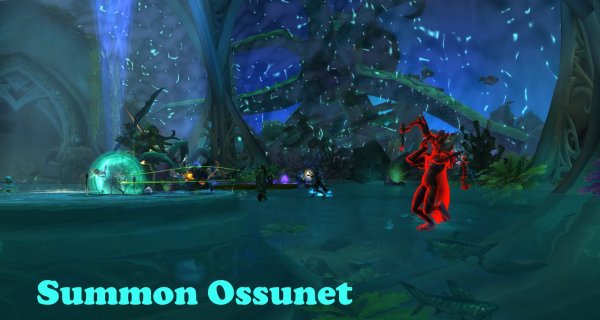
Summon Ossunet and Becon Sarukel
Boss summons an Octopus that is attached on the outside wall of the platform. The Octopus shoots ink pools on the platform called.
Standing on the pool gives a debuff called Befouling Ink.
This Debuff does shadow damage every 2 sec and speed by 35% for 10 seconds.
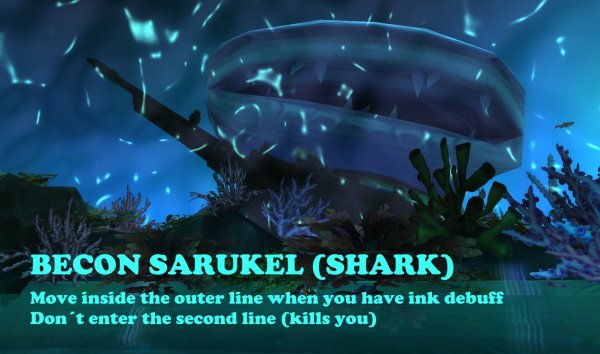
A short time after Octopus Ossunet, the shark will appear (Becon Sarukel).
This shark will breath in and suck all players to him (Devouring Maw).
This does raid damage to all players and if any player comes within 15 yards to him, the player dies.
Tactic: Summon Ossunet and Becon Sarukel
The ink pools are important to stop the shark when he breathes in and sucks players to him.
Have selected ranged (healers/dps) players to do this.
3 players with ink debuff is needed to stop the shark.
Ranged
Stand on a pool before the shark comes (Becon Sarukel).
When you have the debuff, move to the shark head.
In front of the head are 2 lines, an outer and an inner. Cross the outer line only and then run out.
Coming closer to the shark (crossing the inner line) will kill you.
Healers
Debuff players will take heavy damage, beware and heal them up.
When shark does AoE damage, use healing cooldowns.
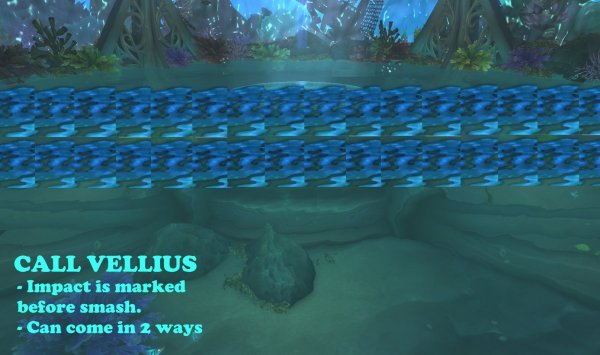
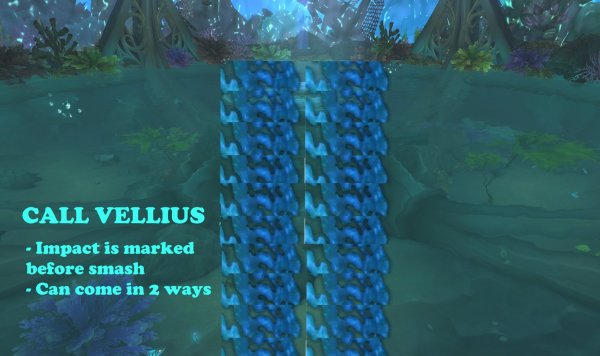
Call Vellius
This wale will jump into the platform and land and smash through the platform (the platform will always be intact for players)
If a player comes in contact with him, they get knocked back and does deadly damage.
Tactic Call Vellius
You will see a mark on the ground before he jumps up, move away from it fast.
The mark is a big line crossing from one side of the platform, to other.
The wale will jump left to right or bottom to top of the platform, so beware.
PHASE 3 – VAST THE OCEANS WITH WRATH
Phase 3 starts when boss health is at 40%
In this phase, the boss will use some of the same abilities from phase 1 (Consuming Hunger. Slicing Tornado) and 2 (Summon Ossunet, Call Vellius) but now they are empowered instead.
She will summon the Octopus with the ink pools, that does more damage and 50% slow instead of 35%.
She will summon the big wale that jumps up and smashes the ground.
She will summon tornadoes.
She will summon Murlocs
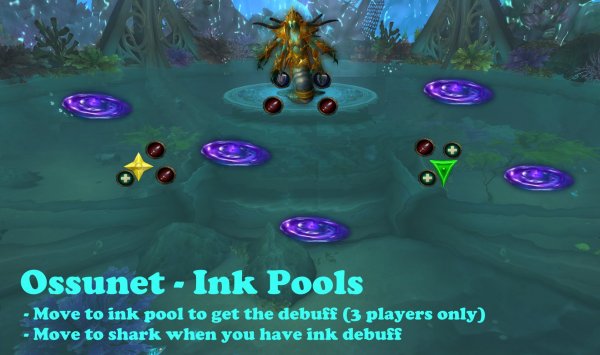
Summon Ossunet
Boss summons an Octopus that is attached on the outside wall of the platform. The Octopus shoots ink pools on the platform-
Standing on the pool gives a debuff called Befouling Ink.
This Debuff does shadow damage every 2 sec and speed by 50% for 10 seconds.
Tactic Summon Ossunet
The pools are landed on random locations.
They need to me removed from the ground if they are on positions players need to be.
Have players that has personal immunity to stand on them and clear them of the platform (paladin bubble, hunter bubble, death knight bubble, rouges etc).
Call Vellius
This wale will jump into the platform and land and smash through the platform (the platform will always be intact for players)
If a player comes in contact with him, they get knocked back and does deadly damage.
Tactic Call Vellius
You will see a mark on the ground before he jumps up, move away from it fast.
The mark is a big line crossing from one side of the platform, to other.
The wale will jump left to right or bottom to top of the platform, so beware.
Slicing Tornado
Boss summons tornadoes that travels from one side of the platform, to the other, with a gap between each tornado.
Getting hit leaves a debuff that does physical damage every second for 20 seconds.
Tactic: Slicing Tornado
The tornadoes comes in a line next to each other with a gap between each other.
The tornadoes can come from any direction in the room.
Make sure to always check where they come from and dodge them.
Make sure to come back to your position again because of other abilities.
Consuming Hunger
Boss summons murlocs called Razorjaw Waverunners.
These murlocs jumps on players backs and are immune to damage, but on this phase it seems that they jump down on their own will after some time.
Murloc on a player does physical dmg every 2 seconds.
Tactic: Consuming Hunger
Healers
Heavy Healing on players that have murlocs on them.
When to Bloodlust/Timewarp/Heroism
On start of third phase when boss is at 40% Health.
Other posts
- World of Warcraft 12.0.7 Revelations Roadmap: Your Complete Content Release Schedule
- MRGM Caught Red-Handed Stealing WoW PTR Discoveries – The Predictable Pattern of Content Theft Continues
- The BEST Midnight Season 1 DPS Tier List Guide
- Midnight Pre-Patch Event Guide: Twilight Ascension Rewards, Rare Timers, and Collectibles
- Endeavor: A Deeper Dive Into WoW’s Expansive New System
- LOADS of Extra Decors You Did NOT Know About!
- World of Warcraft Players Score Exclusive Housing Decor with Diablo 4: Lord of Hatred Pre-Order
- Brawler´s Guild 2025 GUIDE
- Legion Remix Decor will be available after Legion Remix
- Professions Unpacked: Your Guide to Crafting Housing Decor with Reagents from Every Era


