Background
When Aegwyn defeated the Avatar of Sargeras, she was unable to destroy his avatar. In an effort to seal it away, the armor has entombed beneath the Temple of Elune, where is remained dormant for hundreds of years. Now, with the Legion tearing down the tomb´s barriers, Kil´jaeden is in position to reanimate the armor and unleash its power on Azeroth.
Overview
This fight is divided in 2 phases in which the second phase is the longest.
Phase 1
- You will fight the mini boss Maiden of Valor and the main boss, The Fallen Avatar.
- The main boss, The Fallen Avatar is trapped and can´t move, but uses loads of abilities on you.
- Fallen Avatar and Maiden have an energy bar. When it reaches 100 energy they will do different things:
• Fallen Avatar will kill Maiden and take the health she has left and put it on himself instead.
• Maiden will put a shield on herself (25% of remaining health absorption) and start casting a spell that kills the raid. If the shield is not broken before Maiden casts the spell, it’s a wipe.
- The energy comes from Pylons on the platform, every 40 seconds by shooting beams at the boss.
- Players need tank Maiden in front of the beam to intercept it from the Pylon so that Maiden gets the energy instead of the boss.
Phase 2
- When boss reaches 100 energy, phase 2 starts.
- The boss destroys the trap and this will destroy the entire platform.
- Players will fall down to a new platform and fight only the boss.
Now, the boss can move.
- The boss has 4 abilities in this phase.
- Boss will destroy the platform after a while and players need to fight the boss surrounded in lava and pieces of platforms, ending with just lava.
- This entire phase is all about mastering players to stack up on Dark Marked players and run away when boss does AoE blast, Sear.
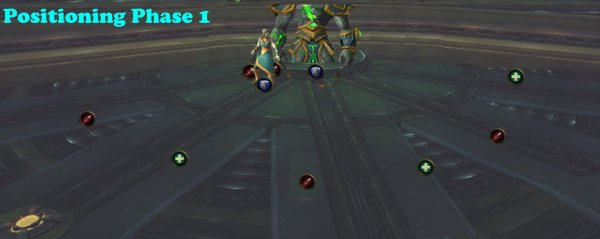
Positioning
PHASE 1
Tanks
Main tank on boss Off tank on Maiden (Tank swap between them occurs) Tank Maiden in between the pylon and boss, in this way she will not get hit with splash damage.
Melee
Spread around Avatar boss
Ranged
Stand spread in a half circle around boss. Spread out from each other at least 10 yards.
PHASE 2
Tanks
Tank boss at the edge of the platf2rm all the time. Always tank boss on a platform.
Melee
Behind boss
Ranged
Half circle around boss Do not spread around boss, try to stay in range to each other.
Abilities and Tactics
PHASE 1 – A SLUMBER DISTURBED
You will fight the mini boss Maiden of Valor and the main boss, The Fallen Avatar.
- The main boss, The Fallen Avatar is trapped and can´t move, but uses loads of abilities on you.
- Fallen Avatar and Maiden have an energy bar. When it reaches 100 energy they will do different things:
• Fallen Avatar will kill Maiden and take the health she has left and put it on himself instead.
• Maiden will put a shield on herself (25% of remaining health absorption) and start casting a spell that kills the raid. If the shield is not broken before Maiden casts the spell, it’s a wipe.
- The energy comes from Pylons on the platform, every 40 seconds by shooting beams at the boss.
- Players need tank Maiden in front of the beam to intercept it from the Pylon so that Maiden gets the energy instead of the boss.
- Every time Maiden reaches 100 energy and get the shield, all focus on her only to break it. If all is done correct, she will use the shield 4 times before phase 2. First shield has the highest absorption since it absorbs 25% of her health.
Boss (Fallen Avatar)
Touch of Sargeras (Heroic mode)
Boss creates fissures on the ground. After 8 seconds, the fissures explodes and each one does 5 million damage to all players. If a fissure is absorbed, it will do 7.5 million damage to players, but equally divided instead.
Tactic: Touch of Sargeras (Heroic)
Raid
Players need to stand on all 3 fissures (A player for each fissure).
Healers
This will cause raid damage, beware.
Tip: Divide the raid in 3 groups:
Group stack on fissure left fissure.
Group 2 stacks on fissure in the middle.
Group 3 stacks on the right fissure.

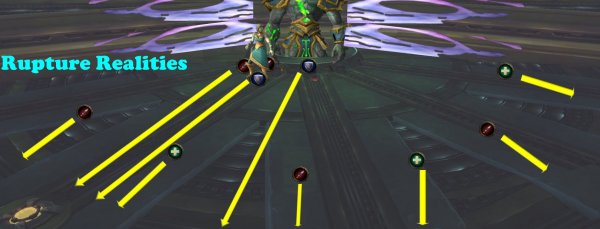
Rupture Realities
Boss unleashes a blast from himself. This does deadly damage.
Players further away from boss when he does blast will take less damage.
Tactic: Rupture Realities
Boss charges the cast for 6-7 seconds before he does the blast.
Run far away from boss before he unleashes the blast.
Unbound Chaos
Boss targets several players and shoots several fire bombs on players location. When a location is targeted, it will explode after 1.5 seconds.
This explosion will do dmg to all players within 5 yards of the explosion.
Players hit by the explosion will also get a debuff that does fire damage every 0.5 seconds for 4 seconds.
Tactic: Unbound Chaos
Move away fast to the direction behind you and run towards the wall. When all bombs are shot, move back to position.

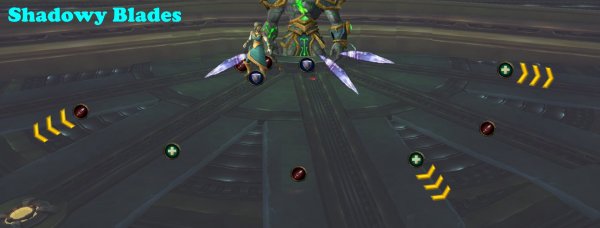
Shadowy Blades
Boss targets 3 random players.
After some seconds, he shoots purple blades that will move fast towards each targeted player and do Shadow damage.
When the 3 players get hit by the blade it will explode and do damage on targeted player, and any player within 10 yards of targeted player.
Heroic mode: The blade explosion does 2.7 million damage to targeted player and any player within 7 yards. This will also create a pool on ground (Lingering Darkness). Any player standing in the pool will suffer dmg every 2 sec and also slowed for 50%.
Tactic: Shadowy Blades
A symbol is shown above the head of the targeted players Ranged
Targeted players make sure you are spread from each other at least 10 yards.
Melee
Target players run fast to the side, get hit, run back in to Maiden again.
Heroic mode: Shadowy blades
Raid
Targeted players run fast to the outer wall before you get hit, so that the pools are placed away from raid.
Desolate
Boss does high/deadly physical damage to the tank.
The hit puts a stacking debuff that increases damage taken by 50% for 29 seconds.
Tactic: Desolate
One tank on boss.
One tank on maiden.
Use defensive cooldown before the Desolate hit from boss.
Tank swap after each Desolate debuff (the one tanking boss will switch to Maiden and vice versa)
Consume
When boss reaches 100 energy, he will break his trap.
He will also kill Maiden, but the health she has left before she dies will heal the boss.
Tactic: Consume
You need to make sure that the boss doesn’t hit 100 energy to fast, until Maiden is dead.
See tactic below regarding the Matrix Empowerment.
Ripple of Darkness
If no player is in melee combat with the boss, he will do high damage to all players in the raid.
Tactic: Ripple of Darkness
See positioning tactic further up.
Run fast back to boss after he does Rupture Realities (the big blast) since you have to run far away from him.
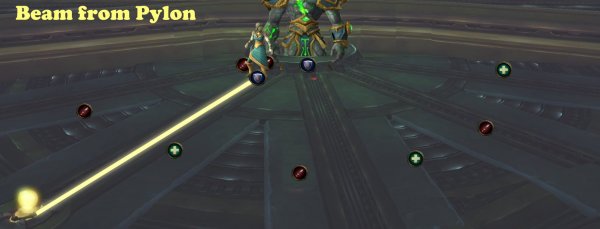
Maiden of War – Abilities
Tank: position her so that she gets hit by the beam from the Pylons and further away from boss so she doesn´t take splash damage
Cleansing Protocol
When Maiden reaches 100 energy, she will put an absorb shield on her. This shield absorbs 25% of her maximum health.
When she has the shield, she will cast Cleansing Protocol that kills the raid.
If the absorb shield is broken, she malfunctions and does 25% of her health as damage to herself and stuns her for 4 seconds which interrupts all casts.
Tactic: Cleansing Protocol
Raid
Dps, tanks and healers will help nuking the shield down.
The plan is that she will get a shield 4 times before phase 2.
Containment Pylon
Corrupted Matrix
When the Matrix is activated, Pylons will shoot beams at the boss so he gets energy every second for 40 seconds.
Maiden can intercept the beam so that she gets the energy instead.
Tactic: Corrupted Matrix
Position Maiden so that she gets hit by the beam.
There are 6 pylons in a half circle on the ground, all leading to boss. The Pylons shoots energy to the boss.
Only one pylon is activated every time and then changes to a random one.
You can clearly see what pylon is activated since that pylon is on fire and has a fel beam on the boss. Offtank needs to move Maiden so that she will get hit by the beam.
PHASE 2 – AN AVATAR AWAKENED
- When boss reaches 100 energy, phase 2 starts. Remember about what happens to Maiden and the balance of energy between the (see above).
- The boss destroys the trap and this will destroy the entire
- Players will fall down to a new platform and fight only the
Now, the boss can move.
- The boss has 4 abilities in this
- Boss will destroy the platform after a while and players need to fight the boss surrounded in lava and pieces of platforms, ending with just
- This entire phase is all about mastering players to stack up on Dark Marked players and run away when boss does AoE blast,

Dark Mark
Boss marks a random player.
After 6 sec, that player will do 6-9 million damage to players within 8 yards. The damage is divided between players within 8 yards of the targeted player. The damage knocks players up into the air.
Tactic: Dark Mark
Targeted players will have a big circle around them with an arrow pointed down at them.
Raid
Run fast to the players that are targeted with Dark Mark and share the damage.
Healers
Beware of raid damage here, especially that players will take damage again, after they land as well.

Sear
Boss unleashes a big fire wave
This does damage to all players, every 2 seconds.
Heroic Mode: The damage of Sear is increased by 50% when boss stands on lava.
Tactic: Sear
Healers
Make sure you have major healing cooldowns ready for this part.
Raid
Use defensive cooldowns
Players maybe have to stack up for more efficient heals.
Rupture Realities (phase 2)
Boss unleashes a blast from himself. This does deadly damage.
Players further away from boss when he does blast will take less damage.
This will also break the platform and leave some pieces of the platform left. Lava is under the platform that is not deep, players can stand on it.
Tactic: Rupture Realities (phase 2)
Boss charges the cast for 6-7 seconds before he does the blast. Run far away from boss before he unleashes the blast.
Jump outside the platform even. After the platform breaks:
Tanks
Move the boss to a platform fast.
Raid
Can stand in the lava or platform.
After a while there will be no more platforms to stand on.

Desolate
Boss does high/deadly physical damage to the tank.
The hit puts a stacking debuff that increases damage taken by 50% for 29 seconds.
Tactic: Desolate
Use defensive cooldown
Tank swap after each Desolate debuff (the one tanking boss will switch to Maiden and vice versa)
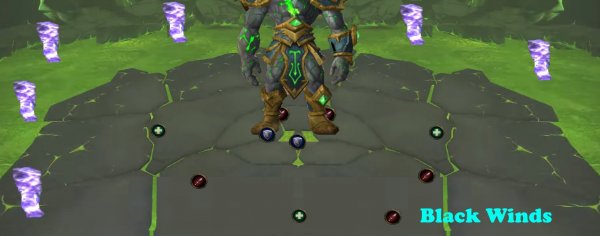
Black Winds (Heroic mode)
Boss creates several whirlwinds that travels through the platform. Touching the storm gives a debuff.
The debuff does very high (2.8 million) damage and reduce all healing and absorbs received by 90% for 10 seconds.
Tactic: Black Winds (Heroic mode)
Have a player marked to follow when you dodge the whirlwinds since the other mechanic Dark Mark may occur at the same time.
When to Bloodlust/Timewarp/Heroism
At pull
Other posts
- World of Warcraft 12.0.7 Revelations Roadmap: Your Complete Content Release Schedule
- MRGM Caught Red-Handed Stealing WoW PTR Discoveries – The Predictable Pattern of Content Theft Continues
- The BEST Midnight Season 1 DPS Tier List Guide
- Midnight Pre-Patch Event Guide: Twilight Ascension Rewards, Rare Timers, and Collectibles
- Endeavor: A Deeper Dive Into WoW’s Expansive New System
- LOADS of Extra Decors You Did NOT Know About!
- World of Warcraft Players Score Exclusive Housing Decor with Diablo 4: Lord of Hatred Pre-Order
- Brawler´s Guild 2025 GUIDE
- Legion Remix Decor will be available after Legion Remix
- Professions Unpacked: Your Guide to Crafting Housing Decor with Reagents from Every Era


