Background
Once the proud leader of the Zanchuli Council, highest advisors to the kings of Zandalar, Zul was praised as the greatest of prophets. Now, the dark prophet has turned on King Rastakhan and would see a true troll empire rule the world once again, even if it means submitting to the blood god: G'huun.
Overview
This encounter is divided in 2 phases.
In phase 1, you will fight Zul and 3 types of adds, a melee, a caster and 4 hounds.
The adds will be at pull and will also spawn during this phase.
You must position the adds so they do not boost enemy dmg (melee), spawn blobs that heals zul (caster) and aoe and control hounds (heal on melee attacks).
Zul will cast several abilities on the raid during this phase, a soak pool (heroic), shadow bolts on random raid members and a debuff that players must run away with that will also spawn adds when expired. These adds will fixate random players and fears on impact. Adds must be dispelled or nuked to kill them.
The tact is to bring all adds to middle and kill them there so Zul gets splash dmg. And when there is a window of no adds, you nuke zul hard.
In phase 2, you will only fight boss (and remaining adds) when Zul has 40% health.
The key of this fight is the shift to phase 2, with minimum adds.
Boss has 3 abilities in this phase.
One is on tanks, which is a frontal cone dmg leaving a debuff. When expired you will leave a very big pool on the ground. Tanks must run to the edge and place them there.
One is on random raid members, they starts moving to the edge and jump out and die. They must be dispelled but far from raid because of a very heavy dmg intake on dispell. This also leaves small adds that will fixate random players and fears on impact. Adds must be dispelled or nuked to kill them.
The last is a soak pool on random location.
Positioning
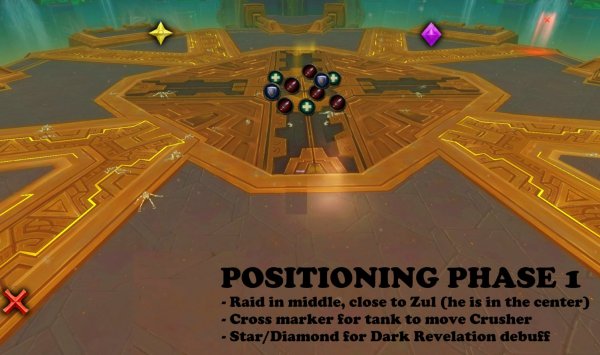
Phase 1
Raid in center (even tanks)
Place markers. These markers will be for following
Cross – For tank to move Crusher add at around 70 energy.
Star/Diamond – For players to move when Revelation debuff.
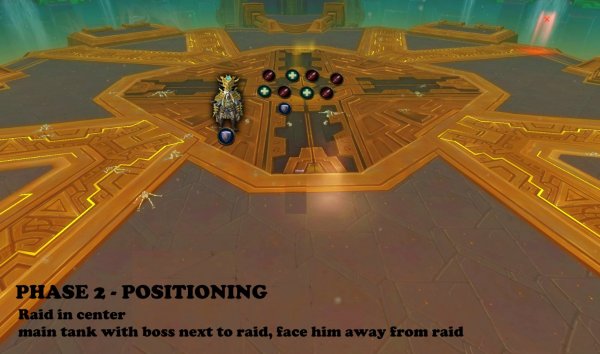
Phase 2
Raid in center of platform.
Tank on the side of raid, boss faced away from raid.
Melee behind boss.
Only main tank in front of boss.
Boss Abilities and Tactics
PHASE 1
In this phase you will fight Zul and his adds, and more of these adds will be spawned during the encounter.
At pull you will face:
ZUL
1 Nazmani Crusher
1 Nazmani Bloodhexer
4 Bloodthirsty Crawg
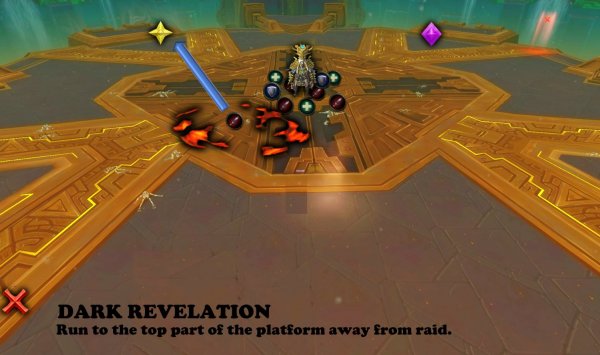
Dark Revelation
Boss puts a debuff on random player.
HEROIC MODE – Boss puts debuff on TWO random players.
After 10 seconds, the debuff does shadow damage to all players but the further away other players are, the damage decreases.
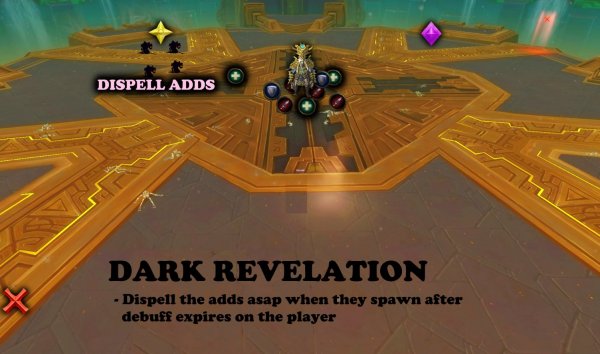
Adds, called Minions of Zul are created when debuff expires.
These small adds fixates random players and cannot be tanked.
These adds puts a fear on targeted player when they reaches its target and the add dies. HEROIC MODE – add does not die after the fear.
These adds have absorbs shield and adds die when the shield is removed.
Tactic: Dark Revelation
Run top side with debuff and wait until it expires.
The tactic is to remove the shield on these adds, either by nuking and destroying it, or by dispelling the shield away from the adds.
The best is to have classes/races that can remove beneficial effect from enemy. These players should remove the shield from the small adds as soon as they spawn.
These are the following classes/Races that should handle it (not confirmed yet)
Blood Elf – Arcane Torrent
Mages – spell steal
Priests - Dispel Magic (mass dispell)
Shaman – Purge
Demon Hunter - Consume Magic
Shadow Barrage
Boss casts Barrage on a random player that does Shadow damage and also puts a debuff for 10 sec that does Shadow dmg every 2 sec.
Tactic: Shadow Barrage
Healers need to beware of random incoming damage and make sure players are topped back up.
The ADDS
Nazmani Crusher (tank)
Frontal cone physical damage.
Thrumming Pulse (occurs when the add has 100% energy)
Increases the damage done by Zul and his minions within 30 yards by 50% for 40 sec. This stacks.
Nazmani Bloodhexer
Spawns Animated Ichor at Bloodhexer location.
These adds move to the boss and loose 1% health every 0.5 sec.
When reaching the boss, they transfer their health they have left to zul and then dies.
Casts Bloodshard shadow damage to lowest health player. This can be interrupted.
HEROIC – Sanguine Presence
If 2 Bloodhexers are close to each other (within 20 yards), they will heal all enemies for 10% every 2 sec.
Bloodthirsty Crawg
Every damage they do heals them for 200% of dmg dealt.
When reaching 100% energy, it explodes and does Shadow damage to all players every 2 sec. for 10 sec.
Tactics: Forces of Blood
Raid stand in center of the platform.
Dps
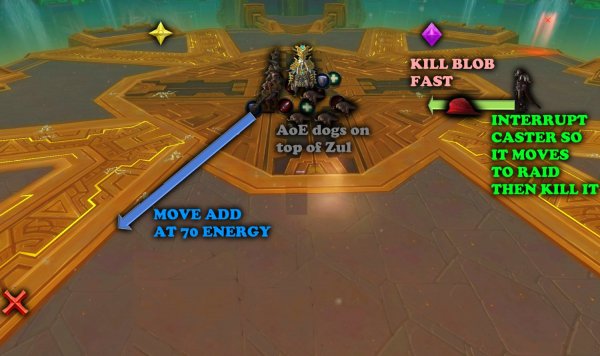
AoE nuke the Crawgs and stun them as much as possible on top of Zul.
Single target the BloodHexers. Interrupt Them and nuke them close to Zul for cleave dmg .
Single Target Crusher.
Melee dps
Only attack adds when they reach zul, for cleave dmg. Don’t slow/stun adds that are not close to zul.
Kill order: Bloodhexer>Crusher>Crawgs.
However, make sure Crusher dies before next one spawns.
Spawn order every time: Crawgs, then 2 Bloodhexers, then 1 Crusher.
Tanks
One tank on Crusher.
Tank Crusher on top of Zul.
Move to cross when the add reaches 70 energy.
After it casts Thrumming Pulse, move add back to boss.
HEROIC
If you have two Bloodhexers at the same time, cc one until the other is dead.
This can be applied on normal as well if you don’t want 2 hexers up and both can spawn Ichor.
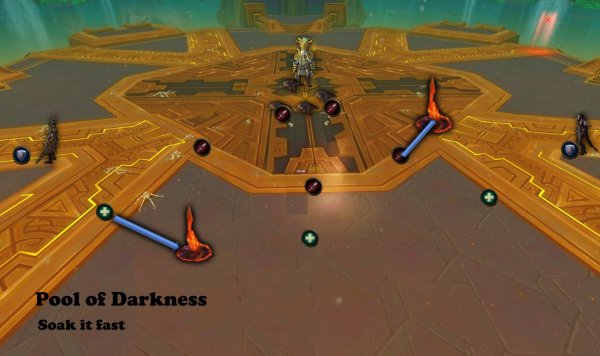
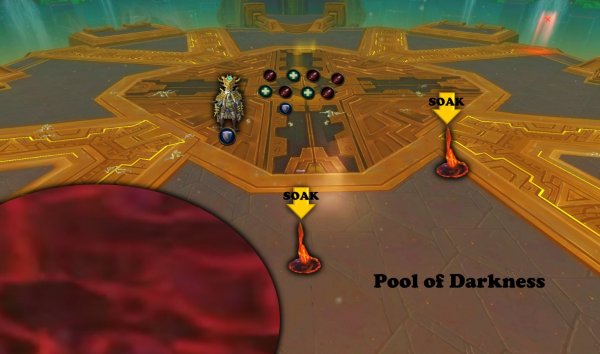
Heroic Mode - Pool of Darkness
Boss creates a Pool of Darkness on a random location for 20 sec.
The pool will pulsate explosions of Erupting Darkness, unless a player is standing inside of it.
Erupting Darkness (Shadow damage to players within 45 yards)
Player standing in the pool gets a debuff that does shadow damage ever 2 sec.
Tactics: Heroic Mode - Pool of Darkness
Make sure to have players standing on the pools.
Ranged is the best pick since they can do damage / heal while standing on the pool.
PHASE 2 - Zul, Awakened
This phase starts when boss reaches 40% health.
Boss starts with a knockback.
Boss does melee damage now and must be tanked.
Raid debuff: Locus of Corruption
This occurs directly in the start of phase 2.
The energy boss gets during phase one will be applied as stacking debuff on the raid.
Each 5 energy is one debuff stack.
The debuff (corrupted Blood) does shadow dmg every 2 sec and stacks and will last during entire encounter.
Tactic: Locus of Corrpution
The only way to decrease the stacks is to take the boss to phase 2 asap.
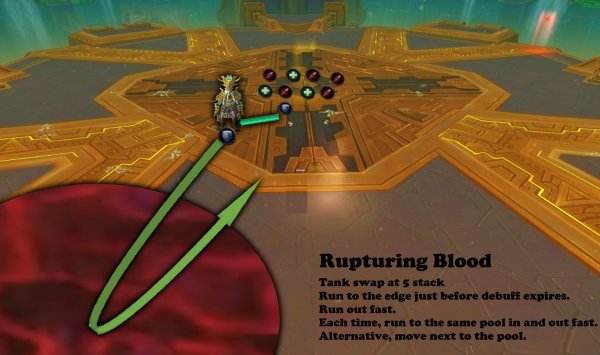
Rupturing Blood (tank)
A frontal cone dmg that puts a stacking debuff on main tank.
This does physical damage every 2 sec for 20 sec.
When 20 sec has passed, a large pool is created under the player, Ruptured Blood.
Any player that touches the pool will take corrupted Blood, shadow dmg every 2 sec and stacks and will last during entire encounter.
Tactics: Rupturing Blood
Tank swap at 2 stacks.
Run to the far edge of the platform when the debuff is about to expire.
Try to place the second debuff pool on top of the previous one. Make sure to run in and out fast.
You will need to have as much of the platform free for other mechanics such as deathwish and Pool of Darkness.
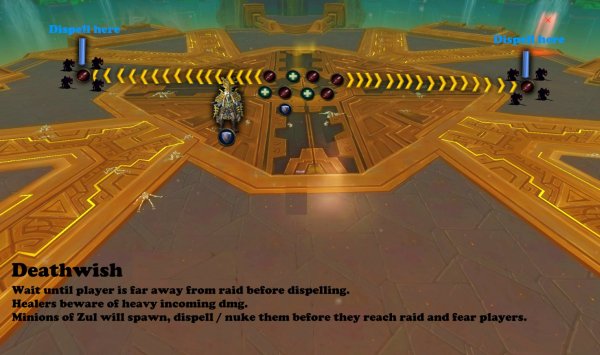
Deathwish
Boss targets 2 random players and puts a Deathwish debuff.
This debuff makes the players walk towards the edge of the platform and jump of and die.
If dispelled (or player jumps), it does high shadow damage to all players but the dmg is descreased the further away the raid is from the player being dispelled.
Also when dispelled, minions of Zul adds are spawned (same as phase 1).
Tactics: Deathwish
Raid will be in the center of the platform.
When players has the deathwish debuff, do NOT dispel directly. Wait until player is further away before dispelling.
Healers beware of heavy incoming dmg.
Handle the adds (minions of Zul) the same way as you did in phase 1.
Pool of Darkness
Boss creates a Pool of Darkness on a random location for 20 sec.
The pool will pulsate explosions of Erupting Darkness, unless a player is standing inside of it.
Erupting Darkness (Shadow damage to players within 45 yards)
Player standing in the pool gets a debuff that does shadow damage ever 2 sec.
Tactics - Pool of Darkness
Make sure to have players standing on the pools.
WHEN TO BLOODLUST / TIMEWARP / HEROISM
Other posts
- Ultimate Guide to Farming Timewarped Badges in WoW Midnight (2026)
- Gearing ALTS EASIER in this UPDATE in 12.0.7
- World of Warcraft 12.0.7 Revelations Roadmap: Your Complete Content Release Schedule
- MRGM Caught Red-Handed Stealing WoW PTR Discoveries – The Predictable Pattern of Content Theft Continues
- The BEST Midnight Season 1 DPS Tier List Guide
- Midnight Pre-Patch Event Guide: Twilight Ascension Rewards, Rare Timers, and Collectibles
- Endeavor: A Deeper Dive Into WoW’s Expansive New System
- LOADS of Extra Decors You Did NOT Know About!
- World of Warcraft Players Score Exclusive Housing Decor with Diablo 4: Lord of Hatred Pre-Order
- Brawler´s Guild 2025 GUIDE


