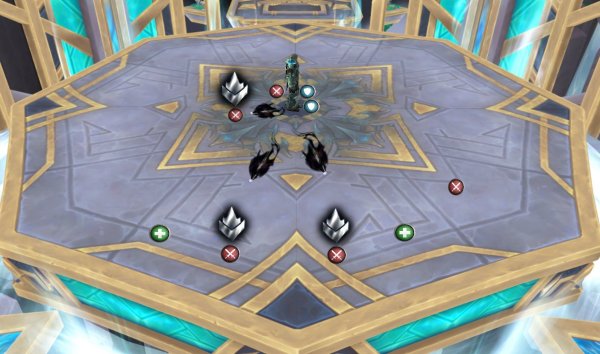
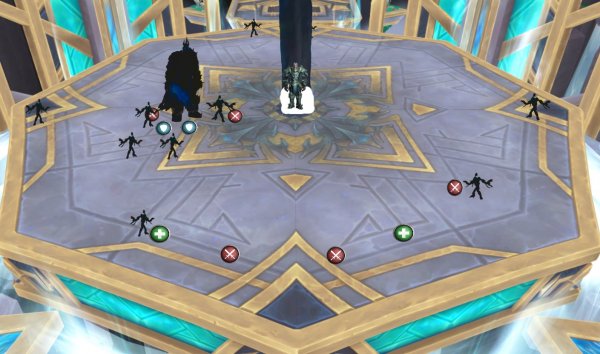
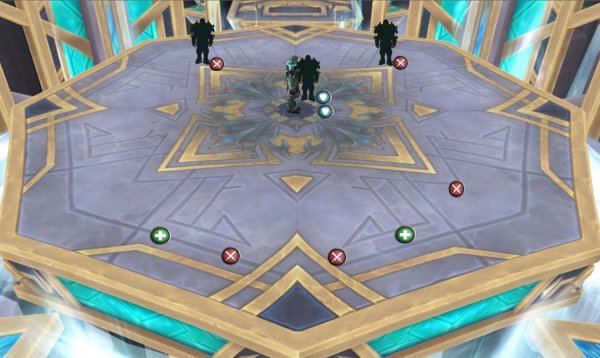
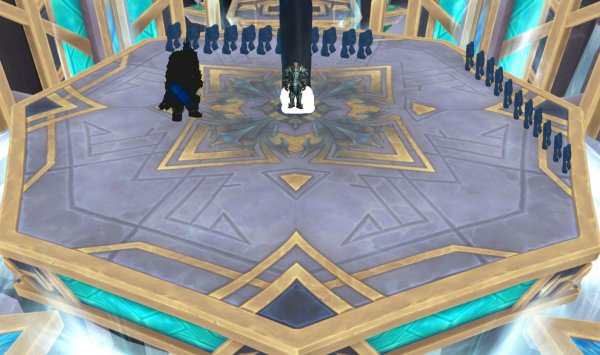
OVERVIEW (Fast Tactics)
This fight has 3 phases and 2 intermissions.
Phase 1
- Tank swap at 8 stacks of Dark Zeal.
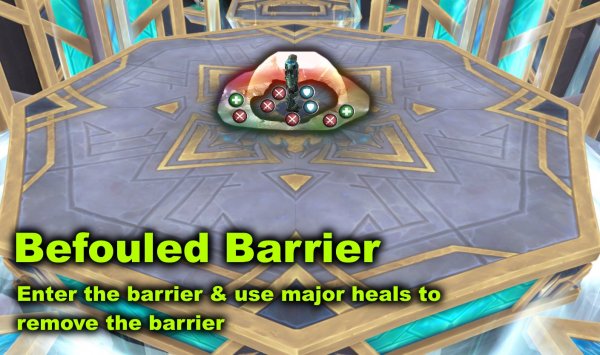
- Enter barrier when it spawns, and healers heal players to remove the barrier.
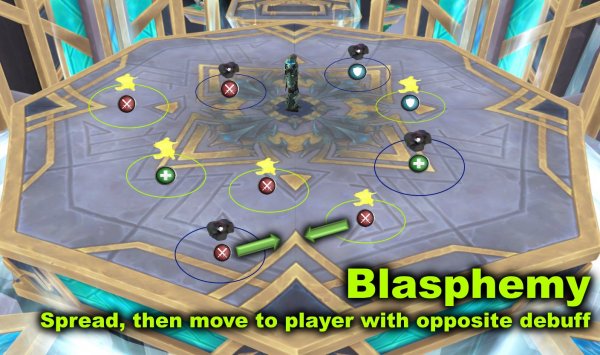
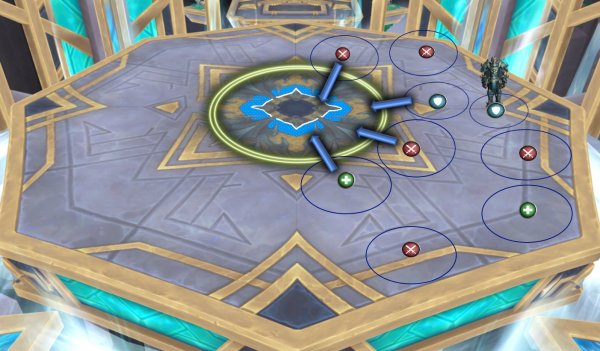
- Spread when circle under you. Half raid gets dark circle with dark orb on head, other half get light circle with light orb on head. Find the opposite player debuff and run in to each other to remove the debuff. You have 25 sec or you die.
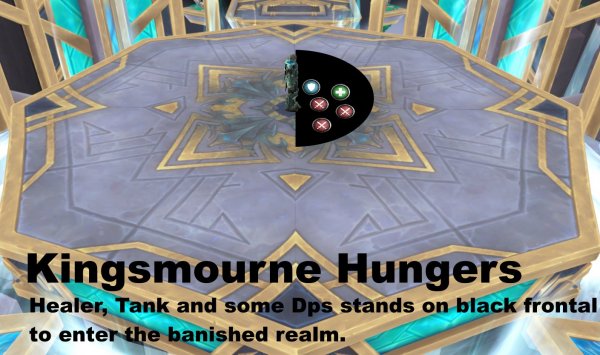
- Approx half the raid stands on the black half circle frontal dmg boss does to enter the banished realm. Heal the 4 hope adds directly. Full nuke the big add and then nuke the small adds. You have 35 sec inside there. The more you kill/heal the more willpower you give Anduin which will result in him boosting you during intermission.
- Stay spread and no one stands between player with arrow and boss. He will shoot 3 orbs on random players that bounces back to him. This does heavy dmg and 4 sec silence.
Intermission 1
- Anduin in immune to dmg and Lich King spawns.
- Anduin gives you extra dmg and extra defensive based on how much will power he got from phase 1.
- Nuke adds when they spawn.
- Tank swap directly after each Soul Reaper.
- Healers beware of raid taking a stacking debuff in this intermission that does more and more dmg.
Phase 2
- Same as phase 1 but no more circle/orb debuffs.
- 2 more abilities added here:
Boss puts dmg debuff on random players.
Boss spawns 3 shadow adds, one in middle and 2 on the edge.
Nuke them one by one.
Have players that interrupt them when they cast Psychic Terror that does dmg over time and fears.
Intermission 2
- Pop Bloodlust/Heroism/Timewarp when Lich King spawns. The dmg he takes goes to the boss.
- Same as intermission 1, but you will also get walls of adds passing through the platform that you must avoid, or you die.
Phase 3
- There is a circle in the middle. Move away from it until needed.
- Boss puts debuff on all players, similar to phase 1 but only dark orb on head. No light orbs to remove it with.
Instead: Spread when debuff comes, then players closest to circle runs in, this clears debuff and one extra random player´s debuff. Continue running in to remove debuffs until all are gone. Try to have 3 sec pauses if it is to much raid dmg (does raid dmg debuff that stacks when entering circle). - Orb spawns that bounce around platform instead of between player and boss. Dodge it.
- Healers beware on this phase.
POSITIONING
Phase 1 and 2
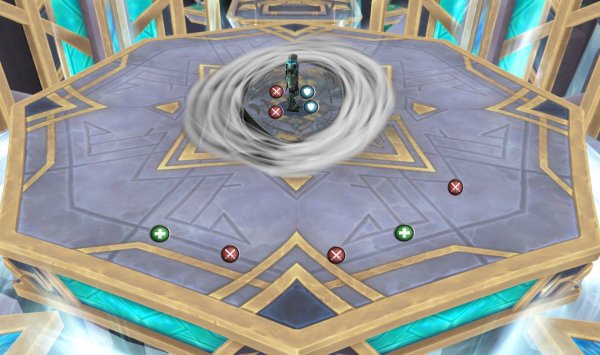
- Tank boss in the center stand on the right side of the platform.
- Melee behind boss on left side of platform.
- Ranged on the lower part of the platform and stay spread.
Intermission
- Players that are in the banished realm, attack adds on the upper side of the platform.
Phase 3
- Tank boss on the right side of the platform.
- Move boss more to center when the inner circle is smaller.
BOSS ABILITIES & TACTICS
PHASE 1
Dark Zeal (Tanks)
- Boss attack speed is increased by 7% for each consecutive melee attack it does on the same player
- This stacks
Tactics: Dark Zeal (Tanks)
- Tank swap after 8 stacks.
Hopebreaker
- Boss does an AoE slam that does moderate dmg to all players.
- This also puts a stacking debuff that does low dmg every 2 sec until boss reaches 100 energy.
Tactics: Hopebreaker
- Healers beware.
Befouled Barrier
- Boss summons a defensive barrier circle for 25 sec.
- This does high Twilight dmg to all players.
- 75% of the healing done to players that are inside the barrier will be soaked by the barrier.
- It requires a lot of healing to reduce the size of the barrier.
- If 25 sec has passed without removing the barrier, it will explode and do very high dmg to all players.
Tactics: Befouled Barrier
- Enter the barrier and use some major heals to remove the barrier.
Blasphemy
- Boss targets all players.
- Half of the players get a dark circle under them and a dark cloud on their head.
- Other half of the players get a light circle and fire on their head.
- If a dark player meets a light player, the debuff is removed.
- If a player has not removed its debuff after 6 sec, it explodes and does deadly dmg to all players within 6 yards.
- If a player runs in to another player with the same color (dark runs in to dark, or light runs in to light) it explodes and does deadly dmg to all players within 6 yards.
Tactics: Blasphemy
- Move away and spread from other players directly before you get a color.
- Make sure you run into a player with the opposite color to remove the debuff.
- Don’t run through other players.
Kingsmourne Hungers
- Boss does a half circle frontal cone attack that does moderate shadow dmg.
- Players getting hit by the cone will be banished for 35 sec.
- Banished players will be on the same platform but another realm.
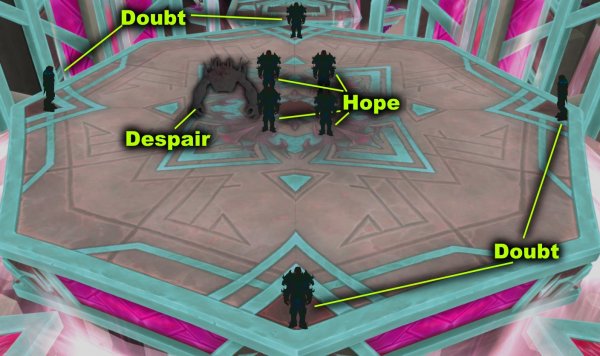
- This realm has:
- 4 adds called Anduin´s Hope
- 4 adds called Anduin´s Doubt
- 1 big add called Anduin´s Despair.
- Despair add must be tanked and this add shoots on the platform (swirls shows area getting hit). Getting hit does moderate shadow dmg and reduces dmg and healing done by 50% for 6 sec. This add must be hit and killed to remove it.
- Doubt adds starts on each side of the platform and moves around the platform and must be hit and killed to remove them.
- Hope adds starts on the center of the platform and moves outward. These adds must be healed to restore.
- Removing the Despair add gives 20 willpower.
Removing a Doubt add gives 5 willpower.
Restoring a Hope add gives 5 willpower.
- HEROIC MODE: The Hope adds has a debuff that reduces healing received by 100%.
Tactics: Kingsmourne Hungers
- You have to remove/restore adds to gather willpower for Anduin, and you have 35 sec each time you enter.
- Half of the raid enters the Banished realm.
One tank must enter.
Healer(s) must enter.
Dps must enter. - Healers
Burst AoE heal the Hope adds directly when they are clustered together at start. - Tank
Pick up the big add (Despair) directly. - Dps
First you full nuke the big add (Despair) directly.
Then you nuke the smaller adds (Doubt). - Players that are not banished will fight the boss as usual in the normal realm.
Wicked Star
- Boss targets 3 random players and will then shoot an orb on each player location.
- The orb travels to the player location and bounces back to boss again.
- Any player hit will get a 4 sec debuff that does moderate Twilight dmg every 1 sec and unable to use abilities.
- HEROIC MODE: If any of Anduins adds get hit by this, they will heal 5% of their max health and heal every 1 sec. Also immune to cc.
Tactics: Wicked Star
- Tank boss in the middle and face the boss to the right side.
- Melee behind boss. Don’t stand between boss and ranged.
Move further back if you are targeted as melee. - Ranged spread on the bottom side of the platform.
- Targeted player gets an arrow on head.
- Targeted player must also dodge the orb when it comes.
- HEROIC MODE: Fight the adds on the upper side of the platform. No players should be there in the normal realm.
Willpower
- When boss reaches 100 energy it will move to the center and start intermission.
- Anduin will boost all players with 200% increased dmg and 90% dmg taken. This is based on the amount of Willpower consumed.
Tactics: Willpower
- See Kingsmourne Hungers on how to gather Willpower.
INTERMISSION 1
Anduin will be on the center of the platform and immune to dmg, and his willpower boost players based on how much willpower he got.
Anduin´s remnant spawns which is the Remnant of the Fallen King (Lich King).
You will fight the Lich king and the dmg it takes will be transferred to the boss.
Army of the Dead
- Lich King will spawn loads of adds.
- Normal mode has one type of add called Fiendish Soul.
- Heroic mode has two types of adds called Monstrous Soul and Fiendish Soul.
- Fiendish Soul adds leaps on a player and do high physical dmg to anyone within 8 yards of that player. It will also reduce healing received by 3%.
HEROIC MODE: When a Fiendish Soul add dies it explodes and does moderate shadow dmg to players within 4 yards.
- Monstrous Souls is the bigger add. Every 1 sec it loses 1% of its health and gain 5% increased physical dmg. It will detonate when reaching low health which does deadly dmg to raid.
Tactics: Army of the Dead
- Stay spread
- Nuke Lich King before the adds spawns.
- Kill the adds when they spawn, pull them to boss if possible.
- Heroic mode: beware not to stand near the Fiendish Souls before they die.
- Heroic mode: Tank the Monstrous Soul and full nuke kill it before it detonates.
Soul Reaper
- Lich King does a hit that puts a debuff on tank that increases physical dmg taken by 150% for 15 sec.
- Boss will also get 100% increased attack speed for 8 sec and do massive physical dmg and shadowfrost dmg to the tank.
Tactics: Soul Reaper
- Tank swap directly after each Soul Reaper so that the other tank that doesn’t have the debuff take the huge hits.
Remorseless Winter
- During this entire phase, the boss puts a stacking debuff on every player that does moderate shadowfrost dmg every 1 sec.
- This stacks every 5 sec.
- You will come up to around 7 stacks.
Tactics: Remorseless Winter
- Healers beware of heavy raid dmg during the entire intermission.
Boss will cast 2 Army of the Dead before phase 2 starts again and health will be around 75-80%
PHASE 2
This phase is the same as phase 1 except for:
- You will no longer have the boss ability Blasphemy.
- You will have two new boss abilities called Grim Reflections and Domination Word: Pain
Grim Reflections
- Boss spawns 3 adds that are dark images of himself.
One in the center and 2 on the edge. - These adds casts Psychic Terror that makes all players fear for 3 sec and also does moderate shadow dmg every 20 sec.
Tactics: Grim Reflections
- Have players that will always interrupt the adds.
- Nuke the adds one by one, start with the center add, then the others.
- The Wicked Stars will come at the same time, make sure you are not close to the adds with it.
Domination Word: Pain
- Boss puts debuff on random players that does low Shadow dmg every 2 sec for 12 sec.
Tactics: Domination Word: Pain
- Just extra healing needed from healers.
Intermission starts when boss has 100 energy.
INTERMISSION 2
Lich King starts again on 100% health.
This Intermission is the same as intermission 1 except for 2 new abilities:
- Dark Presence
- March of the Damned
March of the Damned
- Boss will summon entire rows of adds that passes the platform.
- There is one opening that has no adds in the line of adds.
- If an add touches a player it does deadly Shadowfrost dmg and a debuff that does deadly dmg every 1 sec for 3 sec.
Tactics: March of the Damned
- Pass the adds by running through the opening with no adds.
- The best is if the tank checks where to go, and the raid follows while doing dmg on Lich King at the same time.
BLOODLUST / HEROISM / TIMEWARP
- Pop lust/heroism/Timewarp when lich king comes out and use full dps CDs on him.
PHASE 3
When phase 3 starts there is a circle that spawns in the center, Beacon of Hope.
Hopelessness
Boss will cast Hopelessness, which is similar to Blasphemy, but every player will get the dark circle around them with a dark orb on their head.
Now there are no players with the light to remove it.
Players will take low dmg every 1 sec and after 25 sec, they will take deadly dmg if not removed.
Entering the circle in the center (Beacon of Hope) removes a players debuff and will also remove another random player´s debuff as well. BUT, this will put a stacking 3 sec debuff that does moderate holy dmg every 1 sec for every player entering the circle.
The circle becomes smaller, the more players that enters it.
Tactics: Hopelessness
- Spread when hopelessness and tank boss on the side of the platform.
- Players that are closest to the center enters.
- Then other players enter as well, until all debuffs are removed on all players.
- Beware not to enter to many at once because of the 3 sec debuff.
Wicked Star – upgraded
- The orbs will now bounce around the platform instead of bouncing to a player then back to boss.
- Does moderate dmg and silence for 4 sec if hit.
Tactics: Wicked Star – upgraded
- Move the boss closer to middle now when the inner circle is smaller, so it is easier to dodge the orbs.
- Healers beware.
Empowered Hopebreaker
- Boss does an AoE slam that does high dmg to all players, instead of moderate dmg from phase 1.
- This also puts a stacking debuff that does low dmg every 2 sec until the fight is over.
Tactics: Empowered Hopebreaker
- Healers beware.
Dark Zeal (Tanks)
- Boss attack speed is increased by 7% for each consecutive melee attack it does on the same player
- This stacks
Tactics: Dark Zeal (Tanks)
- Tank swap after 8 stacks.
Other posts
- MRGM Caught Red-Handed Stealing WoW PTR Discoveries – The Predictable Pattern of Content Theft Continues
- The BEST Midnight Season 1 DPS Tier List Guide
- Midnight Pre-Patch Event Guide: Twilight Ascension Rewards, Rare Timers, and Collectibles
- Endeavor: A Deeper Dive Into WoW’s Expansive New System
- LOADS of Extra Decors You Did NOT Know About!
- World of Warcraft Players Score Exclusive Housing Decor with Diablo 4: Lord of Hatred Pre-Order
- Brawler´s Guild 2025 GUIDE
- Legion Remix Decor will be available after Legion Remix
- Professions Unpacked: Your Guide to Crafting Housing Decor with Reagents from Every Era
- WoW Housing: Best Tips Guide
