Background
Since striking the bargain that chased the draenei into the stars, Kil´jaeden believed the Legion could not be stopped. Yet, none of his deceptions have prevented you from reaching his critical moment. Infuriated that Sargeras promise of victory has never come to pass, the demo lord prepares to face you himself, for a final battle that will shape Azeroth´s destiny forever.
Overview
The fight takes place at a spaceship.
This fight is divided in 3 phases and 2 intermissions. You will fight boss on all three phases and during the intermission 1, you need to handle mechanics and in intermission 2, you need handle mechanics and kill adds asap.
Phase 1 – The Betrayer
During this phase you will fight boss and at the same time soak meteors that will otherwise do loads of damage or kill the raid.
A big orb will land in the middle of the platform that does tons of damage and a huge knockback. Players must stand close to the orb (you die if you stand under it) so they don´t get knocked back out of the platform.
On heroic mode, adds will spawn (copies from players) that do raid damage
Intermission: Eternal Flame
Intermission 1 starts at 80% boss health
During this intermission, the boss will fly up in the air and you need to handle mechanics and survive since boss will put a buff on him that makes him take 99% less damage.
The boss will still use 1 ability (2 in heroic) from phase 1: Armageddon and Rupturing Singularity (Heroic)
Phase 2 – Reflected Souls
Everything that happens in phase 1 and Intermission phase will happen on phase 2.
In normal mode, boss will also do Shadow Reflection (adds).
Intermission: Deceiver´s Veil
Intermission 2 starts when boss has 40% health.
During this intermission, the boss makes the entire platform dark which makes you not able to target any player or enemy further than 8 yards.
Boss will summon waves of Shadowsoul adds. Killing these adds will remove the darkness.
Illidan will enter the fight and give you his ability to see in darkness, standing close to him gives you a debuff that does damage but at the same time lets you target other players and adds so you can heal others and kill the enemies.
Phase 3 - Darkness of a Thousand Souls
Phase 3 starts after you have killed all adds and darkness is gone from the platform.
During this phase you will attack boss while a rift will spawn from time to time. This rift will try to pull you in. The rift is good and bad for you. The good news is that also sucks in shadow bolts and fire pools, but the bad news is that it does damage on you when you stand close to it.
You will also dodge Fel energies from obelisks that spawns around the platform and explode after a while.
Positioning
Tanks
Tank boss in the inner circle (not center) and turn him away from middle. Main tank in front of boss. Off tank behind boss.
Raid
Stack behind boss on all phases and all intermissions.
Abilities and Tactics
PHASE 1 – The Betrayer
During this phase you will fight boss and at the same time soak meteors that will otherwise do loads of damage or kill the raid.
A big orb will land in the middle of the platform that does tons of damage and a huge knockback. Players must stand close to the orb (you die if you stand under it) so they don´t get knocked back out of the platform.
On heroic mode, adds will spawn (copies from players) that do raid damage.
Boss has 3 Abilities (4 in Heroic mode)
Felclaws
Boss is empowered for 9 seconds.
Each melee hit on Tank puts a stacking debuff.
Debuff: takes 40% more physical damage for 25 sec and stacks.
Heroic mode: The Felclaw hits every player stadning in a cone in front of the boss.
Tactic: Felclaws
Tank swap after the boss is done doing Felclaw (takes 9 seconds).
Tank swap after every Felclaw.
Off tank behind boss (no one in front of boss except main tank)
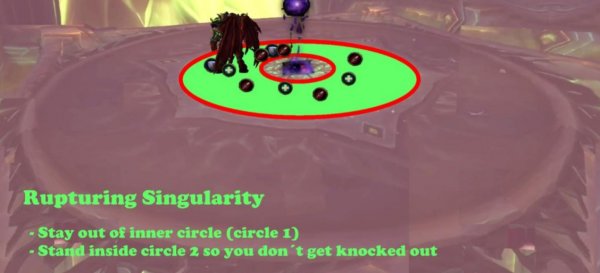
Rupturing Singularity
Boss drops an orb in the center of the platform.
Players struck by the orb dies directly (>100 million damage).
All players suffers 1 million damage, no matter distance from the orb.
This also does a knockback.
Tactic: Rupturing Singularity
The orb travels slowly before it hits the ground on circle 1, the small Stand between circle 1 and circle 2, in this way, you will not get hit by the orb, and you will not get knocked out of the platform.
Singularity on phase 2: It seems that this orb lands on positions as well. Stand next to the orb and position yourself so your knockback will still let you land on the platform. Do NOT stand under the orb.
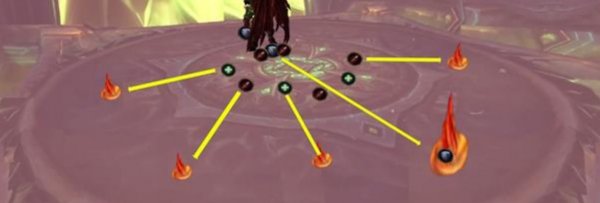
Armageddon
Boss will cast 2 different meteors on a random location, one is called Armagedon Rain, and the other one is called Armageddon Hail.
Armageddon Rain
The meteor lands on the ground 7 seconds after the boss casts it.
The impact does high fire damage and also a stacking debuff that does fire damage every 2 seconds for 1 min on players being hit.
If no one is hit by the meteor, it does Armageddon Blast: All players take double the damage from impact and debuff.
Armageddon Hall
The meteor lands on the ground 7 seconds after the boss casts it.
The impact does very high physical damage (>14 million) and also a stacking debuff that does physical damage every 2 seconds for 10 seconds.
If no one is hit by the meteor, it does Armageddon Blast: All players take double the damage from impact and debuff.
Tactic Armageddon
Have selected players to soak Big ones.
Boss will do Armageddon 9-10 times during the entire fight.
Remember that Armageddon will happen during phase 1, intermission 1 and phase 2.
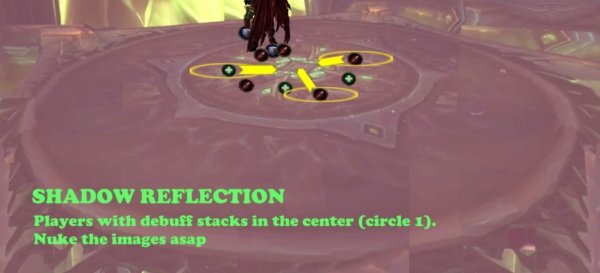
Heroic mode: Shadow Reflection
Boss targets random players.
Targeted players gets a circle around them.
After 8 sec, the targeted players gets a copie of themselfes that is hostile.
The copie casts Erupting Deadflame all them time.
Erupting Dreadflame does fire damage to all players.
Each time its casts it gets a stacking buff called Eruption, that increase damage done by 60%. Each time it casts it will give other compies within 20 yards a the Eruption buff as well.
Tactic: Shadow Reflection
Targeted players must stack up on middle (Raid will be in the inner middle circle, so no much movement is needed).
All dps must focus on copies only and AoE kill them.
Each cast the copie does takes about 9-10 seconds, meaning, they must die before they cast it a second time.
So you have 18 sec to AoE them down, which is plenty of time
Intermission phase: Eternal Flame
Intermission 1 starts at 80% boss health
During this intermission, the boss will fly up in the air and you need to handle mechanics and survive since boss will put a buff on him that makes him take 99% less damage.
The boss will still use 1 ability (2 in heroic) from phase 1: Armageddon and Rupturing Singularity (Heroic).
Bursting Deadflame
Boss targets several random players.
After 5 seconds he does High fire damage to the targeted players.
Any other player within 15 yards will take same damage as well.
Tactic: Bursting Deadflame
Raid stacked in middle behind boss.
Players with debuff runs away to the sides to keep center area free for non-debuffed players.
Focused Deadflame
Boss targets a random player (arrow above its head).
After 5-6 seconds, the boss casts a fireball on that player that does >6 million fire damage.
Any player between boss and targeted player will share that damage.
Heroic mode: Player taking damage from this will explode and take 1 million fire damage.
Players within 5 yards will also take the same damage.
Tactic: Focused Deadflame
Raid will be stacked in middle behind boss. When a player is affected with Focused Deadflame, move slightly backwards and the rest of the raid stands in a line between affected player and boss.
Nether Gale
Boss takes 99% less damage during this phase.
Tactic: Nether Gale
This interphase (intermission) is just about handling the mechanics and survive until phase 2 starts.
Phase 2 – Reflected Souls
Phase 2 starts after boss has done his abilities in intermission phase (no way to speed up intermission phase)
In this phase, you will have all the abilities from phase 1 and the intermission phase (see above for tactics and positioning).
Normal mode will also have the boss ability: Shadow Reflection (Heroic mode have this in phase 1 and phase 2).
Intermission Phase – Deceiver´s Veil
Intermission 2 starts when boss has 40% health.
During this intermission, the boss makes the entire platform dark which makes you not able to target any player or enemy further than 8 yards.
Boss will summon waves of Shadowsoul adds. Killing these adds will remove the darkness.
Illidan will enter the fight and give you his ability to see in darkness, standing close to him gives you a debuff that does damage but at the same time lets you target other players and adds so you can heal others and kill the enemies.
Deceiver´s Veil
Boss puts a debuff on every player (Deceiver´s Veil).
The debuff restricts you from targeting friendly players and hostile adds that are further than 8 yards from you.
The longer time you are in the darkness (longer time you have the debuff), the more healing you will absorb (less healing you can take).
Adds: Shadowsoul
Boss summons several special adds called Shadowsoul.
These adds do low shadow damage to all players periodically.
Illidan
Illidan flies into the platform during this phase.
Players standing within 8 yards of Illidan will get Illidan´s Sightless Gaze.
The Sightless Gaze allows you to see and hit enemies within 40 yard radius.
The Sightless Gaze allows you to heal other players within 40 yard radius.
Players with Sightless Gaze will also suffer fire damage every 1 second for 20 second.
Tactics: Intermission phase
Raid Spread out fast and run around the platform to find Illidan.
When you find Illidan, ping on minimap so everyone in raid knows where he is and moves to him.
Run close to Illidan so you get the debuff and then kill the adds fast.
Healers, run close to Illidan so you get the debuff then heal the raid.
Remember that you have 20 seconds until it wears off, so you need to get back to him again and get the debuff again
PHASE 3 – DARKNESS OF A THOUSAND SOULS
Phase 3 starts after you have killed all adds and darkness is gone from the platform.
During this phase you will attack boss while a rift will spawn from time to time.
This rift will try to pull you in.
The rift is good and bad for you. The good news is that also sucks in shadow bolts and fire pools, but the bad news is that it does damage on you when you stand close to it.
You will also dodge fel energies from obelisks that spawns around the platform and explode after a while.
Darkness of a Thousand Souls
During the entire phase 3, the boss will periodically shoot shadow bolts at all players that does 3 million damage instantly, and more than half a million damage every 2 seconds.
Tactic: Darkness of a Thousand Souls
Raid Run close to the Rift that is created on the side of the platform.
Make sure you are so close that you get the Gravity Squeeze debuff.
In this way, the shadow bolts will pass you and get sucked into the rift instead.
Use defensive cooldowns when you have the Gravity Squeeze debuff since it does damage over time.
Healers Use healing cooldowns when players run close to the rift.
Demonic Obelisk
Boss summons pillars (Obelisks) around the platform.
After a short time they will detonate and splash out fel energy beams from each side of the pillar.
Affected player will take 2< million fire damage and does a knockback.
Tactic: Demonic Obelisk
Tanks
Tank boss in the middle but position yourself so you don’t get hit by the pillars when they shoot out fel energy beam.
Raid
Stand behind boss in the center of the platform but position yourself so you don’t get hit by the pillars when they shoot out fel energy beam.
Tear Rift
Boss creates a rift near the edge of the platform. This rift does 3 things:
1) Pulls players close to the rift. players close to the rift will take high shadow damage every 1 second, called Gravity squeeze.
2) Sucks in the Shadow bolts from Darkness of Thousand Souls if players are close to the rift. Close to the rift means that players have Gravity squeeze debuff on them.
3) Pulls the fire pools created from Flaming Orbs (Heroic). The fire pool also reduces in size while getting pulled to the rift.
Tactic: Tear Rift
When boss does not cast Shadow bolts
Raid Run away from the rift so far that you don´t have the debuff Gravity squeeze.
When boss casts shadow bolts
Raid Make sure you are close to the rift and have the debuff Gravity squeeze before boss casts shadow bolts (Darkness of thousand souls).
Use defensive cooldowns.
Make sure you don´t fall of the platform
Healers
Use Raid healing cooldowns.
Bursting Deadflame
Boss targets a player and shoots fire damage.
Player and all other players within 15 yards takes high fire damage.
Tactic: Bursting Deadflame
Raid stand in the center behind boss.
Players with debuff rins away from the raid (away from middle).
Focused Deadflame
Boss targets a random player (arrow above its head).
After some seconds, the boss casts a fireball on that player that does >4.5 million fire damage.
Any player between boss and targeted player will share that damage.
Heroic mode: Player taking damage from this will explode and take 1 million fire damage.
Players within 5 yards will also take the same damage.
Tactic: Focused Deadflame
Raid stacks behind boss.
Targeted player runs slightly back behind raid.
Rest of the raid will stand in a line between targeted player and boss.
When to use Blood Lust/Heroism/Timewarp
At start of Phase 2.
Other posts
- Midnight Pre-Patch Event Guide: Twilight Ascension Rewards, Rare Timers, and Collectibles
- Endeavor: A Deeper Dive Into WoW’s Expansive New System
- LOADS of Extra Decors You Did NOT Know About!
- World of Warcraft Players Score Exclusive Housing Decor with Diablo 4: Lord of Hatred Pre-Order
- Brawler´s Guild 2025 GUIDE
- Legion Remix Decor will be available after Legion Remix
- Professions Unpacked: Your Guide to Crafting Housing Decor with Reagents from Every Era
- WoW Housing: Best Tips Guide
- Everything Coming in World of Warcraft Patch 11.2.5
- Midngiht Collectors Edition LEAKED


