As usually, these tactics are my own and does not mean they are the most optimal.
Helya is the last Raid boss in Trial of Valor, patch 7.1
Background Story
Though she once served as Odyn´s right hand, the vengeful Helya will stop at nothing to ensure her ancient curse binds the titan keeper to the Halls of Valor. No longer satisfied with ruling her shadowy realm, Helya now commands her vast kvaldir army to plague the lands of the living.
Overview
The platform is divided in one main in the middle and 2 smaller ones on left and right side of stairs.
The fight is divided in 3 phases
Phase 1: Boss has 5 abilities.
Phase 2: Boss swims away but does some abilities. Main event is the adds that spawns and tentacles that needs to destroyed to get the boss back again.
Phase 3: Is a combination between phase 1 and phase 2 abilities/events.
Phase 1 – Low Tide
Helya has 5 abilities in this phase
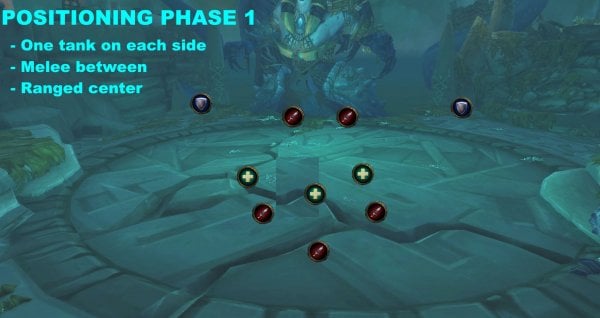
Positioning Phase 1
Tanks
Stand on each side of boss opposite from each other.
Melee
Stand spread on the center of boss.
Ranged
Stand spread on the center further back from boss.
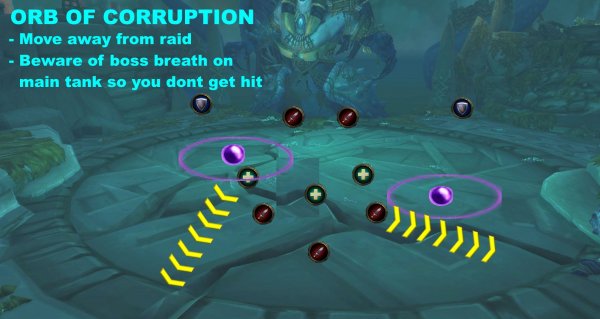
Orb of Corruption
Boss targets several players and shoots an Orb at them
This Orb fixates that player and does pulsating dmg while moving.
Taking dmg from an Orb gives a stacking debuff that increases dmg taken from orbs by 100%.
Tactic: Orb of Corruption
Move away from the Orbs, away from raid.
Beware of the Breath boss does on tank direction so you don’t get hit.
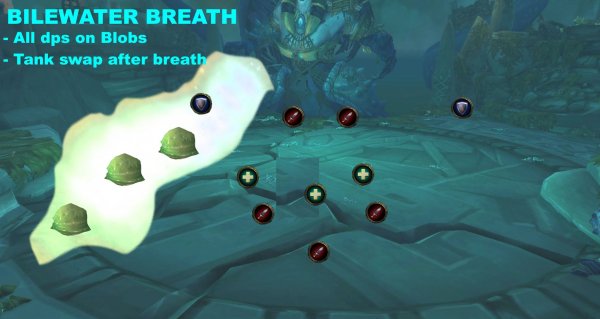
Bilewater Breath
Boss does a breath on main tank location in a frontal cone that does very high dmg.
The breath does 2 things:
- Applies a debuff on tank (anyone getting hit) by breath.
This debuff decrease armor by 100% for 30 sec. - Several slimes (Bilewater Slimes) will land on the breath location.
Each slime does dmg within 5y when they land on the ground.
Each slime will burst after 20 seconds and do deadly dmg to ALL players.
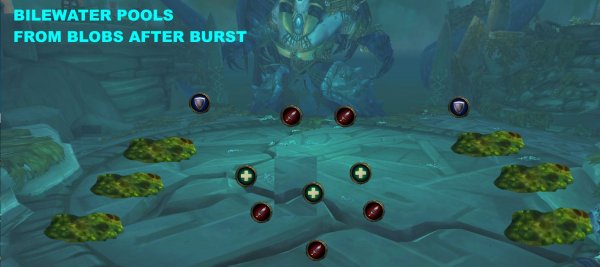
The health left of a slime reduces the dmg a slime does when bursting.
After bursting, each slime leaves a pool (pool size also depends on health left).
The pool does moderate dmg every second for 45 s, if a player stands on it.
Tactic: Bile Water Breath
Tanks
One tank on each side of boss.
The breath will hit the left or right side of the platform depending on who is tanking.
Tank swap after each breath.
Use def CD at breath.
DPS
Every single dps needs to focus on the slime and kill them asap.
Healers
Get ready to heal up players after slimes burst if not all are killed.
Some player/s will maybe touch the pool afterwards and needs a lot of healing.
Raid
Move away from the pools on the ground after slimes burst.
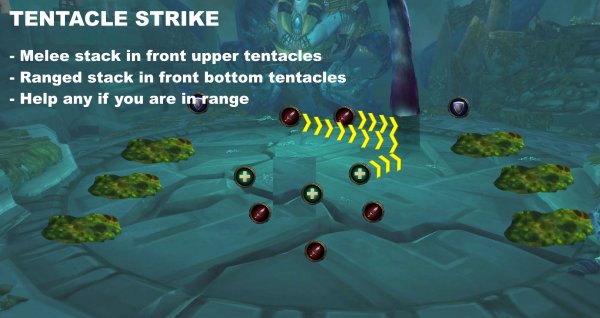
Tentacle Strike
A big Tentacles spawns either in front of the boss or on the opposite side of platform.
The tentacle slams the ground doing deadly dmg but is shared amongst players.
If no one takes the slam, the slam will send a shockwave that does deadly dmg to all players.
Tactic: Tentacle Strike
Melee
Stack in front of tentacles when they spawn near boss.
Ranged
Stack in front of tentacles when they spawn behind on the opposite side of boss.
Raid
Help front/back tentacles slams as well. Especially depending on how many melee/ranged you have in the raid.
Taint of the Sea
Boss puts a debuff on random player that does Frost dmg every second.
When the debuff is dispelled, it explodes does low dmg to all players.
When the debuff is dispelled it will also leave an essence under the player that explodes after a while and does high dmg to anyone within 8 yards.
Tactic: Taint of the Sea
Everyone stand spread at least 8 yards.
Dispel the taint directly.
Player dispelled moves away from the essence and then moves back after explosion.
Corrosive Nova
If no players are in melee range, the boss will cast Corrosive Nova which does 2 things:
- Blasts every player with Frost damage
- Gets a buff that increase Helyas dmg by 3% and stacks
Tactic: Corrosive Nova
Melee and tanks
Make sure there is ALWAYS someone in melee range on boss.
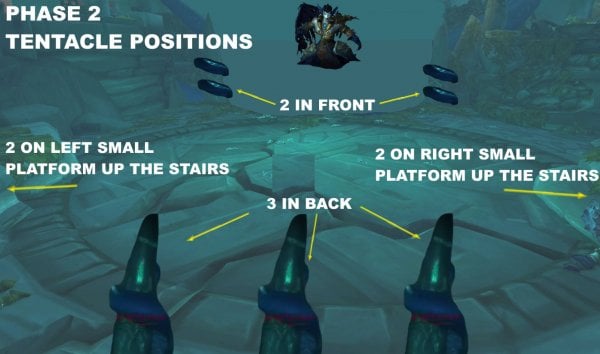
Phase 2 From the Mists
Starts when boss has 65% health
Helya moves further back out in the water and summons tentacles
2 on upper side
3 on bottom side
3 on left side up the stairs
3 on right side up the stairs
Killing these tentacles will bring her back.
During this phase, Helya will summon 3 types of adds after she casts water waves on the middle platform (Fury of the Maw).
Grimelord add
1 add will summon per time.
Has 3 abilities
Sludge Nova: Stomps the ground that does high dmg to players within 15 yards and knocking them back.
Fetid Rot: Puts a stacking debuff on players within 70y that does dmg every 3 sec and decrease healing received by 10% per stack. Dispelling does dmg to nearby players within 5y and applies another rot debuff on those players.
Anchor Slam: Slams the ground doing very high Physical dmg and knocking players to the air and increase their dmg taken by 400% for 6 sec.
Night Watch Mariner
1 add will summon per time.
Has 3 Abilities
Lantern of Darkness: Does Shadow dmg to all players every 05s for 6s and dmg increases by 75% each puls and stacks.
Ghostly Rage: Increases attack speed by 30% for 6s.
Give no Quarter: Goes underground and pops up somewhere else. When popping up, it does high dmg to any player within 8 yards.
Decaying Minions
One add for each player will be summoned per time.
Has 3 Abilities
Rabid: Fixates a random player.
Decay: A pool is created after a minion dies that does dmg if you stand on it.
Vigor: Increases dmg done by 10% and stacks.
Boss
2 Abilities
Fury of the Maw: Sends a big Wave passing entire platform that does dmg (and 25% increased dmg stacking debuff) and push players away. This wave also removes the Bilewater pools (from phase 1) and Decay pools.
Torrent: Blasts several enemies with water that does low dmg and 5% increased dmg stacking debuff)
Tactic: Phase 2
You need to move to where the tentacles are and kill the big adds there.
Small adds need to be AoE nuked in the middle platform.
Alternative you can start at Add wave 2 tacts directly and have ranged killing the tentacles on upper side of middle platform.
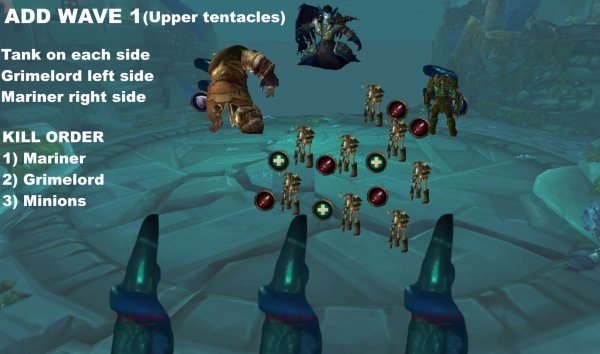
Add wave 1
Positioning add wave 1
Tanks on each upper side of the platform.
Healers spread in middle.
Ranged spread in middle.
Melee on right upper side first (where Mariner add is located)
Tanks: Wave 1
One tanks Grimelord on left upper corner (tank near the tentacles for cleave dmg)
One tanks Mariner on right upper corner (tank near the tentacles for cleave dmg).
Use defensive cooldowns when needed (see above).
Alternative: Have 3 tanks on this fight and 3rd tank, tank swap with Grimelord tank after each Anchor Slam.
DPS: Wave 1
Add Kill order:
1) All dps focus nuke Mariner first. Spread out until this add is dead.
2) Destroy tentacles on the corner.
3) Nuke Grimelord second (Melee watch out from Stomp and slam)
4) Destroy the tentacle on that corner.
5) Stack in middle and aoe all the Minions second.
Healers Wave 1
Stay spread in the middle.
Use healing cooldowns when raid will stack in middle to aoe the adds.
Tank on Grimelord needs defensive cooldown when getting hit by Slam.
Getting Rot debuff Wave 1
Move to left or right side of the away from raid, wait for dispel then move back again.
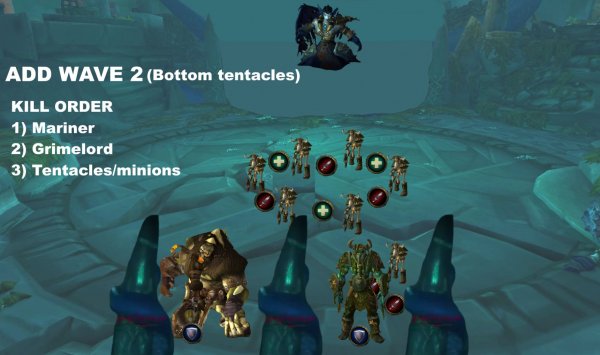
Add Wave 2
Next adds will come after boss casts Fury of the Maw.
Positioning add wave 2
Tanks on each bottom side of the platform.
Healers spread in middle.
Ranged spread in middle.
Melee on right bottom side first (where Mariner add is located)
Tanks: Wave 2
One tanks Grimelord on left bottom corner (tank near the tentacles for cleave dmg)
One tanks Mariner on right bottom corner (tank near the tentacles for cleave dmg).
Use defensive cooldowns when needed (see above).
Alternative: Have 3 tanks on this fight and 3rd tank, tank swap with Grimelord tank after each Anchor Slam.
DPS: Wave 2
Add Kill order:
1) All dps focus nuke Mariner first. Spread out until this add is dead.
2) Destroy tentacles on the corner.
3) Nuke Grimelord second (Melee watch out from Stomp and slam)
4) AoE the tentacles and Minions
Depending on raid setup you can let melee aoe the minions down while ranged is attacking Grimelord.
Healers Wave 2
Stay spread in the middle.
Use healing cooldowns when raid will stack to AoE the adds.
Tank on Grimelord needs defensive cooldown when getting hit by Slam.
Getting Rot debuff Wave 2
Move to left or right side of the platform, wait for dispel then move back again.
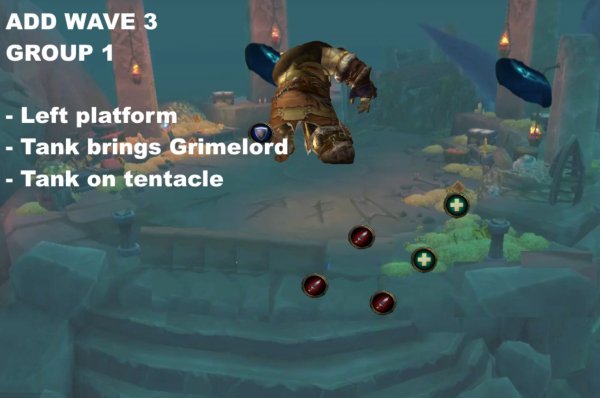
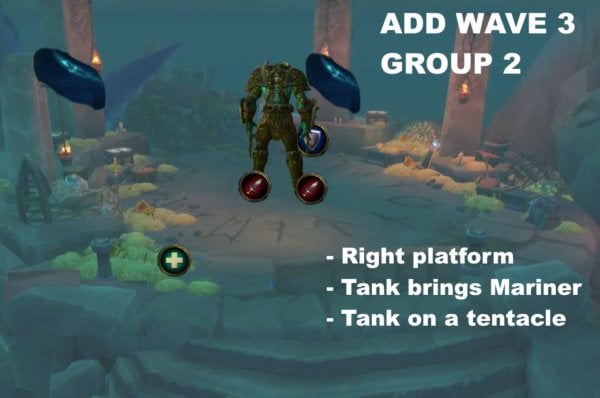
Add Wave 3
Next adds will come after boss casts Fury of the Maw.
Split the raid in two groups.
Group 1 runs up the left stairs to the small platform.
Group 2 runs up the right stairs to the small platform.
Have one tank in each group.
Have equal heals in each group.
Have mostly ranged in Group 1
Have mostly melee in Group 2
Pull the Grimelord to the left platform (Group 1)
Pull the Mariner add to right platform (Group 2)
Tank big add next to a tentacle for cleave dmg.
Nuke tentacles while tank brings the big add.
Kill big add on your side.
Nuke tentacles until minion adds spawns.
Entire raid runs down to middle platform and aoe the minions.
Run back up and nuke tentacles.
Alternative: Nuke minions on the small platform but beware of pools.
Add Wave 4
Depending on dps, this add wave will maybe come as well.
This add wave will be handled the same way as wave 3.
Continue until tentacles are down.
Phase 3 – Helheim´s Last Stand
When both tentacles are down, Helya comes back and phase 3 starts.
Boss health is at 46% when all tentacles are destroyed.
In this phase, Helya will use Abilities from both phase 1 and phase 2 but some are empowered.
Adds will spawn on this phase as well (Minions and Mariner).
There will be loads of Decay pools (from Orbs and Minions) which needs to be controlled to certain areas. Boss does big water wave on this phase as well that clears the decay pools.
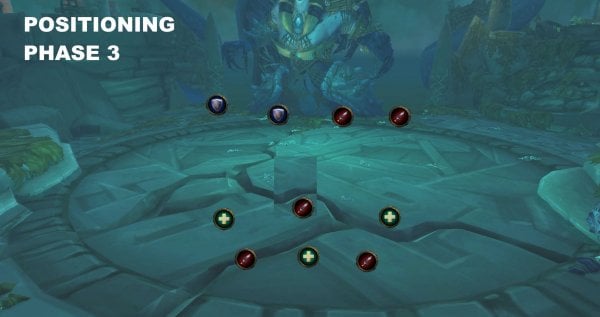
Positioning Phase 3
The one tanking, stand on left side of boss platform.
Melee spread out in middle and right side
Ranged in middle at max range from boss. Spread out from each other.
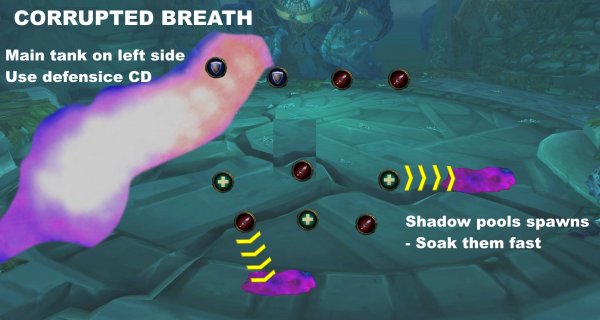
Corrupted Breath
Boss breath Shadow, dealing high dmg.
If the breath doesn’t hit any target, it will explode and do dmg to all players instead.
Breath causes shadow pools to spawn on random locations on the platform (Axions).
The Pool does dmg and a healing absorption to players within 5y of affected player for a few seconds.
If no player stands on the pool, it will apply Axion dmg to all players instead.
Tactic Corrupted breath
Tank
Make sure you are on left side with breath, use def CD for breath.
No other player behind/close
Healers
Beware that tank gets high dmg from the breath.
Raid
Run to a shadow pool fast and soak it.
If a player is ready to soak and gets Orb targeting that player, be ready to take over the soak so that player can run away with Orb instead.
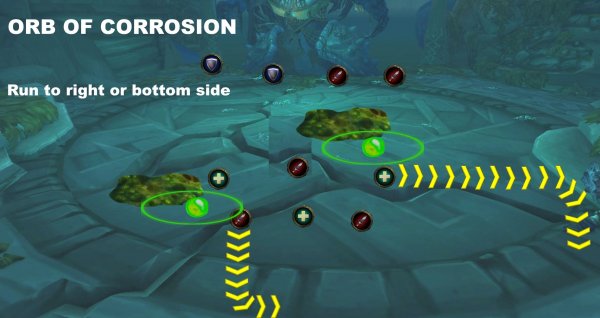
Orb of Corrosion
Boss targets several players and shoots an Orb at them
This Orb fixates that player and does pulsating dmg while moving.
Each pulse leaves a green pool on the ground (Decay) that does dmg if you stand on it.
Tactic Orb of Corrosion
Move fast to right side of the platform and kite the orb there.
Plan your path so you use as much of right side of the platform as possible.
Use the bottom side of the platform as well when needed.
Leave left side and middle free from pools.
Taint of the Sea
Boss puts a debuff on random player that does Frost dmg every second.
When the debuff is dispelled, it explodes does low dmg to all players.
When the debuff is dispelled it will also leave an essence under the player that explodes after a while and does high dmg to anyone within 8 yards.
Tactic: Taint of the Sea
Everyone stand spread at least 8 yards.
Dispel the taint directly.
Player dispelled moves away from the essence and then moves back after explosion.
Corrosive Nova
If no players are in melee range, the boss will cast Corrosive Nova which does 2 things:
- Blasts every player with Frost damage
- Gets a buff that increase Helyas dmg by 3% and stacks
Tactic: Corrosive Nova
Melee and tanks
Make sure there is ALWAYS someone in melee range on boss.
Fury of the Maw
Sends a big water wave, passing entire platform that does dmg (and 25% increased dmg stacking debuff) and push players away. This wave also removes the Decay pools.
This will be needed so much when the platform will be overwhelmed with decay pools.
Two type of adds will spawn
Night Watch Mariner
1 add will summon per time.
Has 3 Abilities
Lantern of Darkness: Does Shadow dmg to all players every 05s for 6s and dmg increases by 75% each puls and stacks.
Ghostly Rage: Increases attack speed by 30% for 6s.
Give no Quarter: Goes underground and pops up somewhere else. When popping up, it does high dmg to any player within 8 yards.
Decaying Minions
One add for each player will be summoned per time.
Has 3 Abilities
Rabid: Fixates a random player.
Decay: A pool is created after a minion dies that does dmg if you stand on it.
Vigor: Increases dmg done by 10% and stacks.
Tactic Adds
When Minions spawn
Fixated players move to bottom left side fast and AoE kill the adds.
Move away from decay pools after they die.
Move back to positions after they are dead.
Main tank
Move to the right side so boss doesn’t do breath on raid.
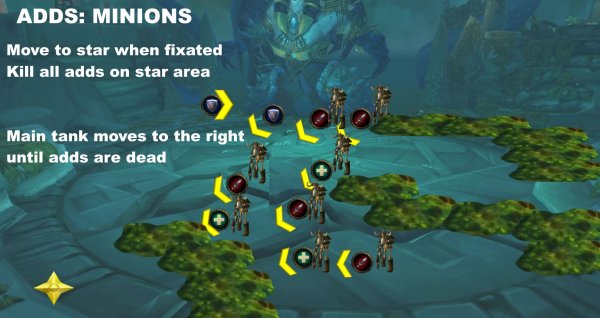
When Mariner Spawns
One tank on boss all the time.
One tank on Mariner. Take the Mariner add to middle upper side.
All dps focus the Mariner add and kill it fast.
Other posts
- MRGM Caught Red-Handed Stealing WoW PTR Discoveries – The Predictable Pattern of Content Theft Continues
- The BEST Midnight Season 1 DPS Tier List Guide
- Midnight Pre-Patch Event Guide: Twilight Ascension Rewards, Rare Timers, and Collectibles
- Endeavor: A Deeper Dive Into WoW’s Expansive New System
- LOADS of Extra Decors You Did NOT Know About!
- World of Warcraft Players Score Exclusive Housing Decor with Diablo 4: Lord of Hatred Pre-Order
- Brawler´s Guild 2025 GUIDE
- Legion Remix Decor will be available after Legion Remix
- Professions Unpacked: Your Guide to Crafting Housing Decor with Reagents from Every Era
- WoW Housing: Best Tips Guide


