Background
Charged by Aegwynn to defend the Tomb of Sargeras, the Maiden of Vigilance has stood watch for hundreds of years. Yet, the guardian did not foresee what effect the avatar´s seeping Fel energy would have on this titan construct. Slowly warped by this maleficence, the Maiden now seeks to destroy any in her path.
Overview
- You will fight the boss on a circular platform in which there is a hole in the middle.
- There are two debuffs in this fight that players will get periodically.
- Players will get either Light Infusion or Fel Infusion.
- If a light debuff player comes close to a Fel debuff player, they will trigger Unstable Soul.
- If a player takes damage from the opposite energy, they will trigger Unstable Soul.
- Unstable soul does massive damage to the entire raid when debuff has passed.
- The key in this fight is to master boss abilities in order to avoid getting Unstable Soul debuff.
- In phase 1, players need to stand on the left and right side of her based on the debuff they get.
- In phase 2, players need to run to the opposite side of the platform and attack a shield on the boss that does AoE damage until interrupted which can only be done after shield is broken.
Tactics below will cover how to master this fight and end with a nice boss kill. Good luck!
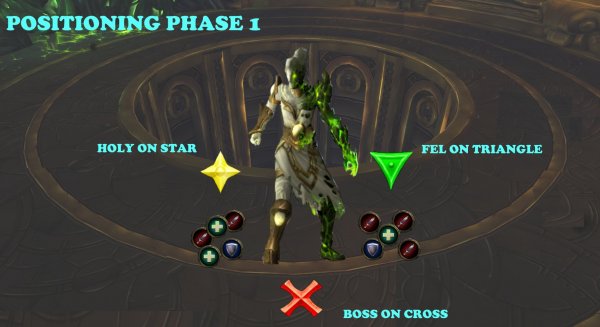
Positioning – Phase 1
Tank 1 is the tank with Holy debuff and stands on star side of boss.
Tank 2 is the tank with Fel debuff and stands on triangle side off boss.
Boss on cross between the 2 groups.
Players with Holy debuff (Holy Group) behind tank1 on star.
Players with Fel debuff (Fel Group) behind tank 2 on triangle.

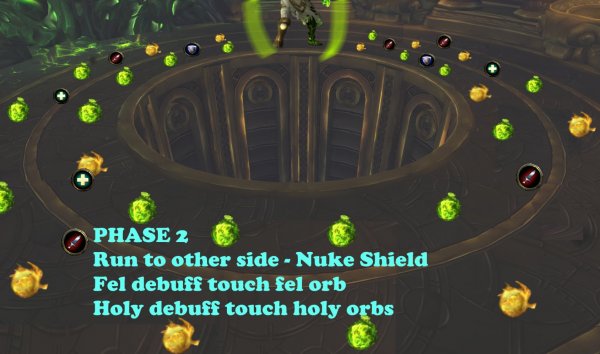
Positioning – Phase 2
Players will run to the opposite side of the platform.
Fel debuff players run on one side to boss.
Holy debuff run on the other side to boss.
Players with Fel debuff touch Fel orbs for dps/healing boost.
Players with holy debuff touch holy orbs for dps/healing boost.

Abilities and tactics
Unstable Soul
Unstable Soul puts a debuff on the player
It does fire damage every 2 seconds for 8 seconds, then the players explode and does damage to entire raid for over a million in damage.
This also does a knock back on players within 5 yards.
Unstable Soul is triggered by
- Players with light and Fel debuff come close to each other.
- Hammers
- Echoes
- Fragments of opposing elements.
- Mass Instability
Tactic: Unstable Soul
There are specific tactics to avoid Unstable soul, for each of the boss abilities.
But there is one ability that does Unstable Soul on players that cannot be avoided (mass instability)
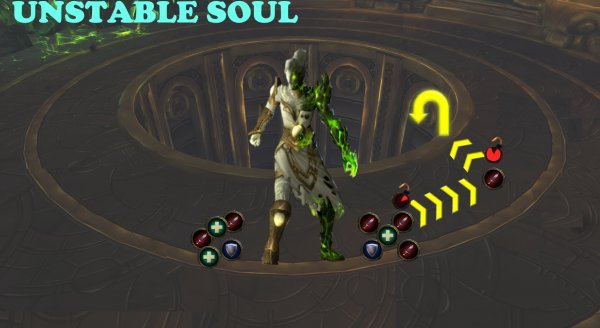
If/when you get Unstable soul, move to the Warden, Aegwynn´s ward.
There is a hole in the middle of the platform.
- Run behind your raid group.
- Jump down at 6 seconds of the debuff.
- You get pushed back up from the explosion.
- Run back to position.

Phase 1 – Divide and Conquer
In phase 1, the boss will put debuffs on players which will either be Fel or Holy debuff.
Players must be divided in 2 groups based on the debuffs.
The boss has abilities that cause Fel or Holy damage and players need to master the positioning of dmg and their debuffs.
Infusion
Boss puts a Light Infusion or a Fel Infusion on players.
Light Infusion
Does Holy damage every 3 seconds.
Fel Infusion
Does Fel damage every 3 seconds.
If a light debuff player comes close to a Fel debuff player, they will trigger Unstable Soul.
Tactic: Infusion
Tank 1 on right side of boss.
Tank 2 on left side off boss.
Players with Holy debuff moves to Tank 1 and stack. Players must be within 20 yards of their tank.
Players with Fel debuff moves to Tank 2 and stack. Players must be within 20 yards of their tank.
Hammers
Boss slams her hammer on the ground, with either Fel or Holy energy.
Hammer of Creation (Holy energy)
- The slam does very high Physical damage.
Holy energy will then be released from the hammer.
This does millions of damage, split between all targets within 20 yards in a cone in front of the boss. - This also creates Light Remanence
The ground after the slam leaves a mark, standing on this mark does holy damage every 2 seconds. - When the mark starts to disappear, it leaves Light Echoes.
This is a blast that does Holy damage to anyone within 4 yards.
Hammer of Obliteration (Fel Energy)
- The slam does very high Physical damage.
Fel energy will then be released from the hammer.
This does millions of damage, split between all targets within 20 yards in a cone in front of the boss. - This also creates Fel Remanence
The ground after the slam leaves a mark, standing on this mark does Fel damage every 2 seconds. - When the mark starts to disappear, it leaves Fel Echoes.
This is a blast that does Fel damage to anyone within 4 yards.
Tactic: Hammers
Tank 1 tanks boss when she will slam Holy energy.
Players with Holy debuff (Holy Group) stack behind tank 1 and don’t be further than 20 yards.
Tank 2 tanks boss when she will slam Fel Energy.
Players with the Fel debuff (Fel Group) 2 stack behind tank 2, and don’t be further than 20 yards.
When boss does Holy slam (Hammer of Creation)
Tank 1 use defensive CD.
Holy Group stack behind tank 1 and don’t be further than 20 yards.
After slam, entire Holy Group moves clockwise and stand on bottom side.
When boss does Fel Slam (Hammer of Obliteration (Fel Energy)
Tank 2 use defensive CD.
Fel Group stack behind tank 1 and don’t be further than 20 yards.
After slam, entire Fel Group moves clockwise and stand on upper side.
Mass Instability
Boss targets 3 random players with Unstable Soul.
Unstable Soul puts a debuff on the player
It does fire damage every 2 seconds for 8 seconds, then the players explode and does damage to entire raid for over a million in damage.
This also does a knock back on players within 5 yards.
Tactic: Mass Instability
If/when you get Unstable soul, move to the Warden, Aegwynn´s ward.
There is a hole in the middle of the platform.
- Run behind your raid group.
- Jump down at 6 seconds of the debuff.
- You get pushed back up from the explosion.
- Run back to position.
PHASE 2: WATCHER`S WRATH
- In this phase, the boss will teleport to the opposite side of the platform and put a shield on her (Titanic Bulwark)
- She will also shoot Fel and holy orbs around the platform (Essence of Fragments)
- She will also do raid damage on the raid that needs to be interrupted after breaking her shield (Wrath of Creators).
- Players must move to the other side of the platform and dodge the orbs that are bad and touch orbs that are good (If you pick up the same as your debuff you will get dps and healing boost.)
- When players reach the boss, they need to burn their dps cooldowns to break the shield the boss has.
- After breaking the shield, the boss needs to be interrupted to stop the AoE damage on the raid.

Blowback
Stuns all the players.
Titanic Bulwark
Boss puts a shield on her that absorbs damage (38 million in normal, 60 million in Heroic and 80 million in Mythic).
This also prevents all interrupts while the shield is up.
Tactic: Titanic Bulwark
Bloodlust/Timewarp/Heroism should be used here to destroy the shield fast.
When there is no bloodlust on phase 2 later, players must touch the orbs that are same as their debuff to get dps and healing boost.
Wrath of Creators
Boss shoots waves of Holy Energy on all players.
Each wave does more damage than previous.
After 30 stacks of Wrath of Creators, the boss does 13 million damage to all players each cast.
This is interruptible.
Tactic: Wrath of Creators
This must be interrupted as soon as the shield is down.
Other posts
- MRGM Caught Red-Handed Stealing WoW PTR Discoveries – The Predictable Pattern of Content Theft Continues
- The BEST Midnight Season 1 DPS Tier List Guide
- Midnight Pre-Patch Event Guide: Twilight Ascension Rewards, Rare Timers, and Collectibles
- Endeavor: A Deeper Dive Into WoW’s Expansive New System
- LOADS of Extra Decors You Did NOT Know About!
- World of Warcraft Players Score Exclusive Housing Decor with Diablo 4: Lord of Hatred Pre-Order
- Brawler´s Guild 2025 GUIDE
- Legion Remix Decor will be available after Legion Remix
- Professions Unpacked: Your Guide to Crafting Housing Decor with Reagents from Every Era
- WoW Housing: Best Tips Guide


