Positioning
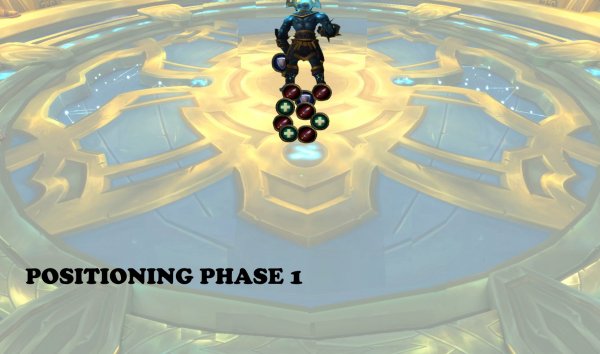
Phase 1
Tanks
Tank boss on the center of the platform.
Always phase boss away from raid
Offtank behind boss
Raid
Stack up behind boss.
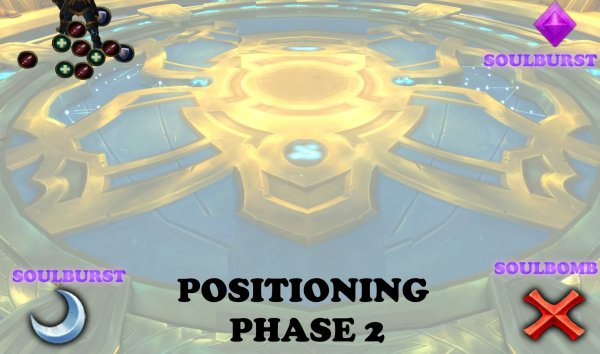
Phase 2
Tanks
Tank boss on upper left side of platform, turn boss away from raid.
Raid
Behind boss soft stacked.
Diamond - Soulburst debuff 1 (right side)
Moon - Soulburst debuff 2 (bottom left side)
Cross - Soulbomb debuff (diagonal side)
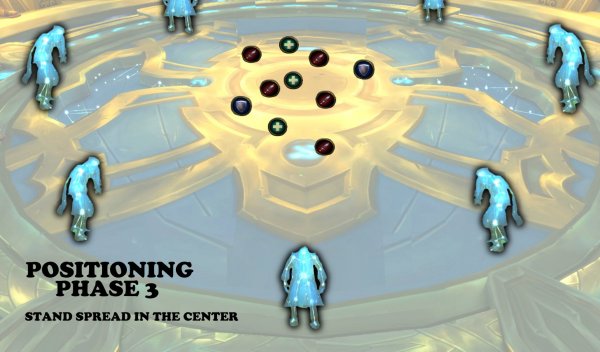
Phase 3
Spread out in the center of the circle.
Phase 4
Tanks
Tank boss on upper left side of platform, turn boss away from raid.
Raid
Behind boss soft stacked.
Diamond - Soulburst debuff 1 (right side)
Moon - Soulburst debuff 2 (bottom left side)
Cross - Soulbomb debuff (diagonal side)

Abilities and Tactics for them
Phase 1 – Storm and Sky
- In this phase, you will only fight the boss.
- The boss does different abilities that creates a Death Fog that does high shadow damage.
- You need to master the positioning of these abilities in order to control where you want the fogs.
- In this phase, players will have titan, Golganneth helping out by throwing some air and water orbs. Rhese buff up your secondary stats for 30 sec and stacks. But stepping in to another type of buff, cancel the first one.
Sweeping Scythe (Tank)
Boss does a cleave dmg (half circle cleave).
This does very high physical damage.
The damage gives a stacking debuff that increase dmg taken from Sweeping Scythe by 150% for 30 sec.
Tactic: Sweeping Scythe (Tank)
Only main tank in front of boss, off tank with raid.
Tank swap 2 stacks of Sweeping Scythe.
Cone of Death (Death Fog)
Boss has an “energy bar” called Titanic Essence.
Every time he reaches 100 Titanic Essence, he will target a random player and slam the ground on that players direction.
This creates a dark cone shape on the ground called death Fog.
Death Fog does very high shadow damage to players every 1 sec when standing on it.
Tactic: Cone of Death (Deaht Fog)
Tanks
Tank boss in the center.
After each death fog slam the raid will move to the side of that cone shaped mark on ground.
You must always turn boss so that he has his back against the raid all the time.
Pay attention and don´t let raid get hit by boss frontal cleave dmg.
Raid
Stack up behind boss.
Move to the right (anti-clockwise) when you see that boss has turned toward raid.
Move away before the black fog is created on the ground to avoid extra dmg.
Always pay attention to when boss turns to raid.

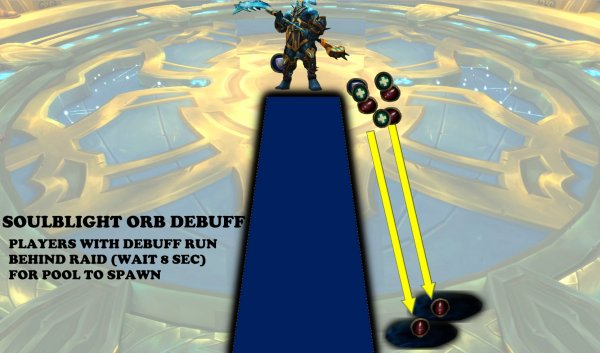
Soulblight Orb
Boss summons a Blight Orb that applies a debuff on players.
The debuff creates death pool at the players location after 8 seconds when it expires.
Tactic: Blight Orb
Targeted player runs behind raid.
Wait 8 sec until pool spawns, then run back.
Tortured Rage
Boss smashes the ground and does high Shadow damage to all players.
Tactic: Tortured Rage
Healers
Beware for the big raid damage and top healers up again fast.
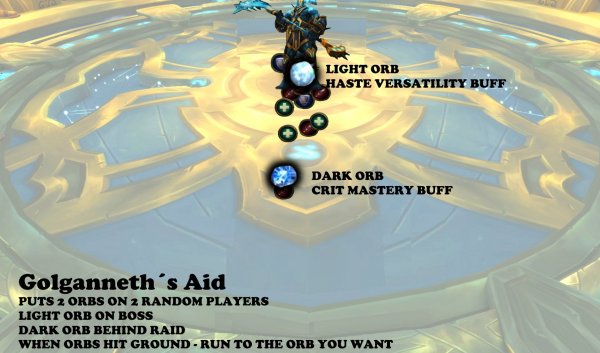
Golganneth´s Aid
Golganneth will enter the fight and aid you periodically.
He will summon two different element debuffs on two different players.
The players will have the orb (on their head) for 10 sec.
One orb is dark (Strength of the sky)
One orb is light (Strength of the sea)
After 10s, the orb will fall on the ground and other players can run into them and gain the buff from them. You can only have one of the buffs active.
Strength of the sky
Stepping in to it gives you 2000 crit and Mastery for 30 sec.
Buff is called Strength of the Sky.
Strength of the sea
Stepping in to it gives you 2000 Haste and Versatility for 30 sec.
Buff is called Strength of the Sea.
Tactic Golganneth´s Aid
Player that has the dark orb stand further back behind raid.
Player that has the light orb stands under boss.
Raid
Run in to the orb that you want buff from.
Phase 2 – The Protector Redeemed
Phase 2 starts when Argus reaches 70% Health.
In this phase, players will have Aggramar helping out.
Golganeth´s Wrath
All the Death Fog is cleared when phase 2 starts (by the help of Golganneth).
A circle swirl is created on the platform except in the center.
Players take high damage from the swirl
Tactic: Golganeth´s Wrath
Entire Raid stacks on boss in the center of the platform.
Sweeping Scythe (Tank)
Boss does a cleave dmg (half circle cleave).
This does very high physical damage.
The damage gives a stacking debuff that increase dmg taken from Sweeping Scythe by 150% for 30 sec.
Tactic: Sweeping Scythe (Tank)
Only main tank in front of boss, off tank behind boss.
Tank swap 2 stacks of Sweeping Scythe.
Tortured Rage
Boss smashes the ground and does high Shadow damage to all players.
Tactic: Tortured Rage
Raid
Use a defensive cooldown just before the hit.
Healers
Beware for the big raid damage and top healers up again fast.
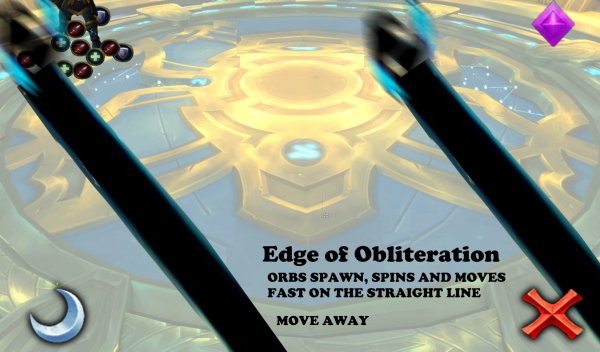
Edge of Obliteration
Boss sends a dark energy ball that travels in a line to the other side of the platform.
Getting hit gives a debuff that does high physical dmg every 2 sec for 12 seconds.
This also does a knockback.
Tactic: Edge of Obliteration
Raid are soft stacked on upper side of the platform.
Make sure to dodge the line.
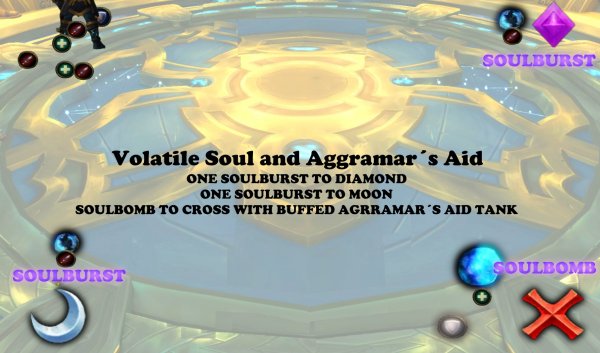
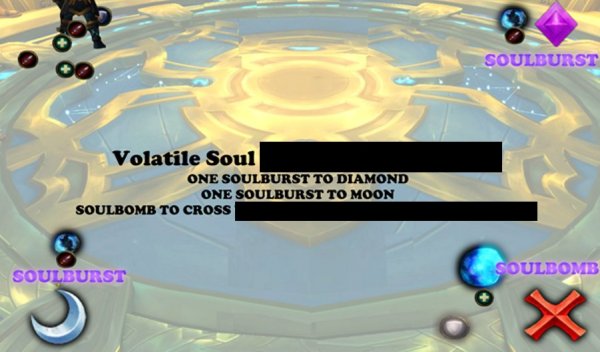
Volatile Soul and Aggramar´s Aid
Boss has an “energy bar” called Titanic Essence.
One phase two: When he reaches 100 Titanic Essence, he will apply
- Soulburst debuff on two players and
- Soulbomb debuff on one player.
Reaching 50 energy again Titanic Essence, he will apply Soulburst debuff on two more players.
Soulburst debuff
Does moderate Shadow damage every 3 sec for 15 sec.
After 15s when debuff wears off, it does high Shadow damage to the player and the entire raid but decreases the further the player is from the raid.
Soulbomb
Does moderate/high shadow damage every 3 seconds for 15 seconds.
After 15s when the debuff wears off, it does millions (deadly) shadow dmg to all players but decreased the further away players are from the raid.
The targeted player will also take the deadly dmg.
Avatar of Aggramar – Aggramar´s Aid
One of the tanks will periodically get Aggramars Aid.
This gives 100% health increased and 40% movement increased for 1 min.
Players nearby to the Avatar of Aggramar player will have all dmg redirected to the Avatar.
Tactic: Volatile Soul and Aggramar´s Aid
Tanks
Tank boss on upper left side of the platform.
Phase boss away from raid.
Tank with Aggramar´s Aid must follow and run with the player that has Soulbomb debuff to protect that player from dying.
Raid
Soft stack behind boss
Soulburst debuff
One runs to right side of platform.
One runs to bottom left side of the platform.
Soulbomb debuff
Runs to the diagonal side (cross over) of the platform.
Phase 3 – The Arcane Masters
Phase 3 starts when Argus reaches 40% health.
Argus is getting suppressed by Aman´thul and cannot be attacked in this phase.
In this phase, you will instead fight 7 adds, called Contsellar Designates.
Adds are positioned in a circle around the platform.
Periodically, 2 adds will grab special weapons an attack melee. These weapons buffs their dmg and one of the weapons will even buff nearby adds.
The key is to kill these 2 adds asap before next set of adds grab weapons.
Cosmic Ray
The adds (Contsellar Designates) target a player and channels a beam towards the player and chasing the player for a short while.
Any player getting hit takes high Arcane damage
Tactic: Cosmic Ray
Raid
Stand spread at the center of the platform.
Be ready to move if you are in the way from the beam.
Targeted players
Stand still.

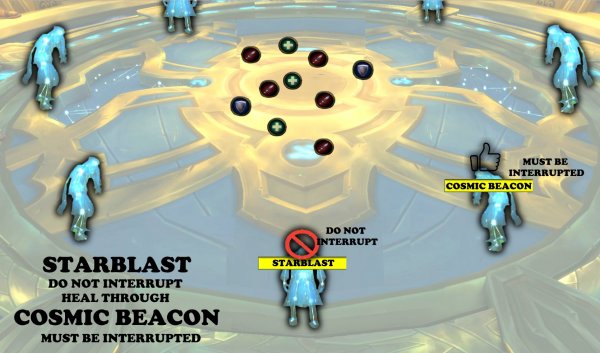
Starblast
Adds do moderate damage to a random player.
Tactic: Starblast
Do NOT interrupt this!!!
If you do, the boss gets the immune buff against interrupts for 20 sec and will lead to that you cannot interrupt the Cosmic Beacon which is the most important one.
Impending Inevitability
Whenever the boss is interrupted, it cannot be interrupted for 20 seconds.
Tactics: Impending Inevitability
If the boss has the immune buff, then healers must beware of the Cosmic Beacon, and use Raid Healing major cooldowns. Have a rotation for that if needed.
Cosmic Beacon
Mini bosses target a random player.
After 8 seconds, it does a Cosmic smash on the player.
This does high Arcane damage to all players.
This also leaves a debuff that does moderate damage every 2 sec for 6 sec and stacks.
Tactic: Cosmic Beacon
This can be interruptible and must be interruptible, no excuses.
If the boss has the immune debuff, then healers must beware of the Cosmic Beacon, and use Raid Healing major cooldowns. Have a rotation for that if needed.
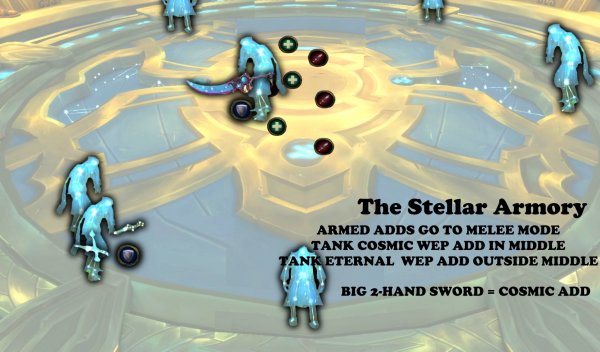
The Stellar Armory
Periodically, Two of the mini bosses will be granted with weapons and engage in melee.
One has the Sword of Cosmos
Melee attack dmg increased by 200% and will also buff other adds within 20 yards by increasing their damage done by 20% for 3 min.
One has the Blades of the Eternal
Melee attack dmg increased by 300%
Tactic: The Stellar Armory
Tanks
One tank on each add.
Tank on Cosmos sword add tanks add in center, away from all other adds.
Add will have a big 2 handed Cosmic sword.
Tank on Eternal sword add tanks add near a caster add
Add will have 2 small Eternal swords.
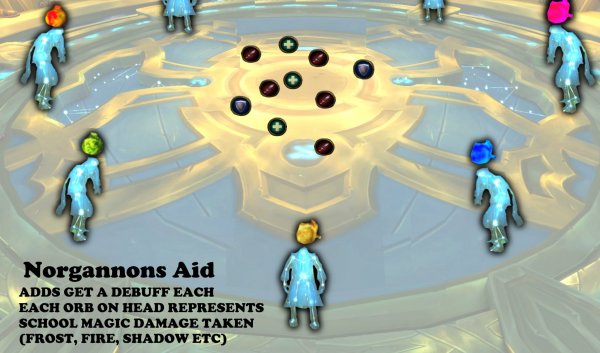
Norgannons Aid
Norgannon will place debuffs on adds that makes the add take 200% extra dmg from a specific element (Fire, frost, shadow, arcane etc), a magic school.
Each add will have an orb on their head.
The orb represents the element it takes increased damage from.
Tactic: Norgannons Aid
Nuke the add that fits your type of element dmg (fire, frost, shadow etc)
Phase 4 – The Gift of Life, The Forge of Loss
In this phase, Argus is strong again and you will fight him again.
You will be killed and start in the spirit world (you are a ghost)
- Run to the tree on the platform to get resurrected and come back to living world.
- Interrupt “end of all things” that boss casts.
This phase is divided in Two: Living world and Spirit World.
Living World
You will fight boss in the living world.
Boss has 4 abilities against players in living world.
Deadly Scythe (tanks)
Boss does a frontal half circle cleave dmg that does very high physical damage.
This also leaves a stacking debuff that increase next scythe with 200%.
The debuff is permanent.
Tactic: Deadly Scythe (tanks)
Tank boss until you die.
Tank swap when tank is dead.
Dead tank use tree to come back again.
Volatile Soul
Same as phase 2.
Boss has an “energy bar” called Titanic Essence.
One phase two: When he reaches 100 Titanic Essence, he will apply
- Soulburst debuff on two players and
- Soulbomb debuff on one player.
Reaching 50 energy again Titanic Essence, he will apply Soulburst debuff on two more players.
Tactic: Volatile Soul
Same as phase 2, but now, player with Soulbomb will just die instead of getting helped by tank via Aggramars aid.
Tortured Rage
Boss smashes the ground and does high Shadow damage to all players.
Tactic: Tortured Rage
Healers, beware for the big raid damage and top healers up again fast.
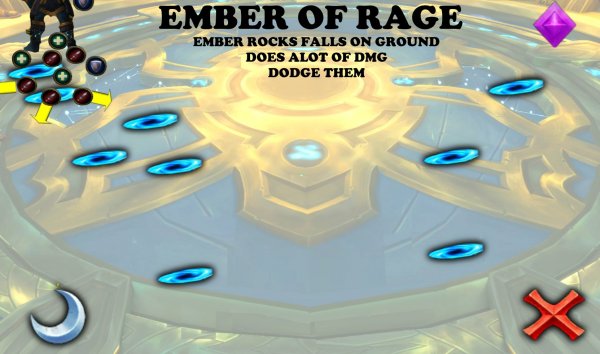
Ember of Rage
Several titan embers falls periodically on the ground.
This does several million in damage and also leaves a stacking debuff that does very high dmg every sec for 20 sec.
Tactic: Ember of Rage
Start tanking boss in center.
Move to dodge embers.
Tanks beware to not face boss to raid when dodging embers.
Raid beware not to run in front of boss when dodging embers.
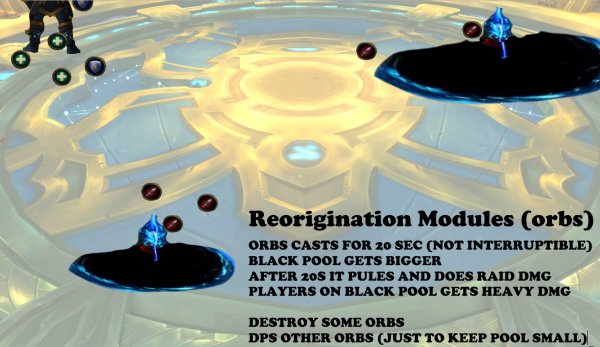
Reorigination Modules (orbs)
Modules (Orbs) that spawns on platform.
1) First they cast Initialization Sequence (drains the Modules health over 20 sec). A black circle radius will grow.
2) Second, they create a pulse, that does Arcane dmg to all players, and several million damage to players inside the black circle.
Each wave they spawn, they will increase in number based on the amount you have killed.
Tactic: Reorigination Modules
Nuke the Modules fast, they are prio 1 when they spawn.
Do NOT stand in the circle
Main thing is to nuke them so their circle is decreased.
Killing them leaves motes of titanic power in spirit realm.
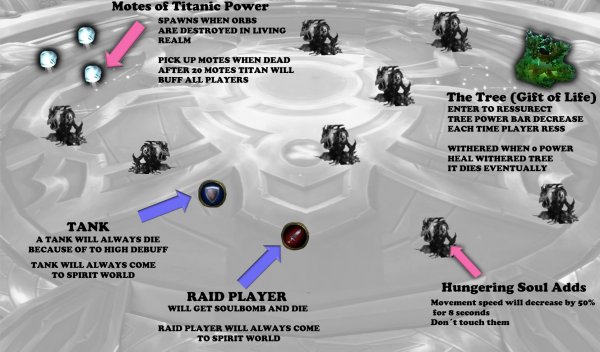
Spirit World
When you die, you will come to spirit world.
Adds
Players must beware of the add in spirit world. If players in spirit world touches the Hungering Soul adds, their movement speed will decrease by 50% for 8 seconds
The Tree (Gift of Life)
To come back, you enter through the tree (gift of life).
The tree has an energy bar that decreases each time a player resurrects.
When the tree has 0 energy, it becomes withered and if players wants to resurrect, they must heal the tree and that gives a stacking dmg debuff.
The tree dies after to many stacks and not healed up (will be hard to heal up with high stacks) and cannot be used anymore.
Motes of Titanic Power
When players are dead, in the Spirit World, they can/should pick up motes that fills up a bar on Khaz´goroth.
Once the bar is full (at least 20 motes needed), he will channel Titanforging that gives 15% extra dmg and healing done to players and 15% extra movement speed. This lasts for 1 mote per second.
You should use Blood Lust once players gain the Titanforge buff.
Other posts
- MRGM Caught Red-Handed Stealing WoW PTR Discoveries – The Predictable Pattern of Content Theft Continues
- The BEST Midnight Season 1 DPS Tier List Guide
- Midnight Pre-Patch Event Guide: Twilight Ascension Rewards, Rare Timers, and Collectibles
- Endeavor: A Deeper Dive Into WoW’s Expansive New System
- LOADS of Extra Decors You Did NOT Know About!
- World of Warcraft Players Score Exclusive Housing Decor with Diablo 4: Lord of Hatred Pre-Order
- Brawler´s Guild 2025 GUIDE
- Legion Remix Decor will be available after Legion Remix
- Professions Unpacked: Your Guide to Crafting Housing Decor with Reagents from Every Era
- WoW Housing: Best Tips Guide


